• Home
  • ABOUT
  • WORK WITH ME
  • Paint Colors
  • Shop Our House
    • Guest Bedroom
    • Front Living Room
    • Living Room with Fireplace
    • Previous Second Living Room
    • Current Playroom
    • Prior Playroom
    • Dining Room
    • Laundry Room
    • Oliver’s Bedroom
    • Guest Bathroom
    • Covered Lanai
    • Patio
    • Master Bedroom
  • CONTACT
    • Facebook
    • Instagram
    • Pinterest

Within the Grove

Join the list to receive occasional news and special updates!

DIY // Painted Fall Doormat

October 7, 2015

Fall Doormat DIY

This post contains affiliate links; learn more on our about page and thanks for supporting Within the Grove by shopping through our links!

I’m determined this year to decorate for fall and the festivities that arrive with the cooler weather.  Last year I couldn’t even think of putting decorations up due to just moving into our home with only our bedroom furnished.  This year I’m starting with a fall craft that will be the first thing I see when walking into my home. Today I’ll show you how to create your own painted fall doormat that is unique to you!

Doormat for the front door during fall

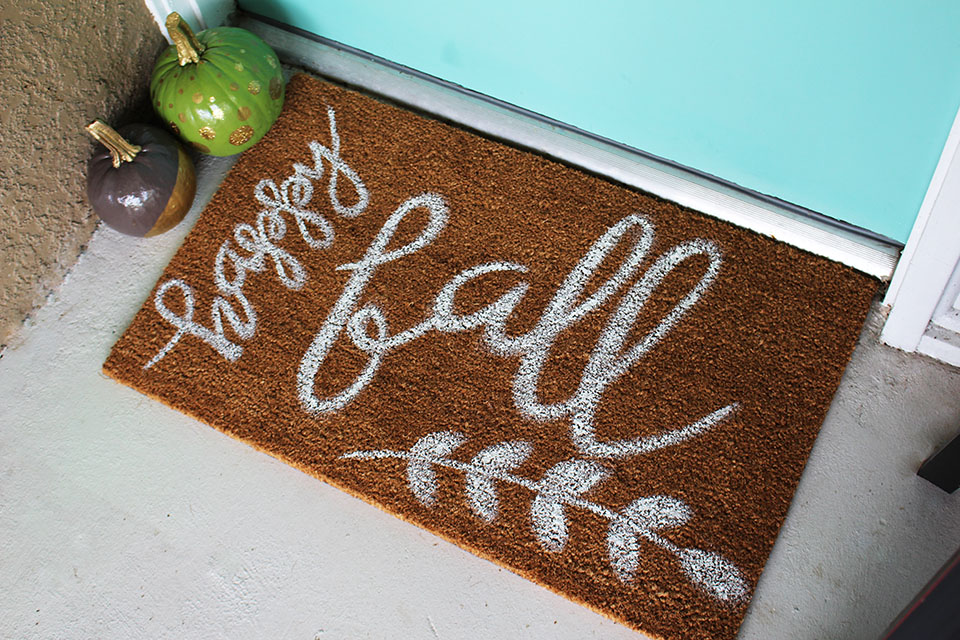
In 30 minutes or less you can create a stylish doormat for the fall season that gives your front porch texture, function, and fall flair.  This easy and inexpensive fall doormat tutorial only cost me $12.  I found my doormat at Home Depot for $10, but you can also find one at Ikea for as little as $5 and can also order through Amazon.

Here’s the how-to:

Supplies:

Doormat || Craft paint || Paint Palette || Paintbrush

As always, I used Martha Stewart acrylic paint for this project.   It’s great for many different surfaces!  I created a doormat a little over a year ago at Sarah’s Hearts’ Meet + Make using the same paint {and was the inspiration for today’s post}.  It still looks brand new a year later!

Supplies for a DIY Painted Fall Doormat

Step 1: Prepare for your painted fall doormat by squirting a generous amount of white paint into your palette {fill more than one round well}.  You will be surprised at how much paint you are about to use!

Using white paint on a doormat

Step 2: Using your paintbrush, lightly paint your wording and design onto your doormat. If you choose to, you can practice writing your quote on a piece of paper first to figure out your typography.

Lightly write your quote on the doormat

Creating your DIY painted fall doormat

I debated using a stencil but quickly realized it would take an hour or more to print and cut out the wording.  I decided to wing it.  This is because I’ve learned that calligraphy no longer has to look perfect thanks to the Flax and Wool Modern Calligraphy Workshop I attended.

Step 3: After you have painted your design, now is the time to go back over each stroke until you reach your desired look.  I painted 3 coats of white paint over my design for a bright white finish.

Paint 2 to 3 coats of paint on the doormat

Step 4: Allow your mat to dry for a few hours before using.  I allowed mine to dry overnight before placing it outside.  Just like the first mat I created a year ago, I did not apply/spray anything over the mat to protect the paint.  Martha Stewart’s paint has held up amazingly well considering the foot traffic that has come through my home in the past year.DIY Painted Fall Doormat

Now you’re fall ready, at least when it involves your front door!  With just 4 supplies and spending less than $15, you can make a statement right away at your front door when it comes to fall decor.  Enjoy your DIY painted fall doormat!

Fall Doormat 1

Let’s keep in touch!

We have a brand new community over on Facebook, House & Home, where we’ll be chatting, sharing, and helping one another when it comes to home decor and projects. Come join us! Check it out here.

Like on Facebook || Follow on Instagram || Follow on Pinterest

Share this:

  • Click to share on Twitter (Opens in new window)
  • Click to share on Facebook (Opens in new window)

Related

Filed Under: DIY, DIY Tutorial, Home Project

« October Wallpaper 2015 // Free Download
WTG Explores // Paper Goat Post »

Comments

  1. Gina says

    October 7, 2015 at 12:51 pm

    I love this DIY! I already have a doormat, but I might just have to try this sometime soon and find myself with 2 doormats. Thanks for sharing! I love your directions and I’ll have to try out that paint. 🙂

    Reply
    • ElizabethRishel says

      October 7, 2015 at 5:31 pm

      Thank you Gina. It was a super easy (and cheap) DIY project that brought a lot of fall flair to my front door. I’ve learned one can never have too many doormats!

      Reply
  2. Karen says

    October 7, 2015 at 9:15 am

    I remember we met for the first time at that M+M!! I want to make new doormats, too!! 🙂

    Reply
    • ElizabethRishel says

      October 7, 2015 at 5:30 pm

      You are so right! So happy that I met you. We need a crafting weekend.

      Reply
  3. Meghan R says

    October 7, 2015 at 9:13 am

    Super cute! I need to work on doormats for my house soon. I have two “front doors!”

    Reply
    • ElizabethRishel says

      October 7, 2015 at 5:30 pm

      Yes, you do! Double doors = double the fun!!

      Reply

Trackbacks

  1. 7 Simple Fall Decor DIY Ideas to 'Festive Up' your House and Porch - Learn Along with Me says:
    September 21, 2020 at 7:34 pm

    […] Photo credit: WithinTheGrove.com […]

    Reply
  2. 68 DIY Door Mats - Graceful & Personalized Tutorials says:
    November 2, 2018 at 10:18 am

    […] Image: withinthegrove […]

    Reply

Leave a Reply Cancel reply

Your email address will not be published. Required fields are marked *

This site uses Akismet to reduce spam. Learn how your comment data is processed.

Looking for something?

withinthegrove

This pretty much sums up the progress of making 25 This pretty much sums up the progress of making 250 cement tiles. But I’m halfway through! The moment I finish the last tile is the moment I knock out the old tile. Let’s do this!
Time to bet on my DIY skills! I’m attempting to Time to bet on my DIY skills! I’m attempting to make my own cement tiles for our outdoor front door area. Mainly because of what I’m saving vs buying them. Won’t be saving much on time but I’M MAKING TILES! Never thought I’d hear myself say that. Make sure to follow along because if this works out, I have a feeling a lot of you are already eyeing a spot in your home to try your own DIY cement tiles. 
 
Thank you @vintagerevivals and @abby_roadhome for showing it’s possible with your gorgeous bathroom tiles! 

#CementTiles #DiyCementTiles #DiyProject #DIYonABudget #DIYProjects
We got the call that the pool build is starting! W We got the call that the pool build is starting! Which had me scrambling to dig up all the plants that were in the way in an effort to save them. Literally down to the last second before the crew showed up. Exciting day but you know what’s even more exciting? Knowing the next crew will officially be breaking ground with the excavation phase of the build.
This time of year is full of organizing and purgin This time of year is full of organizing and purging to bring spaces back to life. But sometimes all a space needs to feel refreshed is, well, a refresh and a little attention. Your number one requested space was the living room. So I gave mine a refresh with some unique and gorgeous finds from @homesense_us . I found a few fun pots for my houseplants, a gorgeous magnifying glass, and a few other items for our coffee table and couch.

I never know what I’m going to find when I walk into Homesense since it’s always rotating with amazing finds. But I do know I’ll walk out with a few new favorites for my home at affordable prices. If you haven’t yet, I urge you to check and see if you have a Homesense near you! #DiscoverHomesense #HomesensePartner
2022, you were awesome. But I’m determined to ma 2022, you were awesome. But I’m determined to make 2023 even better! And I hope you join me! We can be one of our biggest cheerleaders, but together we’re going to do big things. Go ahead and write down a big, small and a few in-between projects you want to get done this year in your home. Kicking it off with intention and that reminder that we can do this. Ready to get started?! Let me know in the comments the first project you want to tackle!
We finally got the Christmas/winter edition of the We finally got the Christmas/winter edition of the window projection up and running! It was a hit for Halloween and just as fun for this time of year as well. I built frames wrapped with a plastic drop cloth but you can also secure the drop cloth over the windows using command strips. The videos are from @atmosfx and we use a mini projector to play them on the screen. Place a Bluetooth speaker outside and you’re in business! Such a fun addition this time of year for the exterior of your home.
It’s the last little bit of the demo we needed t It’s the last little bit of the demo we needed to do in order to give the green light for the pool to start. And 2,456 pavers later, it’s done! This was exhausting but worth the money we saved doing it ourselves. And why remove them? We’re using a different stone around the pool and we want it to be cohesive up to the house. Don’t worry, someone got one heck of a deal on these pavers, we made a little money, and someone else got them out of our driveway. I’d say that’s a win-win. Stayed tuned for the entire pool process as we enter 2023. It’s going to be pretty exciting to watch!
Our patio space has served us so well over the yea Our patio space has served us so well over the years and now it’s time for a change because we’re getting a POOL!! Sharing this with you makes it even more real because just a year ago I would have told you it isn’t in the cards for us. We’ll be breaking ground soon but first we have to remove the screen enclosure. Spoiler: we won’t be putting one back up around the pool. It has already made the biggest difference visually and SO much natural light pours into our home now with it gone. It’s going to be so exciting seeing this all unfold so stay tuned! Up next: removing the pavers.
This holiday season we were able to travel to my h This holiday season we were able to travel to my hometown for the first time in awhile. We were greeted by the most beautiful sunset on the beach. Fast forward to this week as I headed to @homesense_us for some holiday shopping, and I ended up finding a few pieces for our home that remind me of that core memory on the beach. The beautiful wicker bench caught my eye first followed by the comforter and toss pillows. Everything at amazing price points while not sacrificing style and quality. #HomesensePartner

Mixing a thrill of a find with a core memory, I guarantee you'll fall in love with your home even more as you go to decorate. Decorating your home isn't grasping on to the newest trend or what you think others would do. It's what YOU want to do. And sometimes that's based on an emotional connection. Oh, the stories your spaces will be able to tell as you decorate each one. Start with seeing if there’s a @homesense_us near you! #DiscoverHomesense #HomesenseSarasota
Load More... Follow on Instagram

Sign up here to have our fresh posts delivered to your inbox!

Enter your email address:

Delivered by FeedBurner

Copyright © 2023 Within The Grove • Customized by Brave Creative Design · Log in

  • Privacy Policy
  • Terms and Conditions
  • Disclosures + Photo Usage
 

Loading Comments...