• Home
  • ABOUT
  • WORK WITH ME
  • Paint Colors
  • Shop Our House
    • Guest Bedroom
    • Front Living Room
    • Living Room with Fireplace
    • Previous Second Living Room
    • Current Playroom
    • Prior Playroom
    • Dining Room
    • Laundry Room
    • Oliver’s Bedroom
    • Guest Bathroom
    • Covered Lanai
    • Patio
    • Master Bedroom
  • CONTACT
    • Facebook
    • Instagram
    • Pinterest

Within the Grove

Join the list to receive occasional news and special updates!

DIY // Create Your Own Sea Glass Bottles

September 22, 2016

DIY Sea Glass Bottles

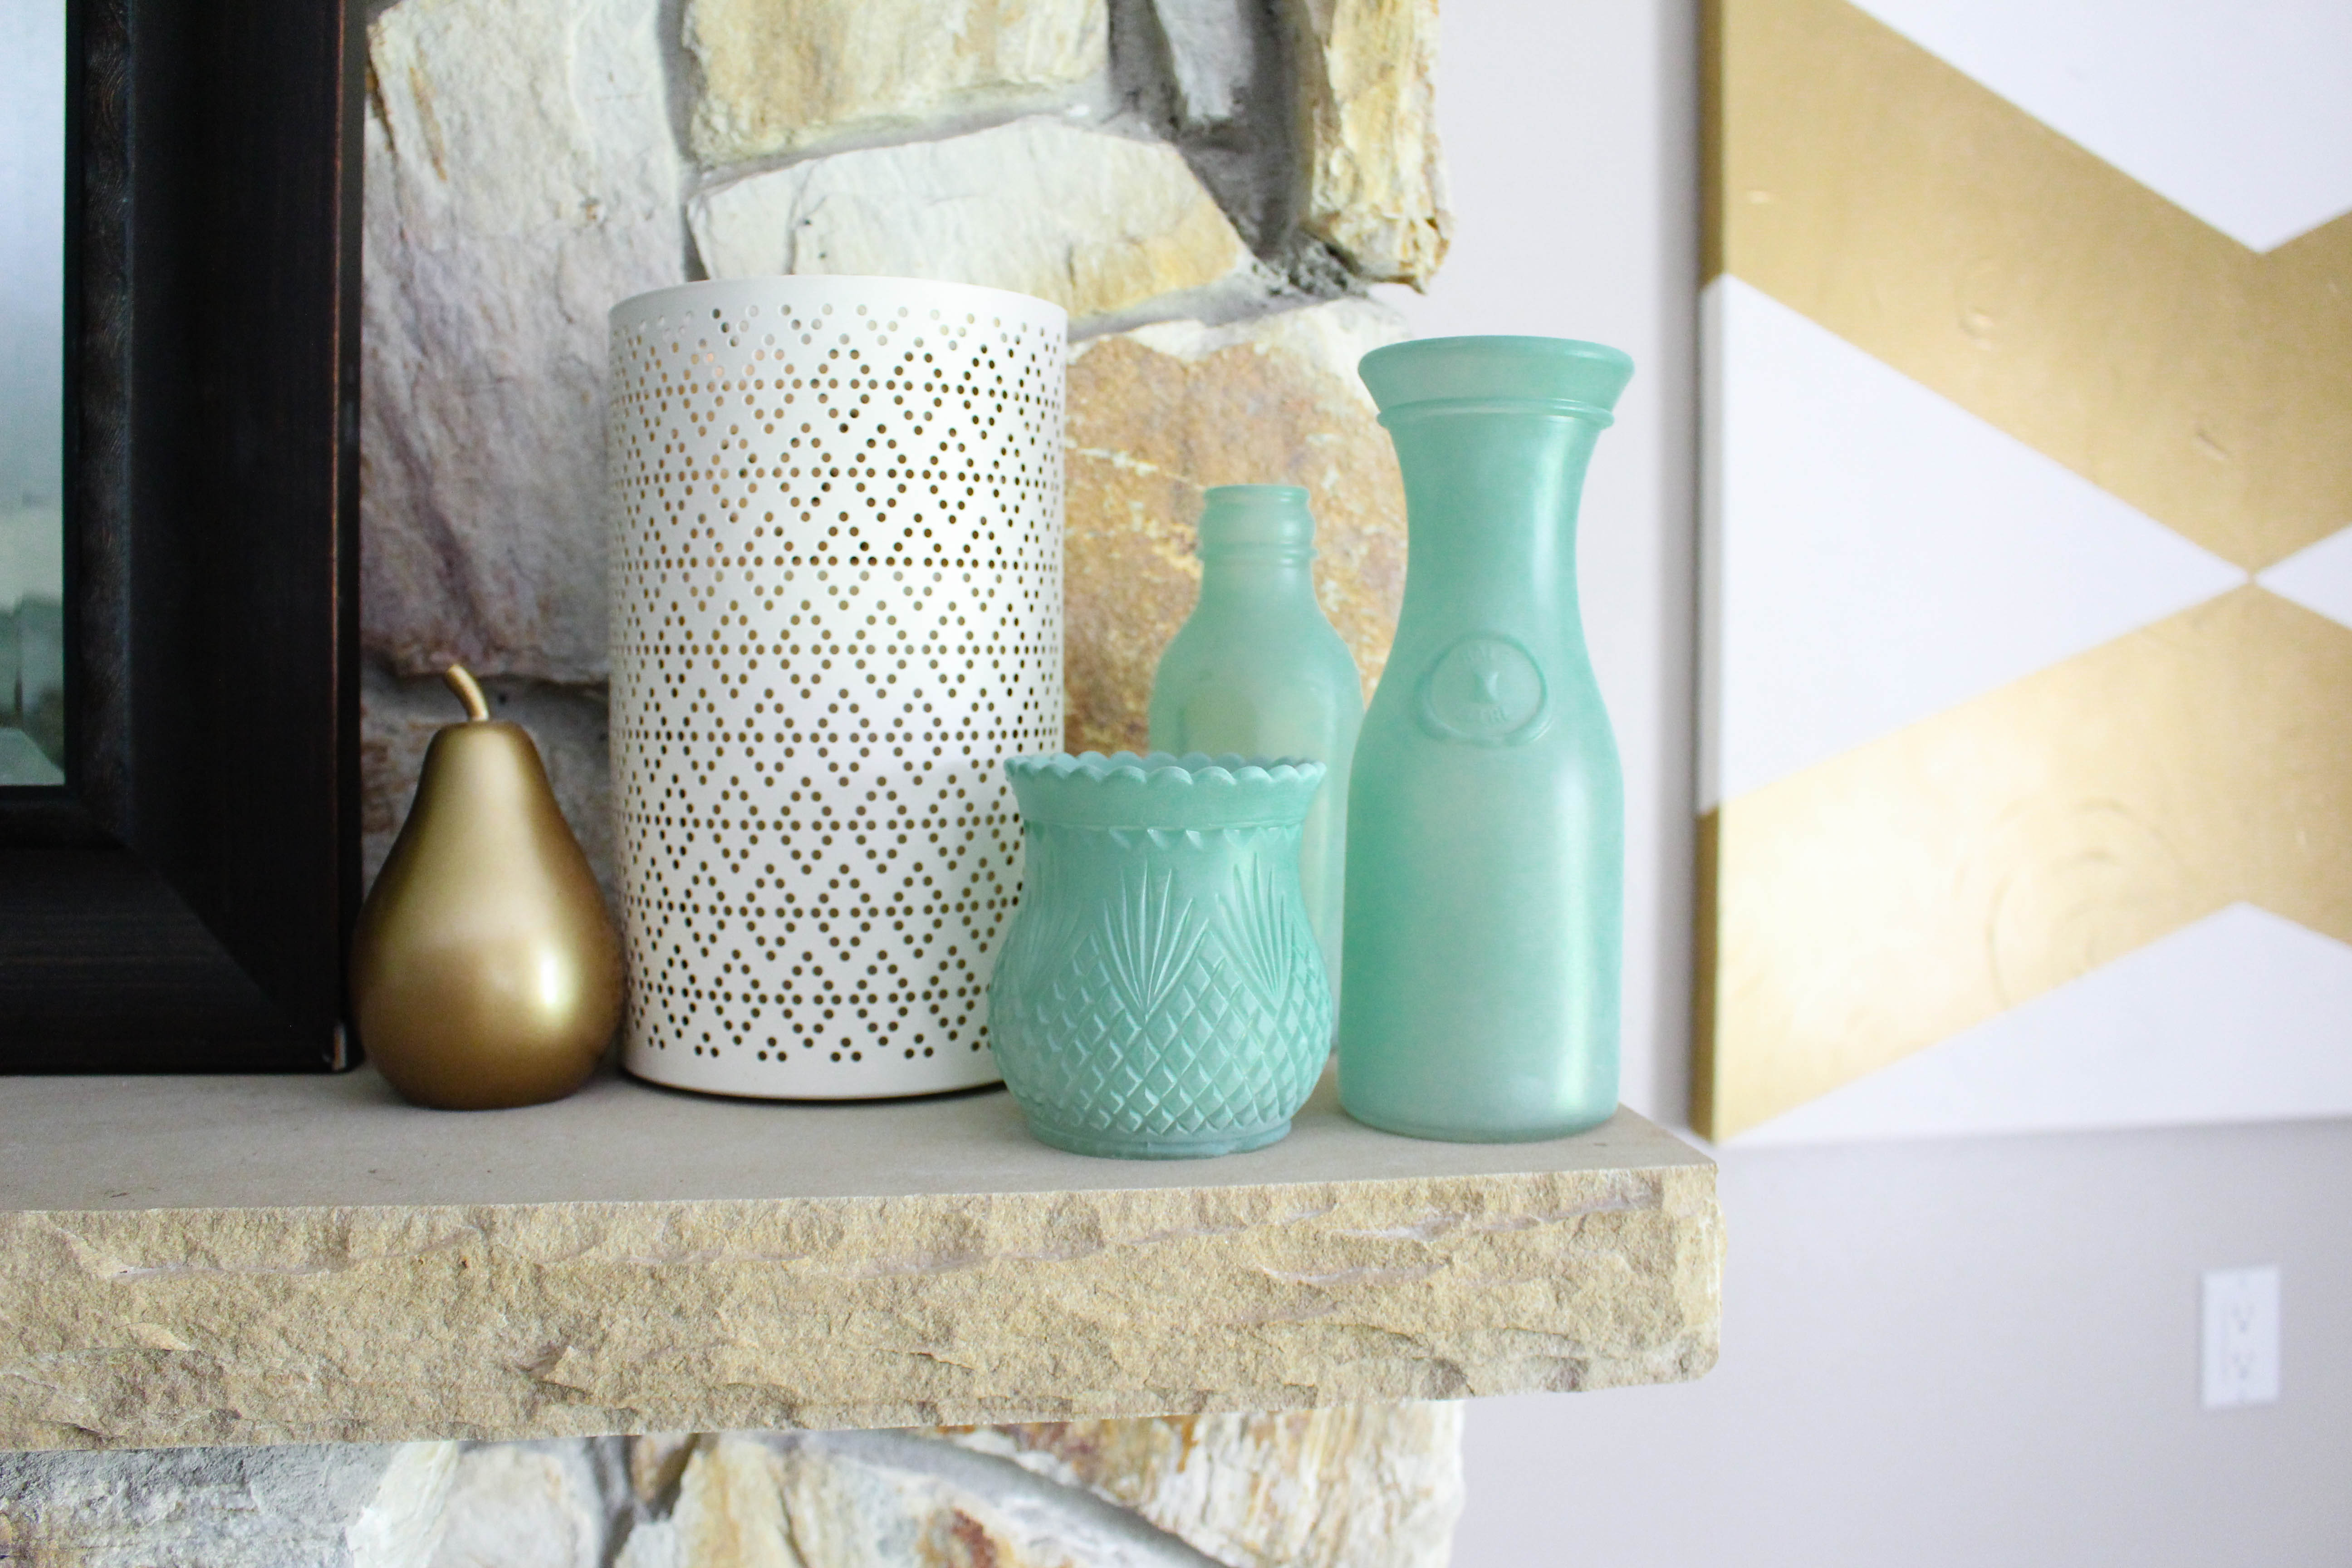
Have you ever noticed you go to Home Depot or Lowe’s for certain things? At least I do!  For example, I always go to Lowe’s to purchase spray paint and find new colors.  They seem to have the best color selection and they offer an abundance of different types of spray paint.  Case in point: I found sea glass spray paint! I’ve never seen this type of spray paint before so I snatched it up in one of my favorite colors, sea foam. Maybe I’m late on this sea glass spray paint, but oh my word, the results are amazing.

Sea glass spray paint that comes in a variety of colors.

Needless to say this prompted a new DIY tutorial.  Honestly, this tutorial is so easy it’s basically showing you how awesome this spray paint turns out! I had a few bottles and vases from my local thrift store that I spent maybe $2 on.  I knew they would be perfect for a sea glass makeover.  With the spray paint costing around $7 (it’s double the price on Amazon), I had new home decor for less than $10.

Vases and bottles found at my local thrift store.

Supplies:

Glass vases and/or bottles – find some amazing ones at your local thrift store || Krylon Sea Glass Spray Paint || Hard surface to spray paint on {that you don’t mind getting dirty}

Turning vases and bottles into sea glass using spray paint.

The How-To:

Take your vases/bottles outside and place on a hard surface that you don’t mind getting spray paint on. Apply an even coat of the sea glass spray paint. It dries fairly quickly and the more coats you apply, the more vibrant and darker the sea glass look becomes.  It was pretty amazing being able to control the deepness of the sea glass color. Allow the spray paint to fully dry before applying another coat. The picture below shows what one coat of spray paint looks like.  I did a total of 4 coats on each vase/bottle.

Creating your own sea glass bottles and vases.

That’s it!  Just let it dry and start decorating with your new home decor.  This spray paint dries with a smooth, powdery finish that gives the glass the look of being tumbled in the ocean waves.  It’s also semi-translucent and sticks well to glass.

Sea Foam Sea glass bottles

I was very excited about the results of this sea glass spray paint and even more thrilled to have new home decor pieces for less than $10.  The sea glass spray paint comes in a variety of colors.  I’m curious to try the cornflower blue color.  Anyone wanting to add that pop of color to their home?  We can create together!  If you’ve already used this sea glass spray paint, what did you think?  I would love to hear about it in the comments below.  Thank you so much for visiting my blog and reading about my latest DIY tutorial!

Creating your own sea glass bottles in a sea foam color

DIY Sea Glass Bottles

Let’s keep in touch!

We have a brand new community over on Facebook, House & Home, where we’ll be chatting, sharing, and helping one another when it comes to home decor and projects. Come join us! Check it out here.

Like on Facebook || Follow on Instagram || Follow on Pinterest

Share this:

  • Click to share on Twitter (Opens in new window)
  • Click to share on Facebook (Opens in new window)

Related

Filed Under: DIY Tutorial, Home Project

« Top 5 Farmhouse Laundry Room Sinks
Home Project // Thrift Store Mirror to Chalkboard Calendar »

Comments

  1. Renee rishel says

    September 22, 2016 at 2:49 pm

    Cool idea!

    Reply

Leave a Reply Cancel reply

Your email address will not be published. Required fields are marked *

This site uses Akismet to reduce spam. Learn how your comment data is processed.

Looking for something?

withinthegrove

This pretty much sums up the progress of making 25 This pretty much sums up the progress of making 250 cement tiles. But I’m halfway through! The moment I finish the last tile is the moment I knock out the old tile. Let’s do this!
Time to bet on my DIY skills! I’m attempting to Time to bet on my DIY skills! I’m attempting to make my own cement tiles for our outdoor front door area. Mainly because of what I’m saving vs buying them. Won’t be saving much on time but I’M MAKING TILES! Never thought I’d hear myself say that. Make sure to follow along because if this works out, I have a feeling a lot of you are already eyeing a spot in your home to try your own DIY cement tiles. 
 
Thank you @vintagerevivals and @abby_roadhome for showing it’s possible with your gorgeous bathroom tiles! 

#CementTiles #DiyCementTiles #DiyProject #DIYonABudget #DIYProjects
We got the call that the pool build is starting! W We got the call that the pool build is starting! Which had me scrambling to dig up all the plants that were in the way in an effort to save them. Literally down to the last second before the crew showed up. Exciting day but you know what’s even more exciting? Knowing the next crew will officially be breaking ground with the excavation phase of the build.
This time of year is full of organizing and purgin This time of year is full of organizing and purging to bring spaces back to life. But sometimes all a space needs to feel refreshed is, well, a refresh and a little attention. Your number one requested space was the living room. So I gave mine a refresh with some unique and gorgeous finds from @homesense_us . I found a few fun pots for my houseplants, a gorgeous magnifying glass, and a few other items for our coffee table and couch.

I never know what I’m going to find when I walk into Homesense since it’s always rotating with amazing finds. But I do know I’ll walk out with a few new favorites for my home at affordable prices. If you haven’t yet, I urge you to check and see if you have a Homesense near you! #DiscoverHomesense #HomesensePartner
2022, you were awesome. But I’m determined to ma 2022, you were awesome. But I’m determined to make 2023 even better! And I hope you join me! We can be one of our biggest cheerleaders, but together we’re going to do big things. Go ahead and write down a big, small and a few in-between projects you want to get done this year in your home. Kicking it off with intention and that reminder that we can do this. Ready to get started?! Let me know in the comments the first project you want to tackle!
We finally got the Christmas/winter edition of the We finally got the Christmas/winter edition of the window projection up and running! It was a hit for Halloween and just as fun for this time of year as well. I built frames wrapped with a plastic drop cloth but you can also secure the drop cloth over the windows using command strips. The videos are from @atmosfx and we use a mini projector to play them on the screen. Place a Bluetooth speaker outside and you’re in business! Such a fun addition this time of year for the exterior of your home.
It’s the last little bit of the demo we needed t It’s the last little bit of the demo we needed to do in order to give the green light for the pool to start. And 2,456 pavers later, it’s done! This was exhausting but worth the money we saved doing it ourselves. And why remove them? We’re using a different stone around the pool and we want it to be cohesive up to the house. Don’t worry, someone got one heck of a deal on these pavers, we made a little money, and someone else got them out of our driveway. I’d say that’s a win-win. Stayed tuned for the entire pool process as we enter 2023. It’s going to be pretty exciting to watch!
Our patio space has served us so well over the yea Our patio space has served us so well over the years and now it’s time for a change because we’re getting a POOL!! Sharing this with you makes it even more real because just a year ago I would have told you it isn’t in the cards for us. We’ll be breaking ground soon but first we have to remove the screen enclosure. Spoiler: we won’t be putting one back up around the pool. It has already made the biggest difference visually and SO much natural light pours into our home now with it gone. It’s going to be so exciting seeing this all unfold so stay tuned! Up next: removing the pavers.
This holiday season we were able to travel to my h This holiday season we were able to travel to my hometown for the first time in awhile. We were greeted by the most beautiful sunset on the beach. Fast forward to this week as I headed to @homesense_us for some holiday shopping, and I ended up finding a few pieces for our home that remind me of that core memory on the beach. The beautiful wicker bench caught my eye first followed by the comforter and toss pillows. Everything at amazing price points while not sacrificing style and quality. #HomesensePartner

Mixing a thrill of a find with a core memory, I guarantee you'll fall in love with your home even more as you go to decorate. Decorating your home isn't grasping on to the newest trend or what you think others would do. It's what YOU want to do. And sometimes that's based on an emotional connection. Oh, the stories your spaces will be able to tell as you decorate each one. Start with seeing if there’s a @homesense_us near you! #DiscoverHomesense #HomesenseSarasota
Load More... Follow on Instagram

Sign up here to have our fresh posts delivered to your inbox!

Enter your email address:

Delivered by FeedBurner

Copyright © 2023 Within The Grove • Customized by Brave Creative Design · Log in

  • Privacy Policy
  • Terms and Conditions
  • Disclosures + Photo Usage
 

Loading Comments...