• Home
  • ABOUT
  • WORK WITH ME
  • Paint Colors
  • Shop Our House
    • Guest Bedroom
    • Front Living Room
    • Living Room with Fireplace
    • Previous Second Living Room
    • Current Playroom
    • Prior Playroom
    • Dining Room
    • Laundry Room
    • Oliver’s Bedroom
    • Guest Bathroom
    • Covered Lanai
    • Patio
    • Master Bedroom
  • CONTACT
    • Facebook
    • Instagram
    • Pinterest

Within the Grove

Join the list to receive occasional news and special updates!

Home Project // Thrift Store Mirror to Chalkboard Calendar

September 29, 2016

Thrift Store Mirror to Chalkboard Calendar

Last month I had the fun opportunity to head to my local Habitat Restore to pick out a few items to flip.  If you didn’t see my first furniture flip, check out the garden planters I made out of locker drawers.  This month the fun doesn’t stop! While I was walking around the store, I was able to find a large mirror that needed a simple makeover but with big results.  Here’s the beauty before:

Before Image of Mirror (1 of 1)

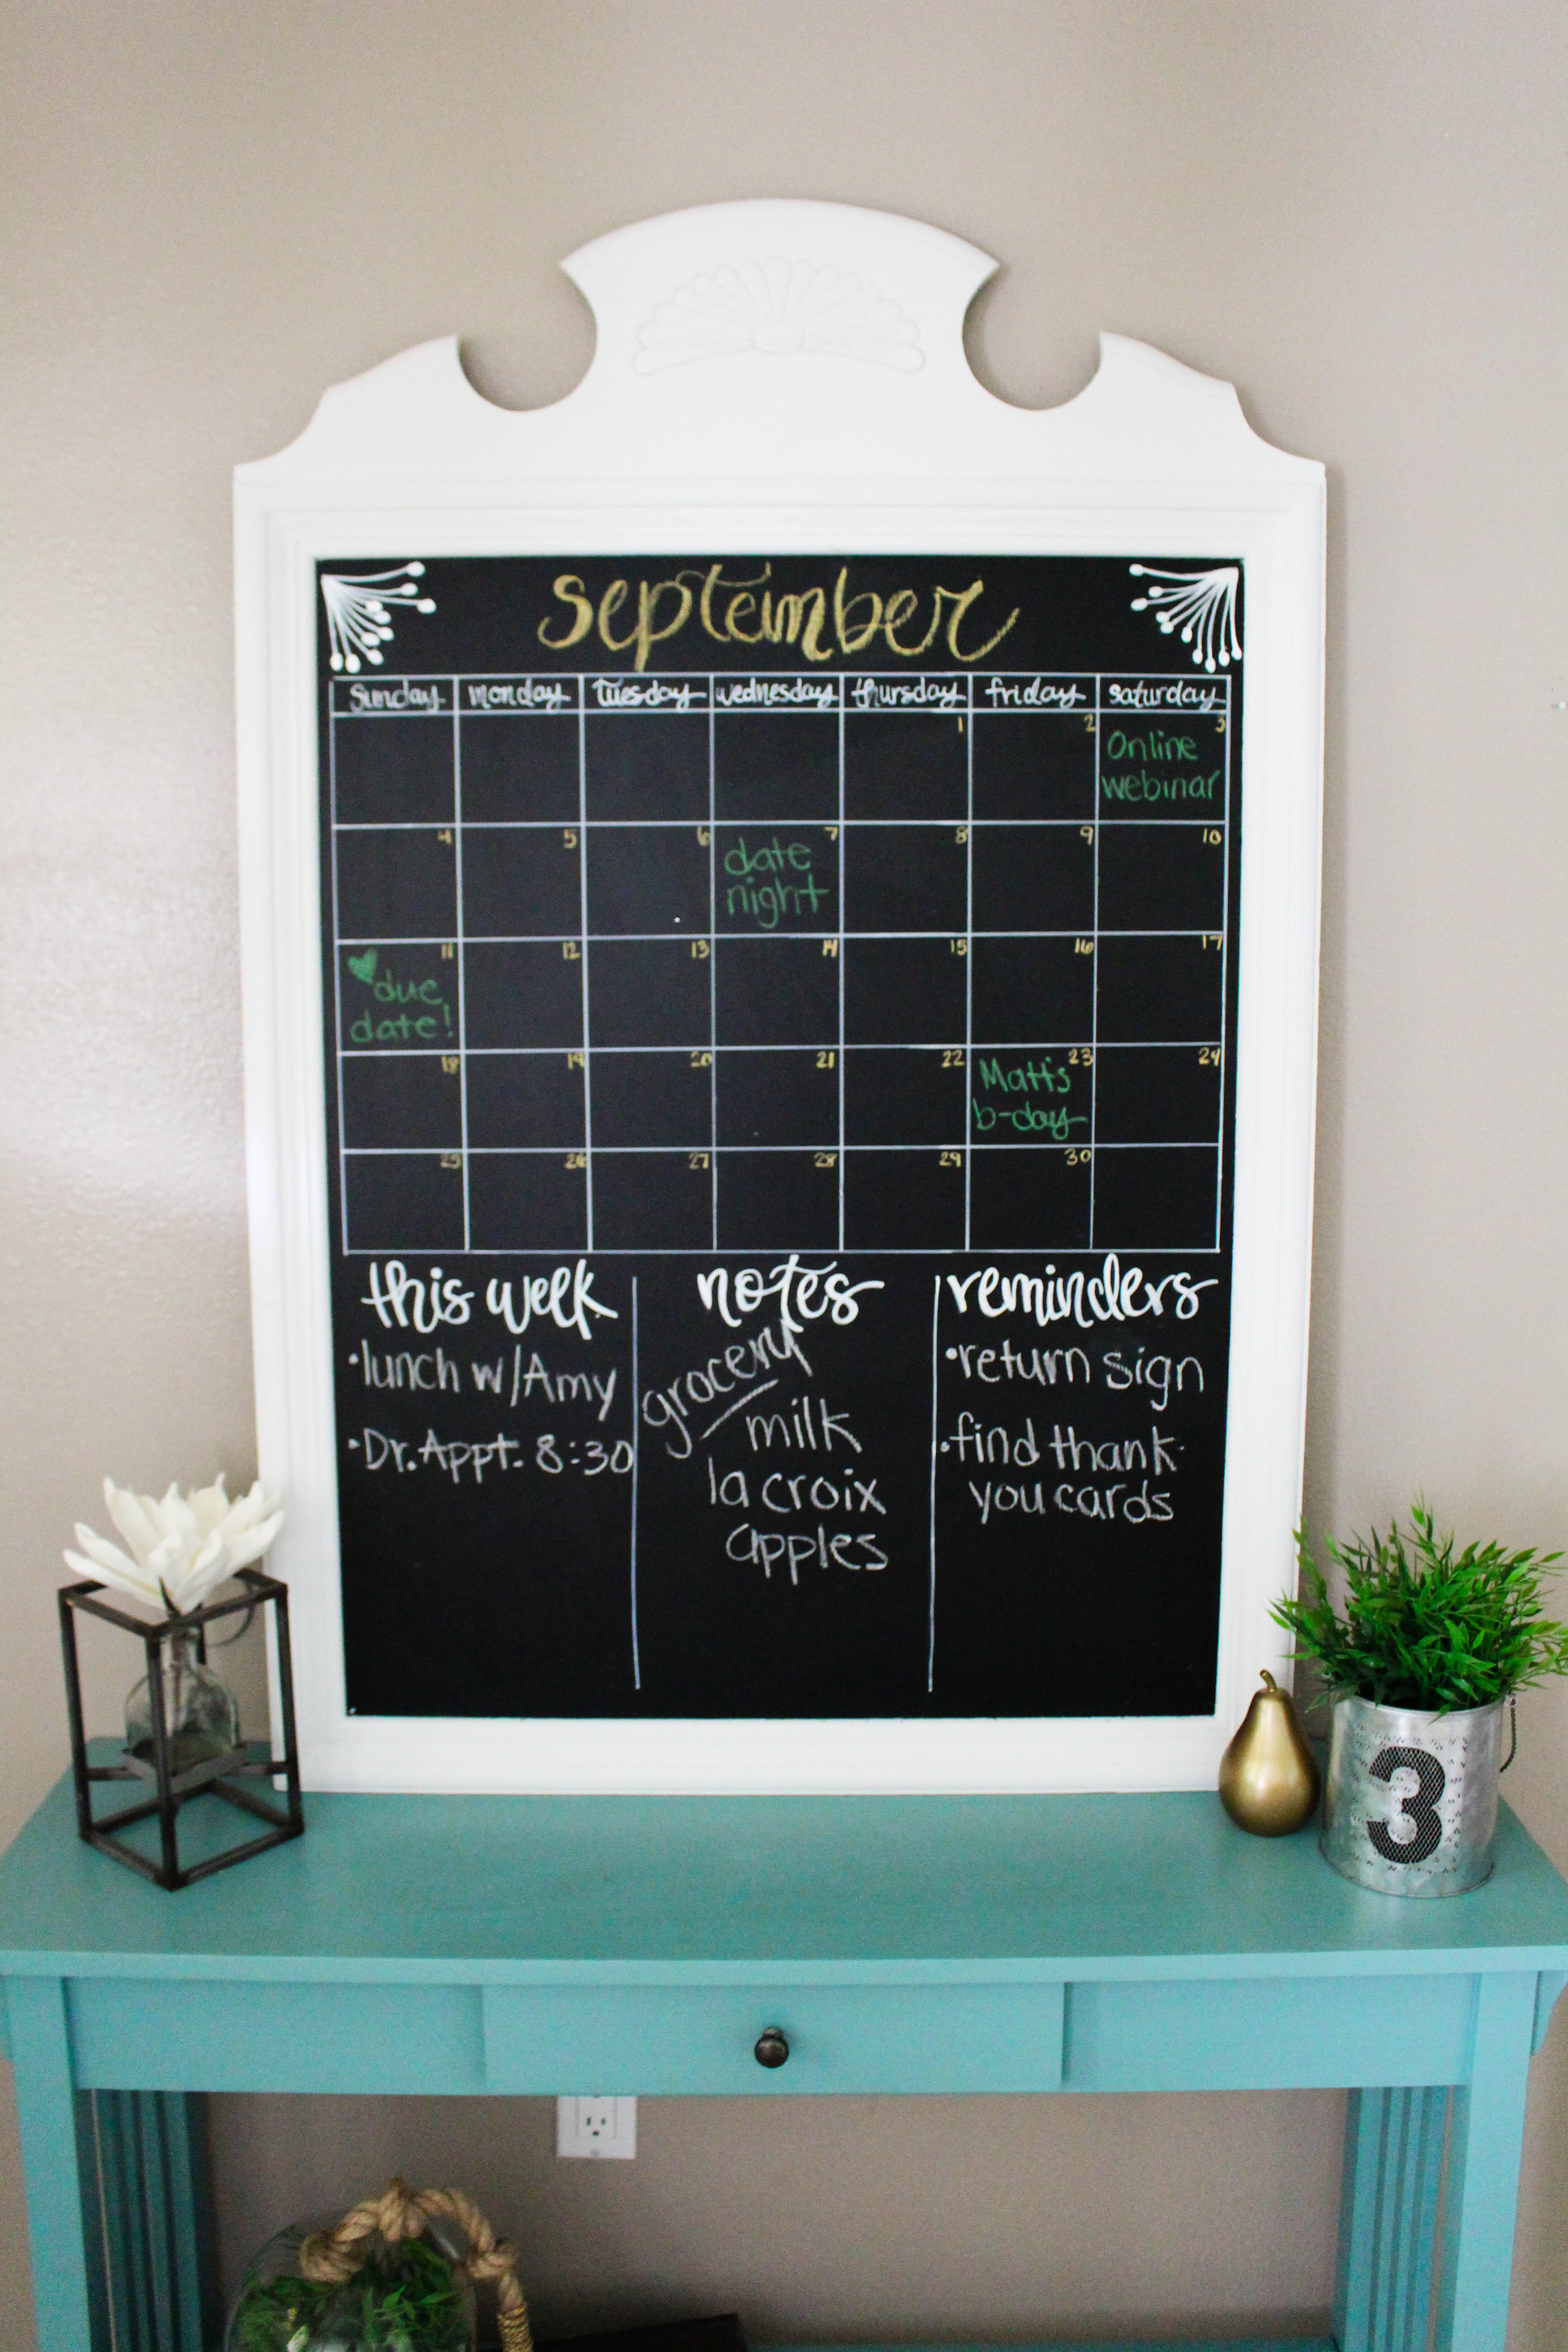
Ryan and I have always talked about having a calendar and memo chalkboard displayed in our home.  It’s a great way to have a visual and constant reminder of our upcoming events, our grocery list, and random notes to each other.  We sync our calendars on our phones but it always comes back to being a pencil and paper gal. I knew as soon as I saw this mirror it was meant to be our chalkboard calendar.

From Mirror to Chalkboard (5 of 8)

This project took one Saturday to complete because of the drying time between each coat.  I used Rust-Oleum Linen White Chalk Paint for the frame.  Two coats of paint later it was already looking like a new piece.  Once the white chalk paint was fully dry, I placed painter’s tape along the inside edge of the frame to prep for the chalkboard paint. I applied three coats of chalkboard paint directly on the mirror. It’s very important to allow the paint to fully dry between coats!

From Mirror to Chalkboard (3 of 8)

To add the calendar I used a pencil and ruler to make sure my measurements were all the same.  I then used a paint marker to trace over the pencil lines.  I used my ruler as the straight edge so that my lines looked clean. Then I simply added the sections at the bottom.  Why a paint pen?  I didn’t want the calendar or my wording at the bottom to erase every time I changed the calendar and notes.

From Mirror to Chalkboard (2 of 8)

From Mirror to Chalkboard (7 of 8)

I can’t wait to put our new calendar to use especially with our little one here.  Our world has completely changed {in an amazing way} and staying organized is more important than ever.  It will certainly help keep us organized and on the same page. As much as I love it on our foyer table, I’ll be adding a French cleat to the back of the chalkboard to hang it in our laundry room.

Feeling inspired? Head to your local Habitat Restore to re-purpose a mirror into a chalkboard calendar for your own home.  It definitely adds a special touch with a farmhouse design.

From Mirror to Chalkboard (1 of 8)

Let’s keep in touch!

We have a brand new community over on Facebook, House & Home, where we’ll be chatting, sharing, and helping one another when it comes to home decor and projects. Come join us! Check it out here.

Like on Facebook || Follow on Instagram || Follow on Pinterest

Share this:

  • Click to share on Twitter (Opens in new window)
  • Click to share on Facebook (Opens in new window)

Related

Filed Under: DIY, Home of the Rishels, Home Project

« DIY // Create Your Own Sea Glass Bottles
October 2016 Pumpkin Everything Wallpaper // Free Download »

Comments

  1. Sharon says

    October 8, 2018 at 9:59 am

    Did you prep the mirror before applying the chalk paint? I’m curious as to how well the paint adheres to the glass surface.

    Reply
    • ElizabethRishel says

      October 8, 2018 at 2:13 pm

      I didn’t do anything to the mirror before painting. But when applying the chalkboard paint, you’ll want to apply it in different directions. In other words, don’t go in the same direction like we’re used to when painting! This will help the paint adhere and for when you’re writing on it. I did this with each coats. I hope this helps!

      Reply
      • Sharon says

        October 8, 2018 at 6:23 pm

        Thank you! Wish me luck.

        Reply
  2. Meghan Roth says

    October 3, 2016 at 11:20 am

    Super cute!

    Reply
    • ElizabethRishel says

      November 15, 2016 at 11:15 pm

      Thanks girl!

      Reply

Trackbacks

  1. Easy Chalkboard DIYs For Home Offices - DIY & Crafts | A Matter Of Style says:
    September 2, 2019 at 6:01 am

    […] Take a thrift store mirror and transform it into a chalkboard calendar for your family to enjoy. It’s a great way to stay organized. Get the tutorial from Within The Grove. […]

    Reply
  2. Fun Chalkboard DIYs For A Kid’s Room - DIY & Crafts | A Matter of Style says:
    February 27, 2019 at 5:00 am

    […] Take a thrift store mirror and transform it into a chalkboard calendar for your family to enjoy. It’s a great way to stay organized within the home! Get the tutorial from Within The Grove. […]

    Reply
  3. 39 Crafty Ideas for Handmade Wedding Gifts | Shutterfly says:
    July 20, 2018 at 4:34 pm

    […] Source: Within the Grove […]

    Reply
  4. 24 Whimsical Easy-to-Make DIY Chalkboards • Cool Crafts says:
    June 13, 2017 at 9:59 am

    […] Grove takes a thrift store mirror and transforms it into a chalkboard calendar in this tutorial for Thrift Store Mirror to Chalkboard Calendar. A great way to stay organized and for your family to […]

    Reply

Leave a Reply Cancel reply

Your email address will not be published. Required fields are marked *

This site uses Akismet to reduce spam. Learn how your comment data is processed.

Looking for something?

withinthegrove

The waterline tile and decking are both done! With The waterline tile and decking are both done! With the limestone making the biggest difference with this pool update. It’s stunning!! Very exciting to see our entire pool area installed. We’re almost there!! Just the interior finish to go and then it’s time to fill the pool. 

•Pavers are limestone in Myra White 
• If you’re local to Central Florida, @caapavers installed ours! 
• Waterline tile is by NPT in the color Carbon.
DIY TILE REVEAL! The front door is styled and now DIY TILE REVEAL! The front door is styled and now taking the time to soak these tiles in! I kept it simple with the decor and took away the rug. If you've been here for a little bit, you know I love to place a rug underneath my wooden doormat. But letting these tiles SHINE is a must. Still can’t believe I made these! Head to the last image. I installed an imperfectly perfect tile as a little nod to these being handmade. DIY tile blog post coming your way soon! Grabbing packages from my front door just became even more exciting. 

Front door color: Black Magic by Sherwin-Williams
House Color: Cloud White by Benjamin Moore
Decor: You can find it on my LTK through my profile!
Right when we thought the pool excavation day was Right when we thought the pool excavation day was exciting, the gunite was installed! We’re about halfway through the pool build and we officially have the shell of the pool done. This all happened so fast. I’m talking about two weeks. The waterline tile and decking up next!
This will forever be a project where I will say: “ I MADE THESE TILES!” What would have cost me close to $2,000 to buy, I was able to make them for $350. I started experimenting with how to make them and nailing down the perfect black color 8 weeks ago. Let that sink in! This has been such a labor of love. 20 hours went into making the tiles. Two weeks worth of demo + installation. And a lot of learning curves in between. This project is so much more than saving money. It’s the process I went through and what I pushed myself to learn and do to get to this moment. We can do hard things!! Cheers to this project being done. How about we make a front door next? JUST KIDDING!! But a new front will be happening!

Thank you @vintagerevivals for showing that making cement tiles is a project one can tackle and @abby_roadhome doing the same with this amazing pattern!
The tiles are in place! 🎉 I’m not done yet bu The tiles are in place! 🎉 I’m not done yet but this is certainly a part of the project that needs to be celebrated. Grout is up next to call this project a wrap. It has been a process but one of the most rewarding ones when it comes to projects I’ve tackled in our home.
IT IS TIME! I have been waiting for this moment to IT IS TIME! I have been waiting for this moment to smash these front door tiles ever since we moved in. And it felt so dang good! Here’s what I’m doing to prep the concrete slab for the tile install: 

1. Remove old tile
2. Use an angle grinder with a diamond grinding blade to remove the thin set and paint. 
3. Wash the slab
4. Apply two coats of Hydro Ban to create waterproofing barrier from the moisture in the concrete slab and to help with crack isolation.
Another exciting step for the pool: Excavation day Another exciting step for the pool: Excavation day! We officially broke ground. It was the coolest thing to watch. Rebar and gunite up next.
250 cement tiles made!! 20+ hours went into making 250 cement tiles made!! 20+ hours went into making these tiles and we’re going to celebrate making it to this point! I questioned myself during the last push when molds started failing, tiles weren’t turning out, and I was just flat out tired. If there’s a project to test patience, this is the one. But want to know the craziest part? I’d do it all over again. What an awesome process being able to make my own tiles. And the part we’ve all been waiting for is coming up next: INSTALL!! Tiles, don’t fail me now.
This pretty much sums up the progress of making 25 This pretty much sums up the progress of making 250 cement tiles. But I’m halfway through! The moment I finish the last tile is the moment I knock out the old tile. Let’s do this!
Load More... Follow on Instagram

Sign up here to have our fresh posts delivered to your inbox!

Enter your email address:

Delivered by FeedBurner

Copyright © 2023 Within The Grove • Customized by Brave Creative Design · Log in

  • Privacy Policy
  • Terms and Conditions
  • Disclosures + Photo Usage
 

Loading Comments...