


Happy Houseiversary! Then and Now After One Year: Part 2

The fun continues today with the ‘Then and Now’ houseiversary celebration! Last week you took a tour of our main living areas in Part 1. It was such a fun day sharing our home with you from a before and after view.
 Today you will be getting a glimpse into our bedrooms, bathrooms, and backyard. I have not taken as many pictures of these areas in the past due to them still being a major work in progress. But, at the end of the day, progress has been made since day one!
Welcome to Part 2 of our home tour!
Hallways
We have a hallway shaped like the letter ‘L’ that leads to all of the bedrooms and one of the bathrooms. I went with a color in the foyer/hallway that is two shades darker then the living room color. It made for a great and smooth transition!
Here is the before: The after:
 I found this window pane at a local thrift store. I gave it a fresh coat of Annie Sloan Chalk paint in antique white, sanded it down for a weathered look, and then added my pictures right on top {so you couldn’t see the tape}.
 This part of the hallway is my favorite! You round the corner and you are greeted with these wooden arrows that I recently made. They turned out perfect!
 I also wanted a gallery wall somewhere in our home. This was the perfect wall and it leads to the guest bedroom. It makes for great home décor eye candy for the guests to enjoy. In case you are wondering why the number 5, it stands for our wedding anniversary: 5/5.
 Guest Bedroom
I love this room for two reasons: the bay window and all the natural light that floods the room during the day {as you can tell from the wooden arrow picture above}.
The before: The after:
 We already had the furniture and color scheme for this bedroom from our apartment. We haven’t done much to this room besides placing the furniture and painting the walls. I have so many visions for this room {including painting the walls a different color}. I am also wanting to re-paint the spool/table. This spool was left by the road for trash pick up when my husband spotted it for me on the way home from work. He knows me all too well.
 Guest Bathroom
All our guest bathroom needed upon moving in was a little paint, bathroom décor, and we were good to go.
The before: The after:
 Ryan, my husband, built the floating shelves and I took off running to find the fun items to place on the them. I am still looking for something unique to place on the stop shelf! The mirror was another thrift store find that was originally a gaudy gold. I painted it with Annie Sloan chalk paint and sanded it to give it dimension.
 Office/Craft Room
This room had me stumped with paint color and it was the last room that I painted. I had so many visions for my home office/craft room that I became too overwhelmed with making a final decision. I know, pressure. 😉
The before:
 Ryan suggested painting it my favorite color: green. Since I couldn’t decide on anything else at the moment, I thought why not? I decided a darker green for the accent wall and the other walls I painted a lighter green. I still wasn’t feeling the green after a few days. It wasn’t bad, just not what I thought I was looking for. That is when I added the amazing gold polka dots to the accent wall. One thing you need to know about me: I love anything gold and I love polka dots! They made such a difference in the room. I am also still on the lookout for the perfect chair. This stool was a $3 goodwill find!
 This is the other side of the craft room. This was our old entertainment center in the apartment that I repainted. The pictures on the wall are from my old planner.
 Master Bedroom
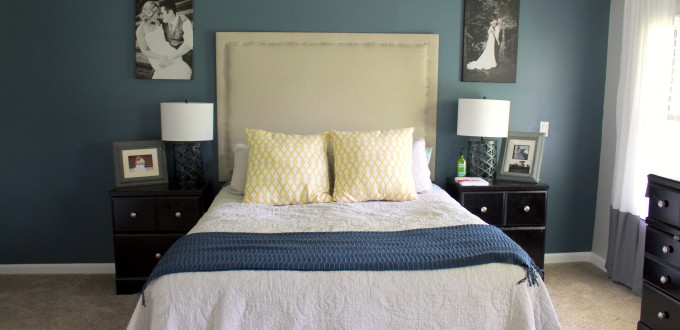
Welcome to my safe haven! This room is still a major work in progress but it is getting there. It is very spacious and unique in it’s shape due to have a little reading nook. After painting the room twice (yes, 4 coats later because we didn’t like the original paint choice), we are in love with the color!
The before:
 The after:
 We went with a light gray and shade of blue for the accent wall that is between a navy and cobalt blue. I am tempted to eventually try out the sea grass wall paper that is a grayish/blue to place on the accent wall. But for now, I love this paint color!
 We are also currently building custom nightstands and keeping our eyes out for a dresser for us to makeover.
As for our closest doors, it took two weekends to give them a facelift. Our house was built in 1979 and comes with special features. When I say special features, I mean that normal closet doors will not fit our closet. When we went to purchase new ones, we quickly realized there is no way they would fit.
 The doors you see now are the original bi-fold doors we transformed into French style doors. Our problem turned into something wonderful and worked out perfectly for us!
Master Bathroom
This bathroom originally did not come with a vent {which Ryan installed. . go Ryan!} and came with the perfect lighting. . . . just kidding. We are still debating which lights we will be installing.
 We decided to paint the bathroom the same light gray as the bedroom so that the color theme flowed easily. We added a large mirror right away and I built the hand towel hanger you see pictured. We planned to remove the white medicine cabinet. We attempted one Saturday afternoon and placed the cabinet right back on the wall after discovering a part of the wall was cut out. The original design of the home had a medicine cabinet that was installed in the wall. We will consult YouTube at a later date on how to fix this.
 The floating shelves in our bathroom are my absolute favorite and happened by complete accident. Ryan ordered the galvanized pipes for the legs of the nightstands he wanted to build. We both realized at the same time they were too long to be the legs of a nightstand. After much thought, this is what we decided to do with them!
 Backyard
Our backyard has honestly been the biggest obstacle. Just look at this before picture! We have spent countless hours and weekends just simply cleaning out our yard. There are parts I can’t even show you yet until we complete the landscaping. Yes people, that bad.
The before:

For now though, here is a look at part of our backyard. I swear our yard has doubled in size just by taking out all of the vines, weeds, and unnecessary plants. It was a jungle! Since this picture we have also had the large tree in the middle removed. You can see here it was dead and the first hurricane would knock it down. Didn’t want to wait and see if that would happen.
 This picture is just for kicks. This AC unit was from 1973 and was STILL working! You don’t want to know our bill last July though. We replaced it a few months ago with summer approaching and didn’t want to be left without AC living in FL {and of course wanted a lower electric bill}.
 If you made it through the entire house tour, you are amazing! Thank you for letting me share our home that we are simply in love with! I hope for more changes and updates throughout this next year. I already have my list and it is growing daily with the projects I want to accomplish. You can keep up with the projects I attempt here on Within the Grove. Have something you want to share? An idea? Something you have done in your own home? I would love to see it!
Let’s keep in touch!
We have a brand new community over on Facebook, House & Home, where we’ll be chatting, sharing, and helping one another when it comes to home decor and projects. Come join us! Check it out here.
Like on Facebook || Follow on Instagram || Follow on Pinterest

[…] See how I have used Brittany Fuson Paper’s Planner as home decor in my home office. […]
[…] industrial shelving that will also be a DIY project. We already have industrial shelving in our master bathroom and love the design and appeal it adds. What I’ve created today with some of my favorite […]
[…] the light is amazing in this room throughout the day. . I put together the perfect pieces for an office space in our bedroom. It’s so dreamy and amazing in this spot, I just might actually have to make […]
[…] recently shared a then and now of our home in celebration of our 1 year houseiversary {part 1 and part 2}. It was very exciting giving you a glimpse into our space we call home. I also realized there […]
LOVE YOUR TOUR! Pinned some great ideas!!
Jordan, you’re the best! Means the world coming from YOU!! Thanks for pinning and reading. 🙂
Love it all! What I want to know is how in the hell you got those polka dots in nice straight lines??
Thank you Meghan! Ha. . . it about drove me crazy. That’s when I went and got a laser level. Life. Saver.