• Home
  • ABOUT
  • WORK WITH ME
  • Paint Colors
  • Shop Our House
    • Guest Bedroom
    • Front Living Room
    • Living Room with Fireplace
    • Previous Second Living Room
    • Current Playroom
    • Prior Playroom
    • Dining Room
    • Laundry Room
    • Oliver’s Bedroom
    • Guest Bathroom
    • Covered Lanai
    • Patio
    • Master Bedroom
  • CONTACT
    • Facebook
    • Instagram
    • Pinterest

Within the Grove

Join the list to receive occasional news and special updates!

Home Project // Kitchen Coffee Bar

June 22, 2016

Coffee Bar in the Kitchen using a dresser

A lot of big projects have been underway in our home that I simply can’t wait to share with you!  I’m sure you can guess one: the nursery.  The fun projects are taking a little while to complete because of demolition, cleaning out an entire room, and finalizing products.   But out of the beautiful mess we’re making, we also created a new, unexpected space: a kitchen coffee bar!

When we lived in Nashville, TN we attended an estate sale and found the perfect dresser to serve as our entertainment center.  Fast forward to our new home in Orlando and that same dresser was moved to my home office to hold all of my shipping supplies.  Hello new entertainment center for our living room. Well the story goes first comes Nashville, then comes Orlando, then comes a nursery for a baby! The dresser was out a spot again but I simply couldn’t part with it.

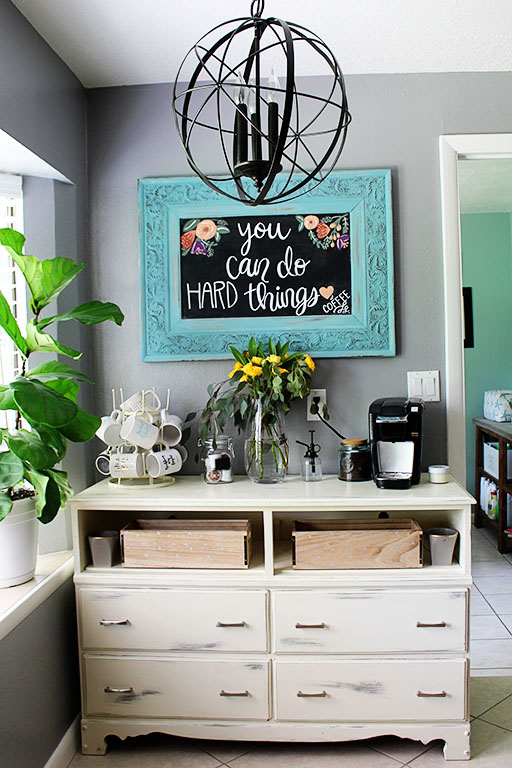
Since we never utilized the breakfast nook to it’s full potential, we broke down the table and placed the dresser perfectly against the wall to create our own Rishel Coffee Bar.   With a couple stools, a new “coffee bar”, the right coffee essentials, and a cozy nook we have the perfect space to brew coffee.

Using a dresser as a coffee bar

I’m a fanatic when it comes to coffee due to feeling invincible with a cup in hand while getting work done. And yes, the coffee struggle is real while expecting our first little one due to not being able to indulge.  Here are some of the decor pieces I’ve included in our coffee bar area to make it functional yet eye appealing at the same time.

Coffee Mug Rack

I used a glass drying rack as a way to hold my coffee mugs.  These are a few of my favorites and I love seeing them on display all the time.  Mugs can serve as decor pieces too!

Using a glass drying rack for coffee mugs.

Coffee Storage

I love the look of clear jars and the texture they bring to a space.  I used one for our K Cups and another one for grounded coffee.  It’s also a perfect way for guests to find what they’re looking for.

Glass Coffee Container

Glass Containter for K Cups

Extra Storage

I found these wooden boxes just a few days ago at Target for $8.  They were a steal!  I’ll be using them to store extra coffee, sugar, napkins, etc.  They hide the not so cute stuff but make the items easily accessible.

Extra coffee supplies in wooden containers

Store extra coffee supplies in a wooden container

Fresh Flowers

We’re always in the kitchen and the natural light that pours into this space makes for a great coffee nook. This is also one of the areas in our home where I make sure to always display flowers. I can’t get enough of Trader Joes and their abundance of fresh flowers at great prices!

Fresh flowers for your home

And I can’t keep going without showcasing my fiddle leaf fig tree.  It is ALIVE and GROWING!  I’m seriously one proud plant mama with this one. It’s doubled in height and grows a new leaf just about every week right now.  No idea why it decided to like me, but I’ll take it!

Fiddle Leaf Fig in Kitchen area

Chalkboard Sign

I saw this quote on Pinterest the other day and seriously laughed out loud.  It was meant for me and I knew it would be perfect for this space.  I’m constantly in fear of failing or not being enough {it’s a real struggle} but with coffee in hand, I feel as if I can accomplish hard tasks. This chalkboard is actually an old mirror I bought at Goodwill for $5.  A little Annie Sloan and chalkboard paint has transformed it into a vibrant chalkboard!

Coffee Bar Chalkboard Sign

Coffee Chalkboard Sign for your home

I’m still needing a neutral colored rug for the space and updated stools.  Until then, I’m pretty excited about the coffee bar space I created out of items from my home that beautifully came together.  Have a coffee bar space of your own? I would love to see your spin on how you serve and display your coffee.

Kitchen Coffee Bar Area

Let’s keep in touch!

We have a brand new community over on Facebook, House & Home, where we’ll be chatting, sharing, and helping one another when it comes to home decor and projects. Come join us! Check it out here.

Like on Facebook || Follow on Instagram || Follow on Pinterest

Share this:

  • Click to share on Twitter (Opens in new window)
  • Click to share on Facebook (Opens in new window)

Related

Filed Under: Home of the Rishels, Home Project, Our Home Improvements

« DIY // Father’s Day Grilling Apron
DIY // Painted Abstract Lazy Susan »

Comments

  1. Catherine Davis says

    September 1, 2016 at 8:51 am

    I ran into your blog this morning by accident and I’m in love! I’m enjoying everything I see. I really like this coffee bar idea, I think I’m gonna try it here. Thanks so much!

    Reply

Leave a Reply Cancel reply

Your email address will not be published. Required fields are marked *

This site uses Akismet to reduce spam. Learn how your comment data is processed.

Looking for something?

withinthegrove

The waterline tile and decking are both done! With The waterline tile and decking are both done! With the limestone making the biggest difference with this pool update. It’s stunning!! Very exciting to see our entire pool area installed. We’re almost there!! Just the interior finish to go and then it’s time to fill the pool. 

•Pavers are limestone in Myra White 
• If you’re local to Central Florida, @caapavers installed ours! 
• Waterline tile is by NPT in the color Carbon.
DIY TILE REVEAL! The front door is styled and now DIY TILE REVEAL! The front door is styled and now taking the time to soak these tiles in! I kept it simple with the decor and took away the rug. If you've been here for a little bit, you know I love to place a rug underneath my wooden doormat. But letting these tiles SHINE is a must. Still can’t believe I made these! Head to the last image. I installed an imperfectly perfect tile as a little nod to these being handmade. DIY tile blog post coming your way soon! Grabbing packages from my front door just became even more exciting. 

Front door color: Black Magic by Sherwin-Williams
House Color: Cloud White by Benjamin Moore
Decor: You can find it on my LTK through my profile!
Right when we thought the pool excavation day was Right when we thought the pool excavation day was exciting, the gunite was installed! We’re about halfway through the pool build and we officially have the shell of the pool done. This all happened so fast. I’m talking about two weeks. The waterline tile and decking up next!
This will forever be a project where I will say: “ I MADE THESE TILES!” What would have cost me close to $2,000 to buy, I was able to make them for $350. I started experimenting with how to make them and nailing down the perfect black color 8 weeks ago. Let that sink in! This has been such a labor of love. 20 hours went into making the tiles. Two weeks worth of demo + installation. And a lot of learning curves in between. This project is so much more than saving money. It’s the process I went through and what I pushed myself to learn and do to get to this moment. We can do hard things!! Cheers to this project being done. How about we make a front door next? JUST KIDDING!! But a new front will be happening!

Thank you @vintagerevivals for showing that making cement tiles is a project one can tackle and @abby_roadhome doing the same with this amazing pattern!
The tiles are in place! 🎉 I’m not done yet bu The tiles are in place! 🎉 I’m not done yet but this is certainly a part of the project that needs to be celebrated. Grout is up next to call this project a wrap. It has been a process but one of the most rewarding ones when it comes to projects I’ve tackled in our home.
IT IS TIME! I have been waiting for this moment to IT IS TIME! I have been waiting for this moment to smash these front door tiles ever since we moved in. And it felt so dang good! Here’s what I’m doing to prep the concrete slab for the tile install: 

1. Remove old tile
2. Use an angle grinder with a diamond grinding blade to remove the thin set and paint. 
3. Wash the slab
4. Apply two coats of Hydro Ban to create waterproofing barrier from the moisture in the concrete slab and to help with crack isolation.
Another exciting step for the pool: Excavation day Another exciting step for the pool: Excavation day! We officially broke ground. It was the coolest thing to watch. Rebar and gunite up next.
250 cement tiles made!! 20+ hours went into making 250 cement tiles made!! 20+ hours went into making these tiles and we’re going to celebrate making it to this point! I questioned myself during the last push when molds started failing, tiles weren’t turning out, and I was just flat out tired. If there’s a project to test patience, this is the one. But want to know the craziest part? I’d do it all over again. What an awesome process being able to make my own tiles. And the part we’ve all been waiting for is coming up next: INSTALL!! Tiles, don’t fail me now.
This pretty much sums up the progress of making 25 This pretty much sums up the progress of making 250 cement tiles. But I’m halfway through! The moment I finish the last tile is the moment I knock out the old tile. Let’s do this!
Load More... Follow on Instagram

Sign up here to have our fresh posts delivered to your inbox!

Enter your email address:

Delivered by FeedBurner

Copyright © 2023 Within The Grove • Customized by Brave Creative Design · Log in

  • Privacy Policy
  • Terms and Conditions
  • Disclosures + Photo Usage
 

Loading Comments...