• Home
  • ABOUT
  • WORK WITH ME
  • Paint Colors
  • Shop Our House
    • Guest Bedroom
    • Front Living Room
    • Living Room with Fireplace
    • Previous Second Living Room
    • Current Playroom
    • Prior Playroom
    • Dining Room
    • Laundry Room
    • Oliver’s Bedroom
    • Guest Bathroom
    • Covered Lanai
    • Patio
    • Master Bedroom
  • CONTACT
    • Facebook
    • Instagram
    • Pinterest

Within the Grove

Join the list to receive occasional news and special updates!

How to Clean a Stained Utility Sink

February 12, 2019

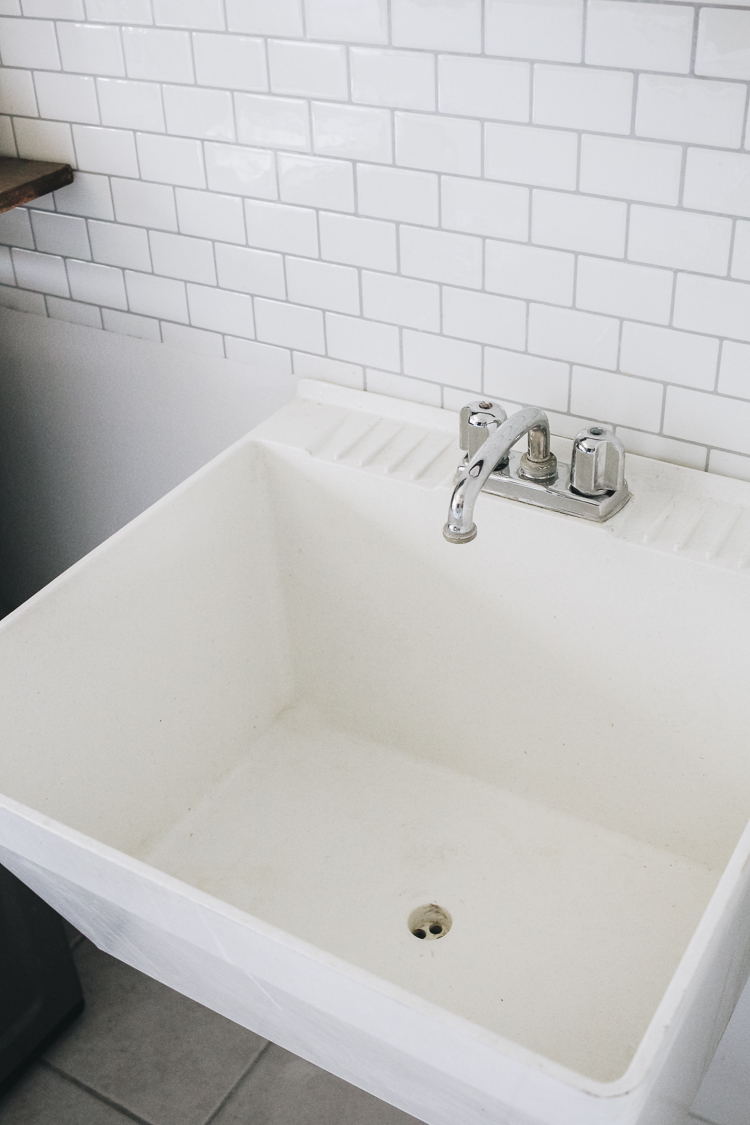
If you have a utility sink in your laundry room or garage, there’s a good chance you may think it’s beyond repair from the stains that have beautifully graced it. For example, we use ours for washing out paint brushes, tools from our home projects and our own hands when they’re too messy to use the regular sink. Over time it has created a very dirty sink that now has layers of paint and other materials.

After sharing on Instagram, I was relieved to find out I wasn’t the only one with this problem. It’s so easy to think that the utility sink is meant for a messy cleanup, therefore it’s okay for it to be a mess itself. But no more! I decided to devote some time in cleaning this sink to see if it could be saved before we looked into purchasing a new one. Not only did I get it clean, but it almost looks like a brand new sink!

Wondering how in the world this was possible? I’m so excited to share how I did it so we all can take back control with our utility sinks. Please keep in mind our utility sink is made of a plastic material and handled the products we used very well. Always check to see if your sink can handle the suggestions below. Here’s the how to.

**Affiliate links are used in this post. Thank you SO much for your support. It allows me to keep bringing you great content.

What You’ll Need

Bar Keepers Friend Soft Cleanser
Bar Keepers Friend Powdered Cleanser
Steel wool in 0000 
Gloves
Putty Knife
Optional: Razor Blade Scraper

The How-To

Before you even apply any cleaner, you’ll want to use your putty knife and scrape off anything that you can from the utility sink. The more, the better!

Once you’ve scraped and then scraped some more, you’ll apply a generous amount of Bar Keepers Friend Soft Cleanser to the areas that need to be scrubbed clean. Make sure you’re wearing gloves for this part! Apply a little bit of water and move the liquid around to cover the area.

Take your steel wool and start scrubbing in a circular motion. Don’t be afraid to scrub hard! Rule of thumb, is that once the suds from the cleaner start to turn brown, it’s time to rinse.

You’ll repeat this process until the entire area is clean. If you’re sink is very stubborn and beyond dirty like ours was, we used a razor blade scrapper to help remove the really tough paint stains. The image below is what our sink looked like after cleaning it twice. It took a total of 5 times to get it fully cleaned.

We then used the Bar Keepers Friend Powdered Cleanser to get what was remaining after the soft cleanser wasn’t working to get those spots. The powdered cleanser is also best to use on rust spots!

That’s it! It truly is as simple as these steps to have a brand new looking utility sink. All it takes is a lot of elbow grease and patience to remove all the stains and dried paint. I’d love for you to share your before and after with us so we can celebrate not having to buy a new utility sink after all!

And let me just say this, if you have never tried Bar Keepers Friend, you’re about to discover the magical work this product can do throughout your home. It’s a staple cleaning product you need to add to your cleaning bucket. You can thank me later !

Want to see more of the laundry room? You can see our original design board for the space, our first update and how we added peel and stick tile to the wall.

Let’s keep in touch! 
We have a brand new community over on Facebook, House & Home, where we’ll be chatting, sharing, and helping one another when it comes to home decor and projects. Come join us! Check it out here.  
Like on Facebook || Follow on Instagram || Follow on Pinterest

Share this:

  • Click to share on Twitter (Opens in new window)
  • Click to share on Facebook (Opens in new window)

Related

Filed Under: DIY

« DIY Plywood Desk
How To: DIY Faux Brick Wall »

Comments

  1. annie says

    March 6, 2023 at 10:58 pm

    So I started the process and it wasn’t going well. Enter the razor blade scraper. and now my sink is like new. Thank you!

    Reply
  2. LaToya says

    March 5, 2023 at 10:18 am

    THANK YOU!!!! I am so glad I found your post. I’m 3 days from getting a new washer and dryer and begged my husband for a knee utility sink, which he quickly stated we didn’t need. Less than $10 later I have a more eye-pleasing sink.

    Reply
  3. Ursula says

    April 8, 2022 at 12:07 pm

    Thank you for sharing this, you saved me some good money not having to replace our sink!
    I regret not taking a pic of before/after but it was definitely a HUGE change! Thanks!

    Reply
  4. Karen says

    March 12, 2022 at 8:48 pm

    My sink was so bad that I was embarrassed to take pictures. Some scraping and cleaning with the powdered Bar Keeper, the sink looks wonderful. Thank you for the guidance.

    Reply
  5. Carol says

    February 16, 2021 at 10:55 pm

    Thank you for your information on how to clean a utility sink. My sink before was even worse than yours. It is now sparkling clean, saving me $60.00 in replacement costs.

    Reply
    • WithintheGrove says

      March 29, 2021 at 10:18 am

      Hi Carol! I am so glad that this helped!

      Reply
  6. betty says

    January 26, 2021 at 4:33 pm

    where can you get Bar Keepers Products. We are in Canada.

    Reply

Trackbacks

  1. How to Clean a Stained Utility Sink - Within the Grove | Dadne says:
    April 30, 2020 at 1:27 pm

    […] Original Source […]

    Reply

Leave a Reply Cancel reply

Your email address will not be published. Required fields are marked *

This site uses Akismet to reduce spam. Learn how your comment data is processed.

Looking for something?

withinthegrove

Round 2 (and final!) for the grass install in our Round 2 (and final!) for the grass install in our backyard. Dang, does it feel GOOD to finally say that! It has been a long time coming and a little sweat equity saved us so much by doing it ourselves. Next on the backyard to do list is turning it into a tropical oasis by planting the flower beds. Think huge birds of paradise! Time to start planning.
It has been 6 years since we moved into our home a It has been 6 years since we moved into our home and visualized the potential our backyard would one day have. The first few years were spent clearing out and claiming our property back . Two years ago we built our dream garden, last year we built the play area that feels more like a magical treehouse, and this year we added a pool (still pinching myself every day). We’re seeing our hard work over the years starting to come together as we approach the finish line of installing grass and landscaping that’s going to bring it all together. As I always say, stay tuned because you know I’m going to share it all with you! And a little reminder for you to keep going because home takes time.
The garden is cleaned up, prepped, and ready for t The garden is cleaned up, prepped, and ready for the summer crop. What started as a single garden box has transformed to this garden space over the past few years. Favorite thing about it: being tucked away in this cozy corner with the winding paths throughout it. One thing I would do differently: using pea gravel instead of the granite rocks we went with. These rocks hurt! Pea gravel is smooth enough to comfortably walk barefoot on.
The grass is in! Saying BUH BYE to the dirt around The grass is in! Saying BUH BYE to the dirt around the pool for the first time since December when we broke ground. We spent the past few weeks installing irrigation throughout our backyard and around the pool. Yesterday we finally had the sod delivered and within a few hours it got us one step closer to finishing our backyard oasis. We still have a long ways to go, but my goodness does it feel good to see this part done! And we can finally check off the final inspection for the pool build.
What does it cost to fill a 16,000 gallon pool wit What does it cost to fill a 16,000 gallon pool with a garden hose? Our total came to $229! Does this total surprise you? This of course can greatly vary depending on where you live and your situation. For us, we live in Florida and on county water. We only pay water fees and not sewage. The water company did not give us a discount. We filled the pool right at the start of our billing month so this is it! Have you filled up a pool before? I’d love for you to share your cost, pool size, and location if you feel comfortable doing so!
We have a 16,000 gallon pool and filled it up with We have a 16,000 gallon pool and filled it up with a single water hose. And we for sure had some questions! Answering them here:

• Why not use a water truck? We weren’t in a rush, it was the best way to end this project watching it fill up, and it would have been more expensive. 

• Why not use our local fire station? Our local fire department doesn’t do this and it isn’t very common that most do. We wouldn’t ask if they did. 

• Did our water company give us a discount? Nope. Most water companies will take off the sewage fee but we only pay for water and not sewage where we live. We did notify them so they wouldn’t turn our water off thinking it was a leak. 

• What is that on the end of your hose? We added a filter on the hose to help reduce iron, scale, any other heavy metals and containments to help give our pool a fresh start. 

• How long did it take? 51 hours 

I’ll be sharing the cost soon so make sure to add your guess in the comments!
Pizza nights are back! And one thing we’re addin Pizza nights are back! And one thing we’re adding since our screen enclosure is gone, are these Bitefighter LED String Lights by @tikibrandproducts . You’ve seen us use them in our playset area and now for our patio area. They give us the ambiance we need at night while helping to fight off the mosquitoes as a 2 in 1 solution. There’s no odor, no mess, and they will last all season long. Cheers to the summer nights ahead! #ad #TIKIbrand
Protecting outdoor furniture for the summer!

It’s time to give your outdoor furniture the best start for summer and to help it last long term. Here are some things you can do to protect your outdoor furniture as we enter the summer season:

1. If you have wood furniture, it’s time to seal it! I use Thompson’s Waterseal on all my outdoor wood furniture except for teak. This protects it from moisture, sunshine, and mold/mildew.

2. Easiest way to help keep cushions clean is by spot cleaning throughout the season. I use 30 Seconds Outdoor Cleaner for quick, fresh looking cushions. 

3. To really protect cushions, Shield H2O provides a water repellent treatment that repels moisture and spills, which in return helps prevent mold and mildew. 

4. Have teak furniture? Use a teak SEALER and not an oil. Teak oil is a short term solution and easily washes out with rain. Time to seal it to last long term! 

I have everything I used in my Amazon storefront under outdoor.
We were told 16 weeks for our pool install but it We were told 16 weeks for our pool install but it ended up taking exactly 12 weeks. Broke ground on December 16th and started filling it with water on March 16th. I’m sharing all the pool details over on my blog. Including the answer to the number one question: How much did this cost? Covering how we picked a pool builder, the construction process, the materials we went with and why, what we splurged on and where we saved, and so much more. Save it for future reference! It’s a good one!
Load More... Follow on Instagram

Sign up here to have our fresh posts delivered to your inbox!

Enter your email address:

Delivered by FeedBurner

Copyright © 2023 Within The Grove • Customized by Brave Creative Design · Log in

  • Privacy Policy
  • Terms and Conditions
  • Disclosures + Photo Usage
 

Loading Comments...