


DIY Artificial Turf Installation: Step-by-Step Tutorial

Thinking about installing synthetic grass? Follow along with our DIY artificial turf installation and get step-by-step instructions for your own backyard.
We had big plans for one epic play area for our family which included installing artificial grass as the base. Had we ever installed turf prior to this? Nope! Was this going to stop us from trying it for the first time? Nope! Did we learn a lot? We sure did. And now we’re able to break down the DIY turf installation step-by-step for you along with the cost of this project.

Can you install artificial turf yourself?
Absolutely! You can definitely install artificial turf on your own. The key, as with any home project, is in the preparation and patience.
We had never done artificial turf installation before taking on this project, but we’re so happy with how it turned out! We did a ton of research and planning before starting and made sure that we had plenty of time to work so we could get each step right.
Luckily, we learned a lot along the way – all of which I’m sharing with you in this post today!
Is installing artificial turf difficult?
While not overly difficult, installing artificial turf does require some effort and attention to detail. There is a fair amount of physical work involved in preparing the ground and laying the base layer. You’ll also need to be precise when cutting and fitting the turf, especially if your space has irregular shapes.
The process can be time-consuming, but if you enjoy hands-on projects and take your time to do each step carefully, you can absolutely accomplish a DIY artificial turf installation on your own!
Before

After

Materials and Tools for Artificial Grass Installation
Shovel
Rake
2×4 with rope for leveling
No-dig landscape edging + extra stakes
Road base – We had this delivered from a local stone and dirt company.
Plate compactor- We rented one from a local company.
Tamper
Heavy-duty weed barrier
Landscape staples
Hammer
Artificial grass
Utility knife with several blades on hand
Galvanized 6 inch nails
Artificial grass tape
Sand made specifically for artificial grass – We bought ours from a local turf company.
Broom
Wheelbarrow
Scoop Shovel
Paver stones
Salt and pepper granite rocks
HOW TO INSTALL ARTIFICIAL GRASS YOURSELF
A DIY artificial grass installation is not a quick job, but it’s totally doable. Follow along step by step to learn exactly how we transformed our backyard with artificial grass.
STEP 1: REMOVE EXISTING GRASS
Once you determine the area you want to install the artificial grass, you’ll want to remove any grass, weeds, brush, etc., and get down to the bare dirt. Typically you want to remove 2-4 inches of dirt to account for the road base and artificial grass that you’ll be installing. In our case, we decided to only remove the grass (which took away about an inch) and focused on leveling the area.

We did this for a few reasons. It was such a large area totaling over 800 square feet and would be a lot of dirt removal. Since our play area isn’t meeting against a sidewalk, patio, or driveway, we could easily make this work. And with that said, we have a plan to make everything level by the end of the project.
STEP 2: LEVEL THE AREA
Whether you just remove the grass like we did or you have to remove a full 2-4 inches of dirt, you need to level the area.
If you go about the route we did or if you have to remove the 2-4 inches of dirt, either way, you need to level the area. This is such an important step you don’t want to skip. This will ensure that you’re artificial grass not only looks great but that there aren’t any dips, slopes, or divots throughout the area.
The easiest way we have found to level an area is to attach a rope to a 2 x 4, or in this case a 4 x 4 with what we had on hand, and drag it along the area. It will naturally drag out any high spots and reveal low spots where you’ll need more dirt. You may be able to shift dirt around or you may have to bring some dirt in to get it level.

STEP 3: PREPARING THE BASE
Preparing the base for the artificial grass is the next step. You’ll evenly spread at least 2 inches of road base throughout the area. This will help create a more level surface and help with drainage once the turf is installed. Since our area isn’t meeting against a structure or concrete pad, we installed a no-dig edging to create the play area shape and to hold the road base in.


Once the road base in place, make sure the area is level. Lightly wet the road base and use a plate compactor to go over the road base a few times. A plate compactor compacts the soil and helps to prevent any future shifting or displacement of the road base in the future once the artificial grass is put down. We rented our plate compactor from a local business which was only $40 for the day.


We did follow behind with a hand taper in some areas where the plate compactor created ridges from running it over the sand. This was partially due to this being the first time we’ve used a. plate compactor.

STEP 4: ADD WEED BARRIER
Once the road base is compacted down, place a heavy-duty weed barrier on top of the road base securing it with landscape staples. You don’t want any weeds or grass trying to push through your artificial grass once you have it installed.

STEP 5: PREPARE THE ARTIFICIAL GRASS
We’re finally to the exciting part of getting the artificial grass installed! We went with the TrafficMaster Fescue Multipurpose artificial grass from Home Depot. We really like how it has the height, texture and even the brown pieces to resemble real grass. It took a few phone calls but we finally found a local store that had enough for our project.


Tip: A few hours before installation, roll out your turf and allow it to sit in the sun. This will flatten it out and make it easier for the install. If you’re installing more than one roll of turf, make sure that the blades are going the same direction with each section. You don’t want them going in opposite directions because the end result won’t look as great or cohesive.


STEP 6: CUT TO FIT
Once the artificial grass is in place, it’s time to cut it to fit your area using a utility knife. You’ll be amazed at how easy it is to cut through turf. Make sure that you have several blades on hand because they do dull quickly.
Before cutting the outer edges, you’ll want to trim your seams first if you have them. We noticed that the blades along the sides of the grass were going in a different direction. This could differ with different kinds of turf. Our solution for this was to cut about an inch off each side of the turf so when the seams meet, the blades were all going in the same direction.

Once the seams were in place and meeting up nicely, we cut along the perimeter of the turf. I tried to cut my turf so that the edge of it hit right on the inside of the landscape edging. And don’t worry! The seams will blend and “disappear” once you fluff the turf with infill.


Make sure that all cuts are done from the back of the turf! You’ll be able to easily see where you need to cut along by being able to see the stitching and it prevents you from cutting off the turf blades. I slowly peeled back the turf as I made my cuts along the back.


STEP 7: SECURING THE SEAMS
This is an area of the project where things didn’t go as great. You want to secure the seams so the turf doesn’t shift, lift up, etc. One way to do that is with turf glue. We tried this approach first.
We placed the seam tape down the middle of the seams, applied the glue, and waited for it to dry. 4 days later the glue wasn’t dry and it was a total fail. We were left spraying off the glue with a water hose and figuring out a different plan.

Which, honestly, we found an even better solution to share with all of you: turf tape. After doing some more research, I found turf tape that has an incredible bond and is 10x easier and less messier than glue. The turf tape is placed down the middle of the seams, paper is removed, and the artificial grass is pressed down onto the tape. We made sure to walk over the seams to really secure it down. They aren’t budging!


STEP 8: SECURING THE REST OF THE TURF
To secure the rest of the turf, we used 6-inch galvanized turf nails. Hammer a nail every 6 inches along the perimeter and every 2 feet on the inside area. Make sure, when hammering a nail down, to move the blades to show the black backing. You want the nail head touching the backing and not trapping the blades of grass. Also, make the nail hit just the top of the backing. You’ll want to prevent making an indention in the backing. This will cause divots in the turf.


STEP 9: INSTALLING INFILL FOR ARTIFICIAL GRASS
The last step of artificial grass install, is installing the infill. There are many different types of infill that you can use but you just want to make sure you use one for artificial grass and one that meets your needs.
For example, there are infills available that help with smell and bacteria prevention if a pet will also be using the turf. Options include: Acrylic Coated Sand, Zeolite, Silica Sand or Crumb Rubber. What you don’t want to do is use beach sand, play sand, or dirt. This will actually promtoe vegetation to grow in your turf.

Once you have your chosen infill, you’ll apply it over the turf. We poured the infill n a wheelbarrow and used a scoop shovel to evenly distribute it over the turf. Then using a stiff broom, brushed it into the bottom of the turf until was evenly distributed to the bottom and the seams disappeared. Infill does a few things. For one, it makes the blades stand up giving it a more natural look. And because it makes the blades stand up, it will keep it looking brand new longer vs the blades being flat and wearing down. It also helps to weigh down the turf.

STEP 10: EDGING ARTIFICIAL TURF
Typically, the infill is the last step of a DIY artificial turf installation. For us, since our turf wasn’t meeting against a structure or concrete slab/pavers, we had one last thing to do. Remember how we didn’t dig down the 2-4 inches at the beginning? Our landscape edging holding the road base and turf area was sitting about and inch and a half about the ground. Don’t worry, we have a plan!
Along the backside, we installed 3/8″ salt and pepper granite rocks that go from our fence to the landscape edging. This created a level transition from the rocks to the turf. We also used the same weed barrier we used under the artificial grass to prevent weeds from growing. We filled in around the trees as well as with the granite rocks but didn’t use the weed barrier. We want to allow the roots of the trees to breathe.


Along the front, I installed pavers along the edging. By digging down, tamping and securing the pavers, I was able to get them flush with the landscape edging. I also installed them at a slight angle so they became flush with the ground as well.

TIME TO ENJOY!
After all of that hard work, it’s time to enjoy the newly installed turf. With weather delays, the glue mishap, and going through this process for the first time, it took us a few weeks to install the turf. This also has to do with tackling such a huge area and creating a curved shape with a path along the back. Go big or go home, right!?
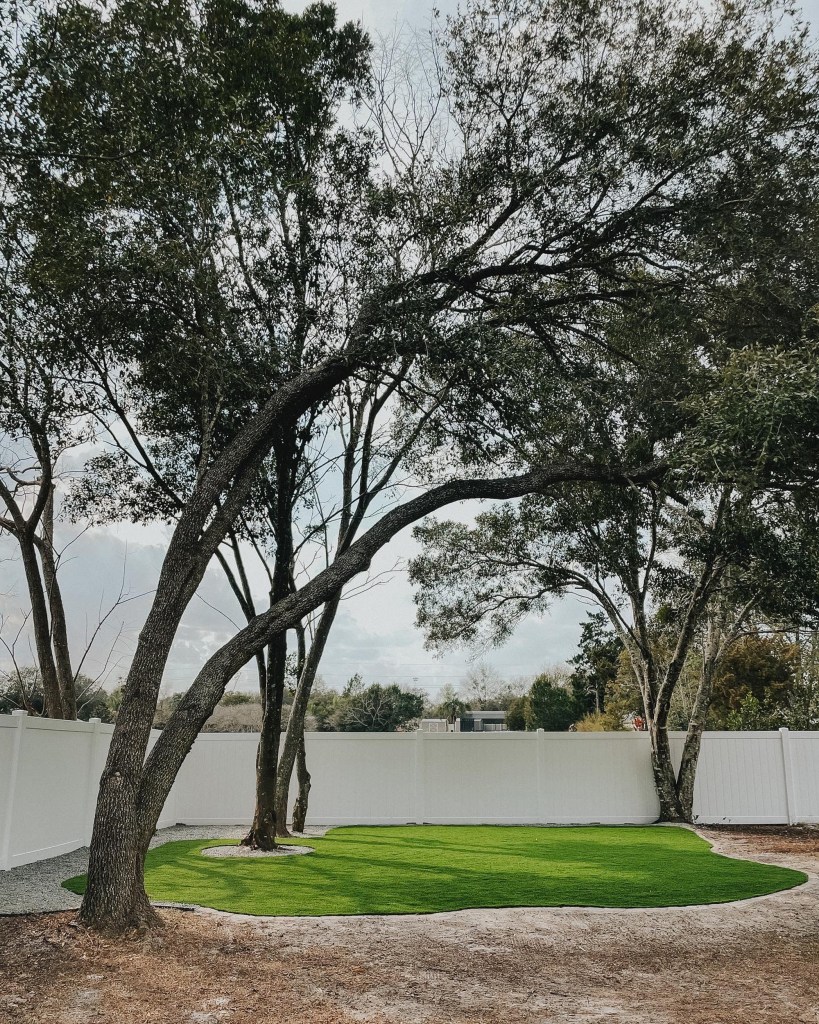

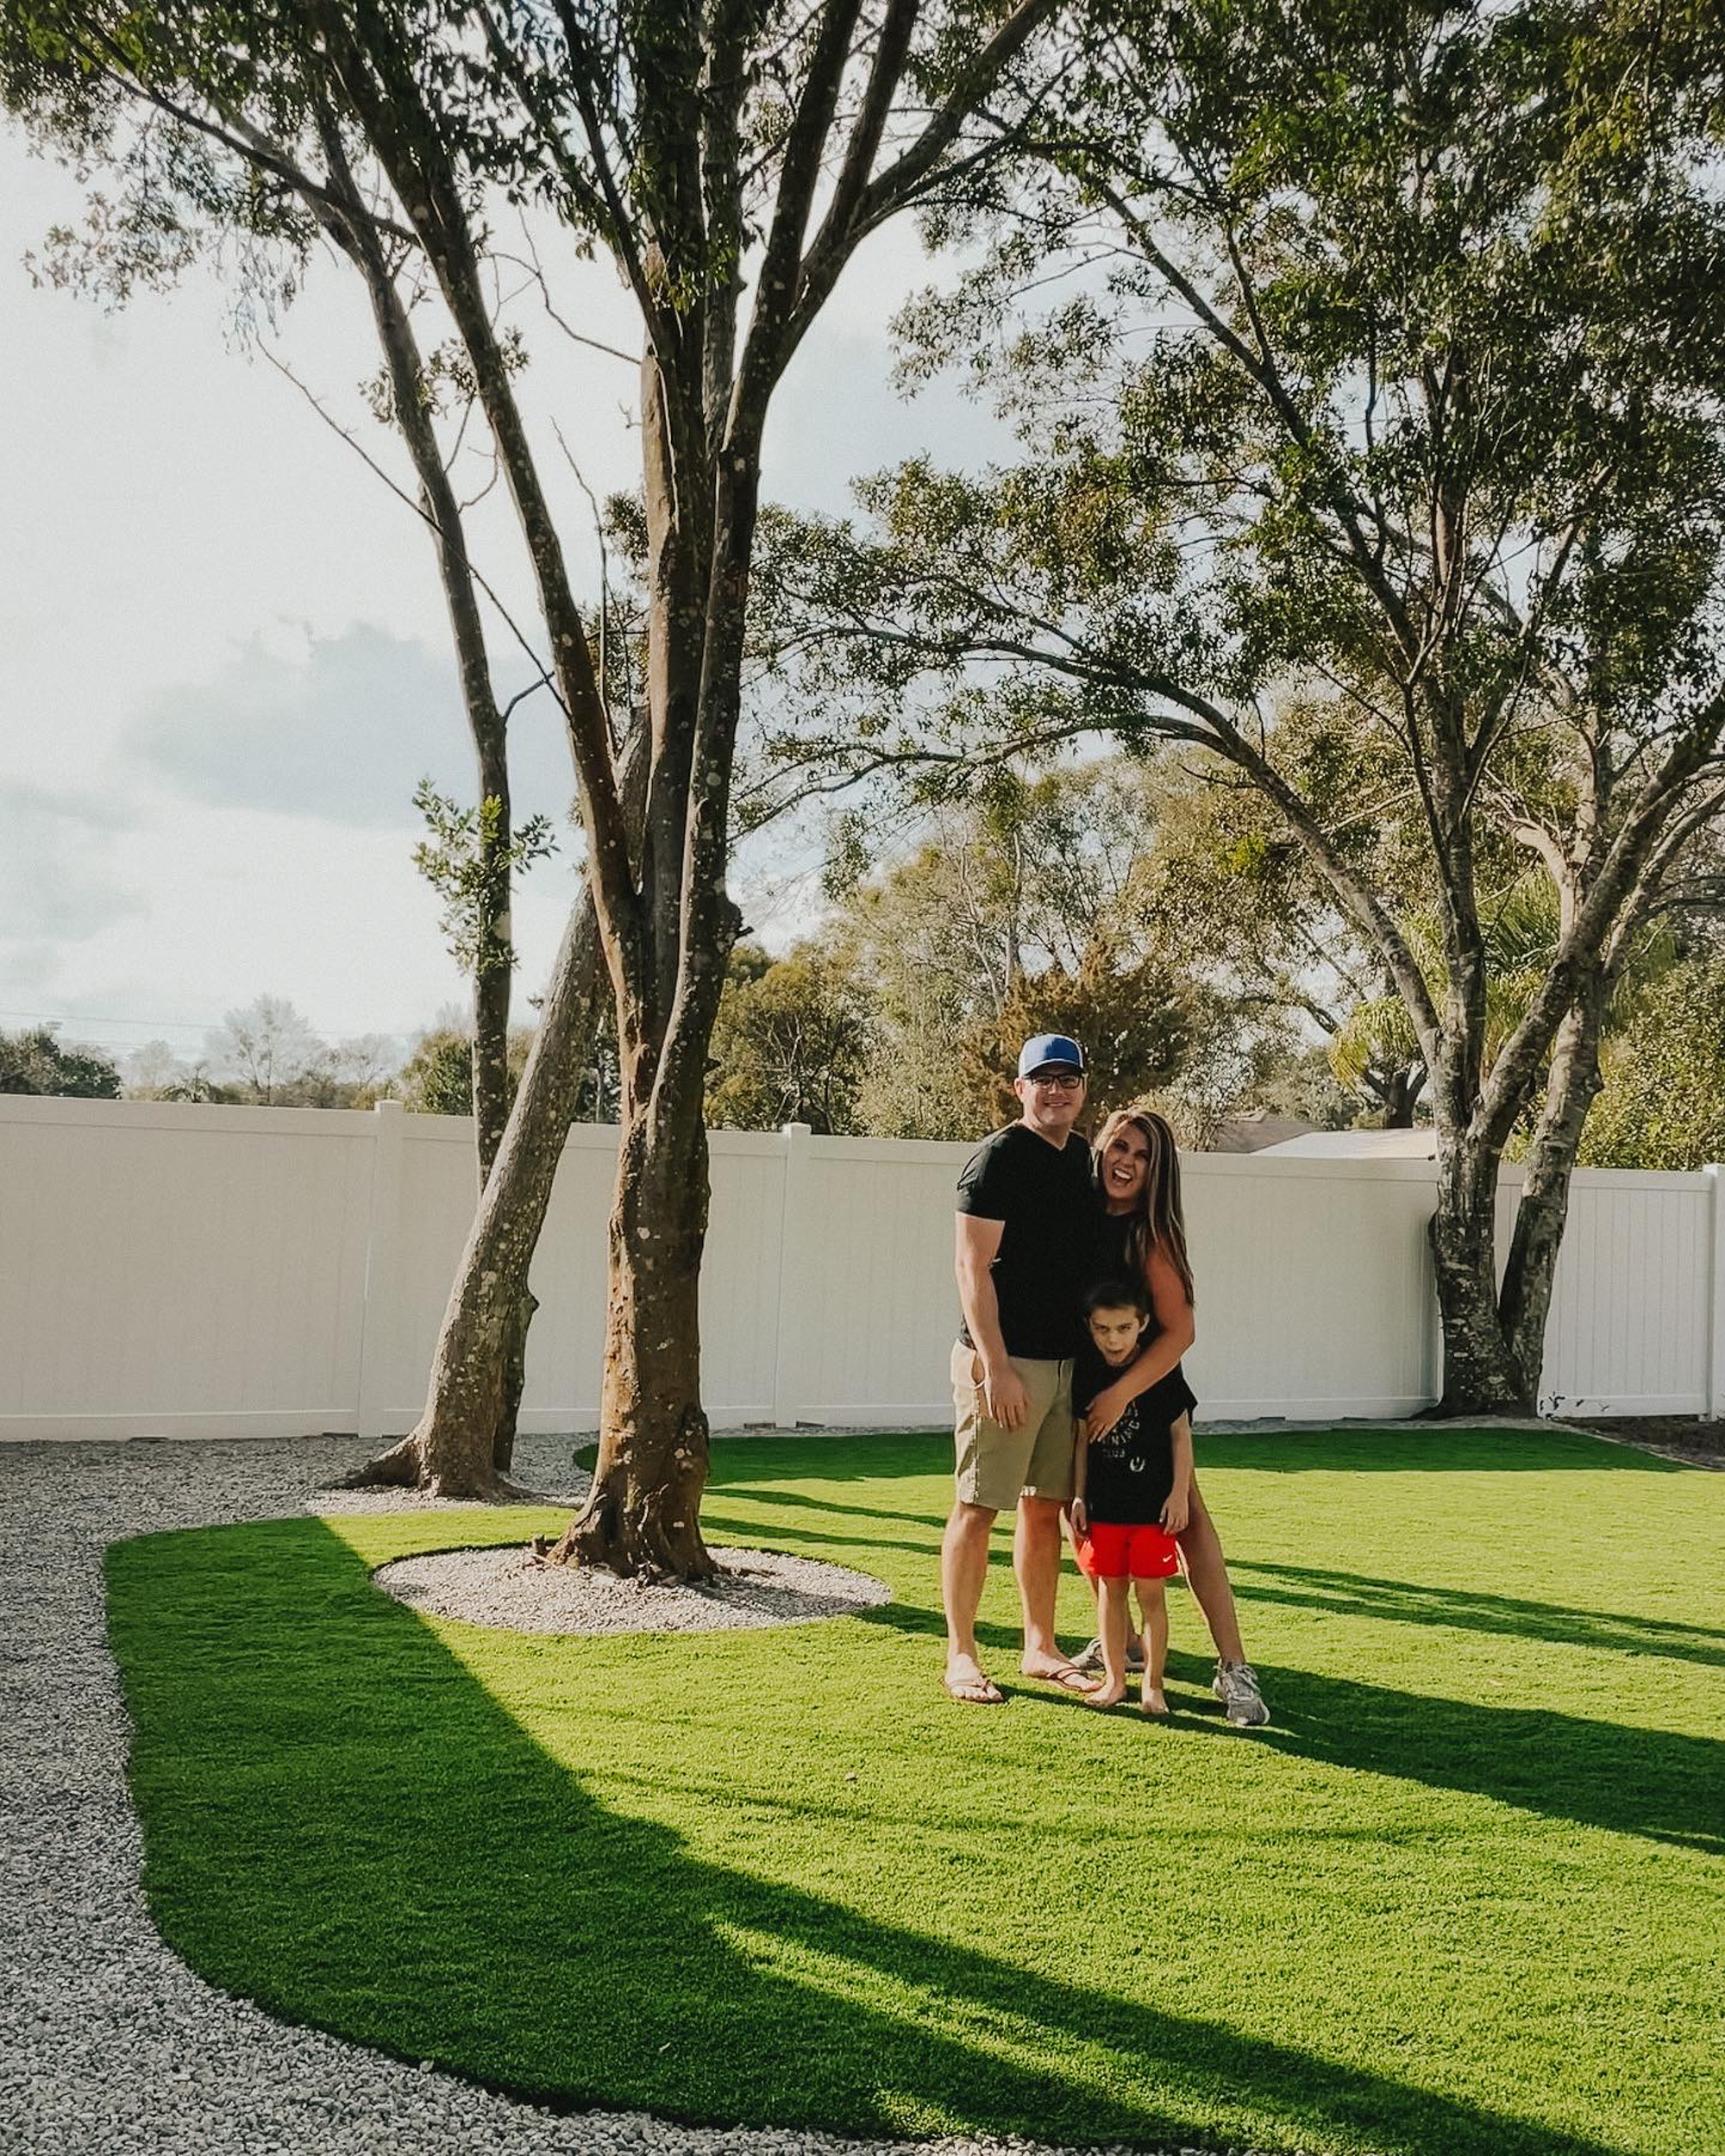
I can’t believe the dramatic and beautiful difference it has made for this corner of our yard. Something we’re certainly proud of and can’t wait to use daily as a family. Our backyard is truly becoming an extension of our home. Want to see what we ended up putting on the turf? Head to this blog post here to see that full reveal.

Common Questions About Installing Artificial Grass Yourself
We’ve gotten tons of questions since first revealing our artificial grass installation DIY. Keep reading for answers to some of the most common ones.
How much does artificial turf cost?
One thing that I like to do is include a cost breakdown with projects. Especially with one like this where you may have no idea the cost of it since it isn’t something you see every day in the DIY world. Here’s the total that we spent and then I’m going break it down even further to the price per square foot. We installed white a large area of turf so by breaking it down by the square footage, it will also give you an idea of what it will cost for an area in your backyard that may be smaller or even bigger.
No-dig edging: $88
Additional spikes: $30
Road base: $280
Plate compactor rental: $40
Weed barrier: $60
Artificial grass: $1,900
Turf tape: $78
450 galvanized nails: $66
65 pavers: $150
3/8″ salt and pepper granite: $250
Infill: $135
Total: $3,077
Total per square foot for turf area: $3.41 ($2,677 in turf materials divided by 785 total square feet.)
**Anything not listed (i.e. rope, 4 x 4, hand tamper, etc., are items we already had on hand).
Can you put artificial turf directly on dirt?
While you technically can, it’s definitely not recommended! Not taking the time to properly prepare your yard for turf means that all your hard work installing artificial grass could soon be destroyed by pesky weeds and other plant growth. It’s also much harder to properly level your turf without a solid base. I would never install artificial grass without removing any existing grass, adding road base and using a weed barrier.
Can pets use artificial grass?
Yes, they can! While you may want to encourage any furry friends to go to the bathroom in other areas of your yard, it’s very easy to clean if they do use the turf. Simply remove any…solid matter…and then spray with a hose to clean.
Does artificial grass get hot in the summer?
This definitely can happen depending on your climate, but we’re in Florida and we haven’t had any issues with it getting too hot. If yours does feel hot, however, you can simply spray it with a hose to cool it down a bit before playing.
Can artificial turf be damaged by rain?
Not at all! It’s designed to withstand all weather conditions. In fact, artificial turf is very permeable, allowing water to flow down under the turf and into the road base so your yard won’t flood.
Install Your Own DIY Artificial Grass!
Ready to upgrade your backyard and add your own artificial turf? Follow along with the steps in this post and be sure to tag me when you share about your project!
Come join us on our other social channels for even more behind the scenes.
Follow on TikTok || Follow on Instagram || Follow on Pinterest || Like on Facebook

Amazing details! We are doing this when it warms up. Thanks for figuring it out for us.
[…] leads me to why we decided to install artificial grass. You can see the artificial grass install tutorial here. From a visual standpoint, I knew I wanted to go with turf. It helps to define the space and stays […]