


How to Paint Black Window Frames and Panes

A few months ago we sat down with a company in our home to get a quote for a few windows to be replaced. We wanted to replace a few at a time starting with the windows in the front. Oh, and did I mention we wanted black windows? When the quote came back at $28,000 (yes, you read that correctly) we were shocked. It was a higher priced company but it got me thinking: why can’t I paint our windows black until we’ve saved for the right moment to replace all our windows.
We pushed that idea out of our minds the following months because we didn’t think there could be a paint suitable for this type of project. We would need something that would last and a paint that can also be used on the exterior side of our windows. With us painting our home in the near future, we also need the windows to be black on the exterior.

I started noticing on Instagram some of my best gals spray painting their window frames. OH, how I craved that look of black windows for our home. For interior windows, it’s perfect! But once again I needed something to do both if I’m going to spend the time tackling this project. That’s when I finally discovered Pro-Industrial Multi-Surface Acrylic by Sherwin Williams. It’s a contractors grade paint that’s made to adhere to the slickest of surfaces while maintaining durability.
**Find the video at the end of how we painted the windows as well.

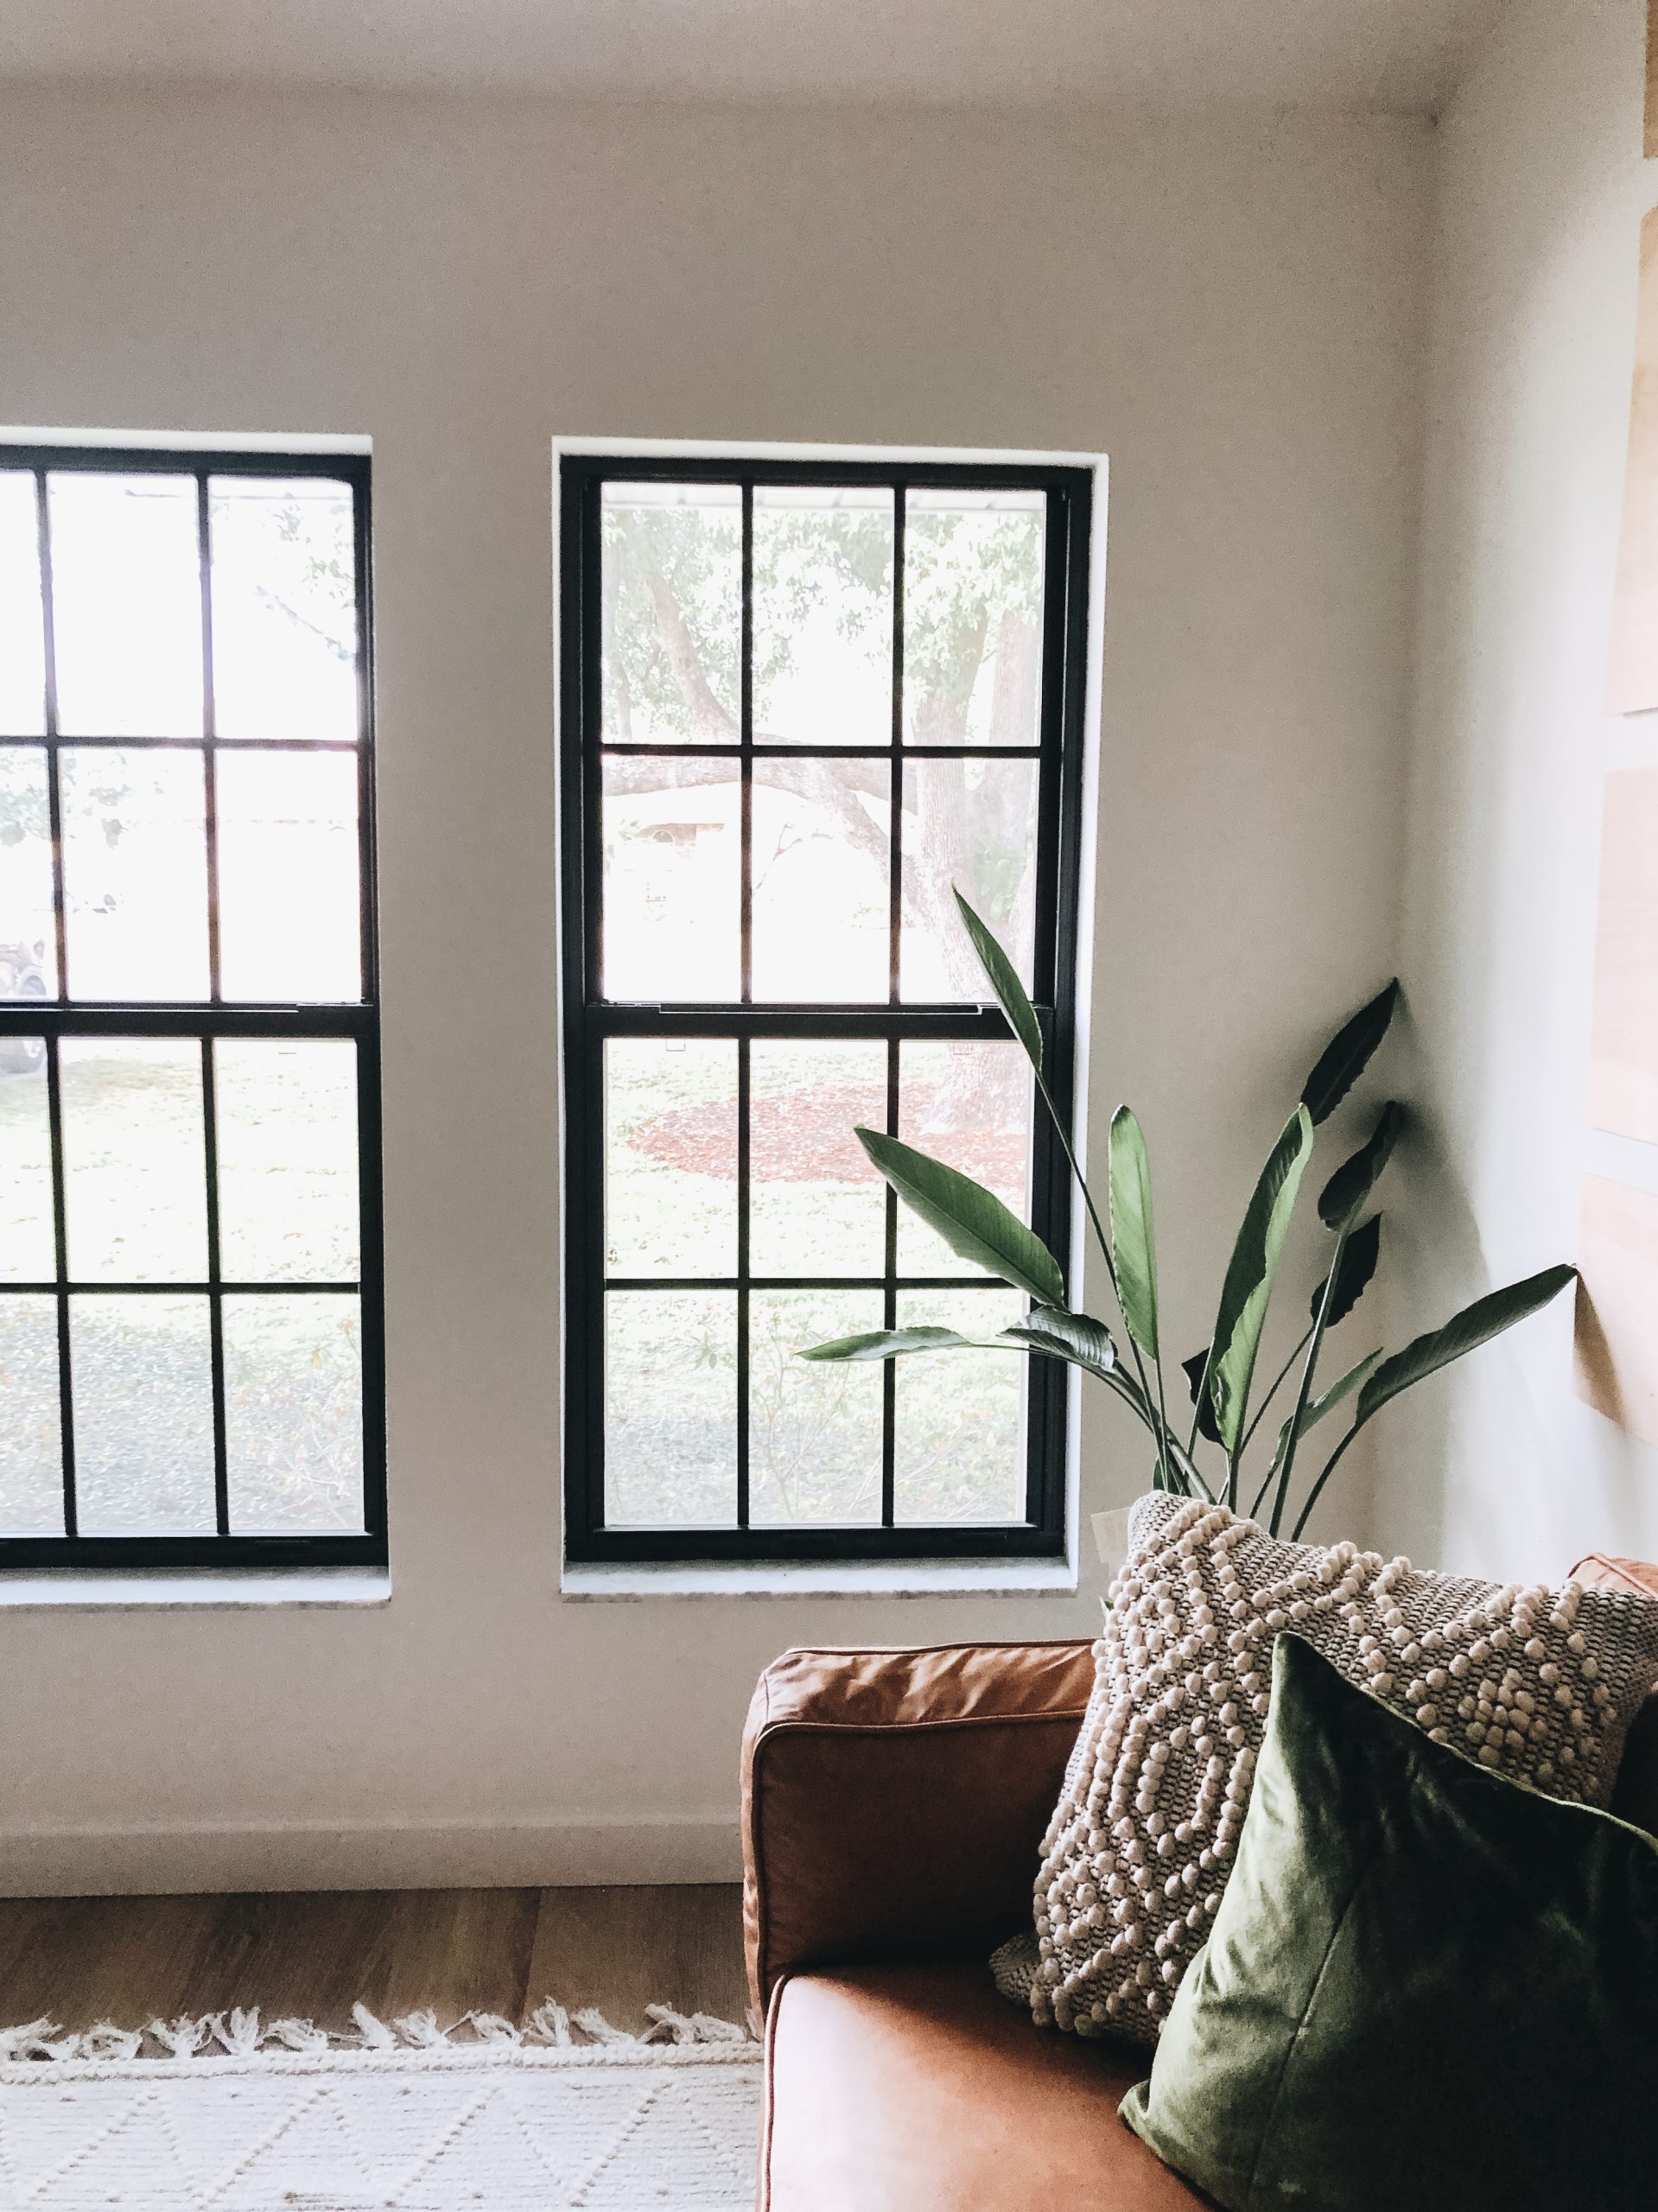
So guess what I did? I PAINTED MY WINDOWS BLACK AND I LOVE THEM! That totally deserved all capital letters because look at this before and after. I’m still in shock at the difference paint made tour windows.

So, you’ve already made it this far and you’re probably wanting to paint your windows as well. There are several ways to do this: spray painting, with a paintbrush or with a paint sprayer. Today I’ll be showing you how to paint your window frames using a paint sprayer. I went this route because I love the finished and flawless look a paint sprayer gives. And to answer a question I’m sure you have right now: yes our windows still open without any issues or paint peeling!

Here’s What You’ll Need
- Frog Tape (green)
- Painters plastic sheeting with tape attached
- Regular plastic sheeting to cover nearby furniture
- to cover the floor – you can also use old towels
- Paint sprayer (we used the HomeRight Super Finish Max)
- Pro Industrial Multi-Surface Acrylic by Sherwin-Williams (we picked Black Magic by SW for our black)
- Paint mask
Optional:
- Electrical tape to create or hide current grids (budget friendly option)
- Pvc strips for a realistic look to create or hide current grids.
How to Paint Window Frames Black
The longest and probably the most annoying part about this project is all the prep work. There is a lot and you must take your time. But I promise you it’s 100% worth it! That moment you peel back all the plastic and painter’s tape is so satisfying seeing your brand new windows!
Prep Work
Using the green frog tape, you’ll tape right along the edge of the interior window frame. In other words, you’ll be applying your frog tape on the glass as close to the frames as you can get it. If you have a top and bottom section to your window like mine, you’ll do this to both.
You’ll then apply the frog tape to outer side of the window frame. This is going to give you that crisp, clean line without getting paint on the glass or the drywall after applying the paint. This step is crucial and so important to take your time!

Now that you have the green frog tape applied, you’ll need to further protect the glass and the outer edges/walls around the window. Since you carefully and precisely applied the frog tape first, you can be a little more care free with the plastic sheeting with painters tape attached. I attach the roll of plastic at the top of the glass pane making sure the blue tape is overlapping the green tape.

Once I have it pressed securely down, I cut the width down to size and unroll the plastic sheeting. You’ll notice how it magically clings to the window which makes this product very easy to work with. Secure the other three sides by taping them down with the Frog Tape.
Tip: As you’re applying the plastic, don’t cover the green tape on the other three sides entirely. Go about halfway onto the tape that’s applied on the window. You want to cut the plastic to where it leaves a small space so that when you tape the other three sides down the tape has something to stick to. Too much plastic and you’re tape won’t have anywhere to go.

Just like you taped off the outer edge of the window frames, you’ll apply the painter plastic along this green tape as well. This was you can stretch the plastic out over the walls to protect from overspray. You may need to apply additional plastic in ares that are covered. This will also be a great time to drape additional plastic, old towels, etc. over surround furniture you don’t want paint dust getting on.


Time to Paint
The moment you’ve been waiting for: TIME TO PAINT! Here are a couple things to note about this Multi-Surface Acrylic Pro-Industrial paint:
- For interior and exterior use.
- Engineered to provide high-hide (in one coat) and stain resistant
- Provides alkyd-like hardness
- Dries fast with dry fall properties. Which means as you apply it with your paint sprayer, the paint dries rapidly has it falls. Because of this, it can be swept up.
- Self-priming to multiple surfaces
- Excellent adhesion to slick and glossy surfaces (hello aluminum and vinyl window frames)
- Can be applied by paintbrush, roller or paint sprayer
- Can be color matched in a variety of colors. We went with Black Magic.
Of course, depending on the paint sprayer you’ll be using, your paint prep might look a little different. Since I’m suing the HomeRight Super Finish Max, I just have to attach the right tip, pour in my paint and start spraying. Thinning isn’t required.

IMPORTANT: I highly recommend wearing a paint mask when using this paint. Since it is mainly acrylic based, the chemicals used in this paint are very strong. Especially since you can’t really open windows during this project since you’re painting them.
Before you start, test your paint flow on a scrap piece of paper, wood, etc. You want to make sure you have a smooth finish. Then run your hands over all of the tape you applied on the windows. The tape likes to pop loose sometimes. Then start applying your paint in slow, even strokes. I found it best to apply the paint on all the vertical pieces first and then switch the nozzle for the horizontal pieces. Make sure you get into all the grooves and look at the window frame from all angles to make sure you painted every square inch.

Of course, depending on the paint sprayer you’re using, determines the amount of overspray. For the HomeRight Super Finish Max ,the overspray isn’t bad at all! You will notice paint dust that can easily be wiped, swept, vacuumed, etc. You can see it in the image below on the plastic sheeting. But remember, one of the great things about this paint is that dries fast as it falls so that it lands as paint dust.

This paint only takes one coat but you still need to go back and look for spots where you didn’t apply enough. Use the light on your phone or grab a flashlight to move across every inch of the windows. Lightly and quickly spray the spots that need a little more paint. It’s easier to check for that now than to notice it later.

Once your windows are fully covered with the paint, you’ll want to go ahead and remove all of the plastic and painter’s tape. The last thing you want is the paint to stick to the tape and ripping off the window as you remove everything.


Applying with a Paint Brush
I wanted to try painting one of my windows with a paintbrush just to see how it went on, dried, etc. Is it an option? 100%. Is it my preferred method? Nope. After painting one window, it took three coats of paint to get a solid look and the finish wasn’t as great as a paint sprayer. There weren’t any strokes but for me you can’t beat that finish that a paint sprayer gives.


DIY Window Panes
One of the questions I got on repeat over on Instagram stories is how I was going to cover the white window panes. In a dream world, they would be on the outside of the glass panes where I could just paint them. So, if you’re one of the lucky ones with them on the outside of the glass, you’ll just tape around them while taping off the rest of the window frame and paint them all together. BUT! If you’re like me with them between the two glass panes, you have to be a little more creative to make them appear black.
Electrical Tape

If you’re wanting to stay within a budget, electrical tape is pretty magical with this. You’ll just apply the black electrical tape over the white panes being careful to keep it in a straight line and to not stretch it out too much.


I found it easier to extend the electrical tape past the windows so that I could get a cleaner cut. Don’t be afraid to readjust! This seriously only takes a few minutes and is a great way to add “window panes” if you currently don’t have any but love the look of them.

PVC Strips
Another alternative is using pvc strips and cross pieces for more of a realistic look. I found these from New Panes where you can order in the quantity that you need. These pvc strips from New Panes can be painted so I used the Pro-Industrial paint to match the window frame color. These are measured, cut, and applied to the windows with either double sided tape or with blade clips.
The magical thing about these pvc strips is that they can hide the white panes and they can also create panes for people who didn’t have them at all. I’m actually seeing a lot of this! Your basic looking window and then adding window panes to step it up a notch visually. You can watch the video below to see my installation process with these pvc strips. Watch the video below to see what you need for this method and how they work.

How many of you are about to go running and paint all your windows black? I would totally jump in and help if I could. I would love to see your reaction when you peel back the tape and plastic and see your new black windows for the first time. Make sure to tag me on your socials if you try this and share! Get ready to have your mind blown. You can also watch the full process of prepping and painting the windows below.


Liz, thank you for sharing this very detailed blog post on painting black windows. Love how they came out! We have over 30 windows in our home & was quoted $90K YIKES! I wish our windows didn’t need to be replaced because I would definitely try this.
Wait…did you paint the inside too…? Ie when you open the window, the inside track of the frame, is that section is still white?
Wondering the same!
So far we’ve painted the interior side and the exterior side. The next step will be painting all of the tracks.
You did an amazing job!!! Looks great. You mentioned you used tape on the top and PVC on the bottom. Is that because the windows won’t open/close with PVC on both? Thanks!!
Hi Robin! We used PVC on the interior side of the windows. The exterior we did the electrical table due to weather elements. With our style of windows, they open fine with the PVC!
When you open your window or your sliding glass door can you see the white frame still where the window overlaps? Or did you take the frame off some how to paint that portion of the window? This seems like more of an issue in the sliding glass door that will be opened more frequently.
Hi! If you tackle this project, you’ll paint where you can where the tracks are exposed. We still have to do our windows but we did do the sliding glass doors. We didn’t have to take them off!
Do you have double pane windows with the white/black frames in between each pane?
We do!
Hi did you paint the exterior frame also? If not what does it look like from the outside. I would love to do this to my windows but I only want to do the inside. Can you see part of the black from the outside.
Thank you
Hi Lori! We painted the interior and exterior. We did the interior a few months before exterior thought and couldn’t see the inside black paint.
Were these wood or metal windows? I want to do this to our honey oak windows to save thousands of dollars but I want to know it will work before going through ALL that work!!
Hello! My windows are metal.
Have you ever done this with wood windows? Or known of a success story with wood windows? ☺️
Hi, I love the fact that you were brave enough to tackle painting your own window’s. My question is couldn’t you use the pvc panes inside as well?
We used the PVC panes inside and the black electrical tape outside. I mainly used the electrical tape on the exterior due to weather.
Several have asked but you haven’t answered. How did the paint hold up to opening and closing the windows/locks? I’d hate to go to all this trouble just to have it ruined when we open the windows later
Hi Jennifer. I answered it in the blog post! They open fine without any issues (at least for me).
How did you get the paint? It appears to only be available for purchase to professionals (contractors, builders, designers, etc).
I went into my local Sherwin-Williams stores and asked for it. They were able to mix it for me without a problem! I’ve also seen others use spray paint instead if that helps.
[…] about the windows. I used the Pro-Industrial paint by Sherwin-Williams on the interior windows (you can read that tutorial here) and loved the results. I confirmed with my local paint store it can be used on the exterior and […]
How did you pant the inside grids (in between the glass frames)?
I went over it in the blog post with two solutions on covering them up!
On the exterior part of the window did you paint the caulk too?
I didn’t!
Does the windows still opens and close appropriately? Also, by opening the window how does the paint holding up in those areas?
Hi! For us, they open and close just the same without any issues with the paint flaking/peeling/etc.
Looks Awesome! How were the locks after painting?
Thank you! They work just like they did before!
Did you have vinyl windows or are they metal? Looks amazing girlfriend!!! Currently looking into painting our vinyl windows black.
Hi! Thank you! We have metal windows.
Thank you for posting this! I have been wanting to paint my windows since I got in a bit late with my new build. The builder already ordered white windows so I only paid to replace the front facing windows. My GC said he’d buy the paint for me at contractor price. Thank you for the tip!
A couple of questions. Do you have a video for painting with liquid tape or have a link to one? Can you use liquid tape on vinyl? And finally, what paint did you use to paint the PVC?
I can’t wait to try the wood slatted wall too!!!
Hi! You can find a lot of videos with using these products over on my Instagram highlights: http://www.instagram.com/withinthegrove . And I used the same paint on the PVC as I did the windows!
How does the paint hold up after opening and closing your windows multiple times? That’s my main concern about painting my windows.
I’m curios about this too. Did you paint the locks and everything?
Everythinng visible was painted and works fine!
I haven’t had an issue with any peeling/flaking!