


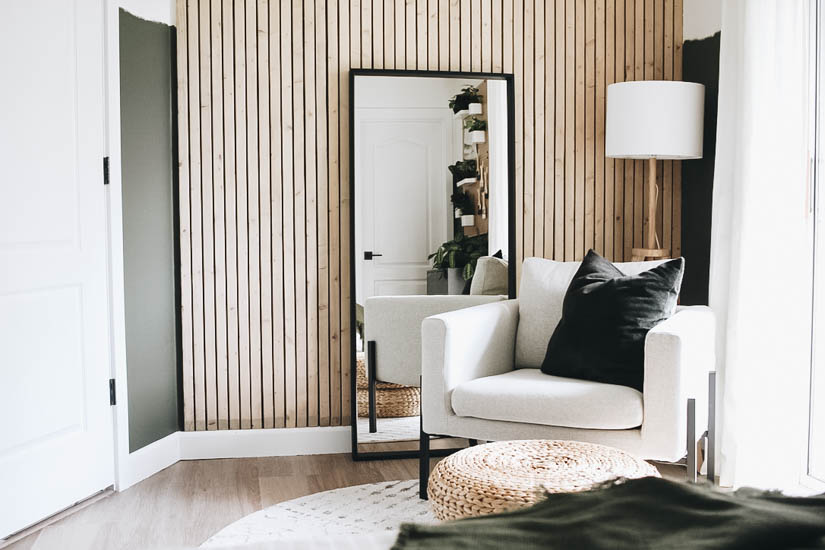


When I started designing the guest bedroom, I knew I wanted a feature wall in the space that highlighted the seating area. Do I go with a bold paint color, a large piece of artwork or just keep it simple? I saw a few wood slat walls floating around on Pinterest and fell in love with the look. Needless to say, I decided to use this as the design and it has become my favorite part of our guest bedroom. So today I’m sharing with you how to install your own DIY wood slat wall.

Materials Needed for a Wood Slat Wall
- Wooden slats – we used 1 x 2 common board
- Orbital sander + sandpaper (depending on the wood you use)
- Stain / Paint
- Tape measure
- Miter Saw
- Jig Saw
- Liquid Nails
- Brad Nailer
** This post contains affiliate links.

To even begin this project, we had to decide which wood we wanted to use. I knew I wanted to use 1 x 2 lumber but debated between common board and pine. The pine isn’t as knotty and doesn’t have to be sanded extensively. Common board has a few knots here and there and needs to be sanded quite a bit to get it to a smooth finish.
Why is common board even an option? Because if you’re looking for a way to make this a budget friendly project, common board is a very affordable option if you’re willing to put in some work. We went with this option and it saved us over $200. If you’re staining your wood slat wall, regardless of price, pine may be your best option because of the beautiful finish. Just a few things to keep in mind.

Another tip to save you time: measure the wall where the wood slats are going and determine how many boards you’ll need while taking into consideration the spacing between each board. Once we got our boards, we placed them on the ground to see if I liked the spacing. I then realized I didn’t like the wider spacing and ended up going back to the store for more slats.

How to Install a Wood Slat Wall
You’ll want to consider painting the wall the wood slats are going on not matter if you’re painting or staining the slats. If you’re painting your slats, paint the wall the same color. Even though I stained ours, the first thing I did was paint the wall black. I wanted that bold color to pop through between the slats once they’re installed. The other color I would suggest is white for a light and airy look.

Step 1: No matter what type of wood you decided to go with, you’ll want to give all the pieces a good sanding. For nicer pieces of wood (poplar, oak, pine, etc.) this will be very quick. Now, if you’re using a nicer pieces and you’re painting them, go ahead and skip to step 2.
For common boards like we used, you’ll be spending quite a bit of time sanding to get them to a smooth, beautiful finish. Start with an 80 grit sandpaper, then a 120 grit and finish with a 220 grit. The 80 grit really works the magic with getting it down to the natural, smooth wood. Then the 120 and 220 grit allow you to work up to that really smooth finish.

** I will say, if you have it in your budget to buy nicer wood, do it. I spent so much time sanding which turned this into a 4 day project. It was worth it because I saved so much money but you have to take the time spent prepping a piece into consideration when preparing for a project.
Step 2: It’s best to stain your boards before attaching them to the wall. But if you’re like me and want to adjust the stain color a bit, it’s okay to stain with them on the wall as well. This is also where I tell you to test, test, and test some more the stain colors you possibly want to use. We ended up sanding down all of our pieces after using a color that was too dark for us. We did test it but didn’t realize how dark it was until we got all the pieces together. Just something to take into consideration!
Stain combo we used:
1 coat Weathered Oak
1 coat Fruitwood
3 coats Pickled Oak

Step 3: Now for the part you’ve been waiting for: attaching the wood slats to the wall! If you’re using a 1 x 2 like us, you’ll want to decide if you want the 1 inch or the 2 inch side showing. It all comes down to personal preference. We decided on the 2 inch side.
You’ll want to measure for each wood slat you’re attach to the wall because you can’t guarantee that the height from the floor to the ceiling is exactly the same all the way down the wall. It is also key for your very first piece to be as straight as possible. This will ensure that all the other pieces will be straight and not be attached at a slight angle.

***If you’re removing your baseboards so that the wooden slats go all the way down to the floor, you’re just measuring for the height and attaching. If you’re attaching the wood slats to rest right about your baseboard, you’ll need to take one extra step. Since the 1 x 2 boards will extend past the baseboards, you’ll want to cut the end at an angle so it blends a little better. Take a look at this before and after:


Typically, you can start with trying a 45 degree angle and adjust your angle from there until you’ve found the angle cut that works best for your baseboards.
As you go to attach each piece, a small amount of liquid nails going the length of the board. Attach the slat to the wall using a brad nailer with nails long enough to go through the slat into the wall. We went with 2 inch nails.


Step 4: Determine your spacing between each wood slat. You may like a wider space where you can use a 1 x 2 piece as your spacer. Personally, I love a smaller space and ended up taping to large painter sticks together to create my spacing.
Starting at the top, you’ll place the spacer flush against the slat you just attached to the wall and then place another slat pushed up against it on the other side of the spacer. Nail the slat into place starting at the top and move the spacer down as you work your way down with the brad nailer. This will make sure your space is the same with all the way down.

TIP: Outlets: You may encounter outlets when installing wood slats. Sometimes you’ll just have to cut a wood slat into two pieces so that they fit on top and at the bottom of the outlet. You may also have board that needs a small piece cut out from the side to fit snuggly around an outlet. This can easily be done with a jigsaw.


Step 5: If you went the route of staining, you can stand back and admire your new wall! I personally didn’t fill in the nail holes due to the wood filler being a different color than the stain. I honestly don’t even notice them.
Now, if you’re choosing to paint our wood slats, you will want to fill in your holes first with wood putty. Once that’s done, you can paint your slats. This will probably be easiest with a paint sprayer to get into the spaces.


This is the perfect weekend project to tackle that will completely transform a space in your home. I hope this inspires you to give it a try! I honestly believe that every home should have a wood slat wall. And if you’re a visual person like me, here’s a video showing you how we created our wood slat wall.

Let’s keep in touch!
We have a brand new community over on Facebook, House & Home, where we’ll be chatting, sharing, and helping one another when it comes to home decor and projects. Come join us! Check it out here.
Like on Facebook || Follow on Instagram || Follow on Pinterest

[…] This is an amazing easy wood slat wall that even beginners can make. the materials that you need for this project are wooden slats, an orbital sander, stain, tape measure, a miter saw, a jig saw, liquid nails, and a brad nailer. Gather the supplies and see how everything can be done in your own beautiful way. Tutorial […]
[…] some dimension to your space with some wooden slats. It’ll bring unique vibes to a room that would otherwise be filled with plain […]
[…] Wood slat walls are similar in appearance to shiplap, but can be cheaper to install. You can find the DIY instructions at this link. […]
[…] Wood slat walls are similar in appearance to shiplap, but can be cheaper to install. You can find the DIY instructions at this link. […]
[…] DIY Natural Wood Slat […]
This is absolutely beautiful! My husband and I are wanting to do this to a smaller wall in my son’s room. If you don’t mind me asking…how much did the slats for this wall cost? Thanks:)
[…] You can also check out the full reveal of the guest bedroom and the DIY Wood slat wall. […]
[…] Within the Grove | Bedroom Accent Stained Slat Wall […]
[…] Within the Grove | Bedroom Accent Stained Slat Wall […]