• Home
  • ABOUT
  • WORK WITH ME
  • Paint Colors
  • Shop Our House
    • Guest Bedroom
    • Front Living Room
    • Living Room with Fireplace
    • Previous Second Living Room
    • Current Playroom
    • Prior Playroom
    • Dining Room
    • Laundry Room
    • Oliver’s Bedroom
    • Guest Bathroom
    • Covered Lanai
    • Patio
    • Master Bedroom
  • CONTACT
    • Facebook
    • Instagram
    • Pinterest

Within the Grove

Join the list to receive occasional news and special updates!

DIY Raw Edge Paint Line

May 11, 2020

When I was designing the guest bedroom, I had a few design choices I had in mind when it came to using a bold paint color. I had painting the ceiling black, color blocking halfway up the wall, and color blocking halfway up the wall but also painting the doors/trim the same color as well. I was wanting something out of the box for us. The basic color blocking was too simple, the ceiling Ryan wasn’t a fan of and literally painting the room half a color didn’t quite feel right for the space. That’s when I decided to get a little edgy (See what I did there?) and decided on a raw paint line.

What is a raw paint line? It’s a fancy term for an unfinished paint line. Instead of having that crisp, straight line there’s an unfinished line where the roller marks are shown. I know, sounds crazy right?! There was a huge debate about it on this Instagram post and I received messages doubting the design choice. But I had this gut feeling it was going to be exactly what this space needed and went for it. Without the furniture and decor in the room, I liked it. But when the entire room came together I fell in love with it. This space wouldn’t be the same without it.

I learned a few things when creating this type of wall design and would love to share with you my process. My biggest takeaway: don’t think too much about it. Here’s how you can create your own raw edge paint line in a space in your home.

What You’ll Need

Tape Measure
Level
(Skip the first two things if you have a laser level)
Pencil
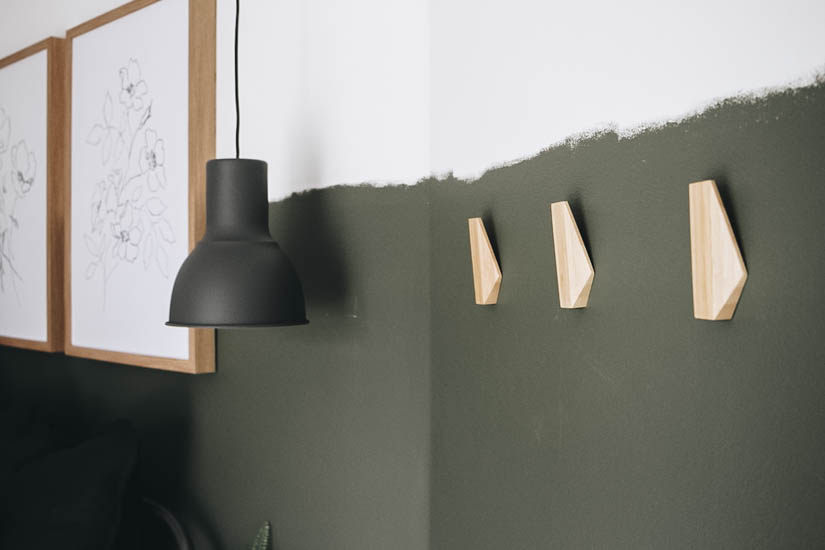
Paint color of choice (I used Dark Olive by Benjamin Moore)
Regular 9 inch roller cover
9 inch roller
Mini 4 inch roller cover
4 inch roller

The How-To

You’ll first want to decide how high you want your raw edge paint line to go. With average height ceilings, my paint line went up to about 64 inches. Once you know the height, create a level line going around the perimeter of the room at that height. I accomplished this by cutting a piece of shipping paper at 64 inches and marking that height around the room. Then I used a level to connect all the lines forming my straight line. An easier way? Using a laser level if you have one.

You might be wondering why you need a line around the room if you’re creating a raw edge paint line. Well, you still want it even overall! You don’t want to look at your wall and see that the right side is a foot higher than the left side. The line basically keeps you level while create areas that may stay a little lower or go a little higher than the line.

Next you’ll start painting your wall starting at the bottom and working your way up. Stop when you’re about a foot away from the line. This will give you room to play around with your raw edge line and get into your groove of how you like the line to look. The last thing you want to do is paint right to the line and then all of a sudden it’s higher than what you originally wanted because of getting the line design to where you like it.

Now, as far as creating the raw edge paint line, I used a regular 9 inch roller and a 4 inch roller. Starting with the 9 inch roller, slowly roll up to the line until there are a few inches left to work with under the line. At this point, it’s okay to have a normal amount of paint on the roller.

As you start working to the line, you want less paint on the roller. To the point where it’s getting paint on the wall but it is super blotchy from it appearing to be dry of paint. I hope that makes sense! This is where your creative freedom comes into play. Make some areas go slightly above the line, then dip down a dip, then have one stop shoot up, etc.

The big roller helps to get your larger areas that you semi-want the same. The 4 inch roller is the next best step to add a bit more “raw edge” detail and is easier to control. You barely want any paint on this small roller as well.

With trying this raw edge look, I discovered there are two final looks you can go with. There’s the clean edge where the line is uneven but it’s still semi-crisp. Refer to the image below. See how it’s uneven but you don’t see any of the splotchiness of the paint roller? You’ll achieve this by kind of pressing down on the roller as you end the roller stroke so that more paint ends up on the wall. This make work for some but I knew I wanted mine a little bit messier with more of that unfinished look.

For more of an unfinished/feathered out look, you’ll do the opposite of the cleaner look by not applying as much pressure and lifting up the roller towards the end of the roller stroke. This doesn’t mean the entire raw edge line has to be feathered out. You could do a mixture of clean and feathered out areas.

It really just comes down to your personal preference. I’m not the first one to try this type of unfinished paint line so the best thing you can do is look some other spaces up on Pinterest that have done this. You’ll know right way, visually, what kind of raw paint edge you like. It can also help guide you in creating your pattern as you move down the wall. For example, use my raw edge lines around my room to know when to move a little up, on and right below the line you drew. I’ll make sure to post a lot of photos below for you to reference.

That’s pretty much it! It’s a straight forward project and pretty easy. If you overthink it, it will become a frustrating and not as fun. So turn on some of your favorite music, grab your paint and start creating! Make sure to tag me if you try this. It always brings me so much joy seeing you try the things we’ve tried in our home.

You can also check out the full reveal of the guest bedroom and the DIY Wood slat wall.

Come join us on our other social channels for even more behind the scenes. 
Like on Facebook || Follow on Instagram || Follow on Pinterest

Share this:

  • Click to share on Twitter (Opens in new window)
  • Click to share on Facebook (Opens in new window)

Related

Filed Under: Uncategorized

« Playroom Mood Board and Design Update
Quick and Simple Outdoor Refresh »

Leave a Reply Cancel reply

Your email address will not be published. Required fields are marked *

This site uses Akismet to reduce spam. Learn how your comment data is processed.

Looking for something?

withinthegrove

This pretty much sums up the progress of making 25 This pretty much sums up the progress of making 250 cement tiles. But I’m halfway through! The moment I finish the last tile is the moment I knock out the old tile. Let’s do this!
Time to bet on my DIY skills! I’m attempting to Time to bet on my DIY skills! I’m attempting to make my own cement tiles for our outdoor front door area. Mainly because of what I’m saving vs buying them. Won’t be saving much on time but I’M MAKING TILES! Never thought I’d hear myself say that. Make sure to follow along because if this works out, I have a feeling a lot of you are already eyeing a spot in your home to try your own DIY cement tiles. 
 
Thank you @vintagerevivals and @abby_roadhome for showing it’s possible with your gorgeous bathroom tiles! 

#CementTiles #DiyCementTiles #DiyProject #DIYonABudget #DIYProjects
We got the call that the pool build is starting! W We got the call that the pool build is starting! Which had me scrambling to dig up all the plants that were in the way in an effort to save them. Literally down to the last second before the crew showed up. Exciting day but you know what’s even more exciting? Knowing the next crew will officially be breaking ground with the excavation phase of the build.
This time of year is full of organizing and purgin This time of year is full of organizing and purging to bring spaces back to life. But sometimes all a space needs to feel refreshed is, well, a refresh and a little attention. Your number one requested space was the living room. So I gave mine a refresh with some unique and gorgeous finds from @homesense_us . I found a few fun pots for my houseplants, a gorgeous magnifying glass, and a few other items for our coffee table and couch.

I never know what I’m going to find when I walk into Homesense since it’s always rotating with amazing finds. But I do know I’ll walk out with a few new favorites for my home at affordable prices. If you haven’t yet, I urge you to check and see if you have a Homesense near you! #DiscoverHomesense #HomesensePartner
2022, you were awesome. But I’m determined to ma 2022, you were awesome. But I’m determined to make 2023 even better! And I hope you join me! We can be one of our biggest cheerleaders, but together we’re going to do big things. Go ahead and write down a big, small and a few in-between projects you want to get done this year in your home. Kicking it off with intention and that reminder that we can do this. Ready to get started?! Let me know in the comments the first project you want to tackle!
We finally got the Christmas/winter edition of the We finally got the Christmas/winter edition of the window projection up and running! It was a hit for Halloween and just as fun for this time of year as well. I built frames wrapped with a plastic drop cloth but you can also secure the drop cloth over the windows using command strips. The videos are from @atmosfx and we use a mini projector to play them on the screen. Place a Bluetooth speaker outside and you’re in business! Such a fun addition this time of year for the exterior of your home.
It’s the last little bit of the demo we needed t It’s the last little bit of the demo we needed to do in order to give the green light for the pool to start. And 2,456 pavers later, it’s done! This was exhausting but worth the money we saved doing it ourselves. And why remove them? We’re using a different stone around the pool and we want it to be cohesive up to the house. Don’t worry, someone got one heck of a deal on these pavers, we made a little money, and someone else got them out of our driveway. I’d say that’s a win-win. Stayed tuned for the entire pool process as we enter 2023. It’s going to be pretty exciting to watch!
Our patio space has served us so well over the yea Our patio space has served us so well over the years and now it’s time for a change because we’re getting a POOL!! Sharing this with you makes it even more real because just a year ago I would have told you it isn’t in the cards for us. We’ll be breaking ground soon but first we have to remove the screen enclosure. Spoiler: we won’t be putting one back up around the pool. It has already made the biggest difference visually and SO much natural light pours into our home now with it gone. It’s going to be so exciting seeing this all unfold so stay tuned! Up next: removing the pavers.
This holiday season we were able to travel to my h This holiday season we were able to travel to my hometown for the first time in awhile. We were greeted by the most beautiful sunset on the beach. Fast forward to this week as I headed to @homesense_us for some holiday shopping, and I ended up finding a few pieces for our home that remind me of that core memory on the beach. The beautiful wicker bench caught my eye first followed by the comforter and toss pillows. Everything at amazing price points while not sacrificing style and quality. #HomesensePartner

Mixing a thrill of a find with a core memory, I guarantee you'll fall in love with your home even more as you go to decorate. Decorating your home isn't grasping on to the newest trend or what you think others would do. It's what YOU want to do. And sometimes that's based on an emotional connection. Oh, the stories your spaces will be able to tell as you decorate each one. Start with seeing if there’s a @homesense_us near you! #DiscoverHomesense #HomesenseSarasota
Load More... Follow on Instagram

Sign up here to have our fresh posts delivered to your inbox!

Enter your email address:

Delivered by FeedBurner

Copyright © 2023 Within The Grove • Customized by Brave Creative Design · Log in

  • Privacy Policy
  • Terms and Conditions
  • Disclosures + Photo Usage
 

Loading Comments...