


Guest Bedroom Reveal with IKEA

This post is sponsored by IKEA. All opinions are 100% my own.

The time is finally here to reveal our guest bedroom makeover with IKEA. And I’m beyond excited for you to see our newest space in our home. Two weeks ago this room looked and felt completely different. I find myself sitting in our guest bedroom in awe that it’s even the same space. When we first moved into our home, our guest bedroom was yellow and burgundy. I quickly painted it and threw in some of our older and thrifted furniture. It got us by for the past two years but I was itching to get my hands on it again.
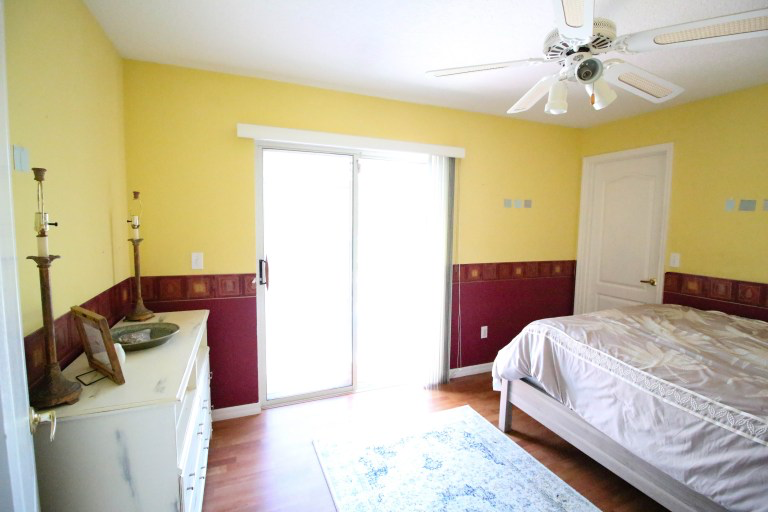

This was a space in our home that drove me crazy every time I walked by it. I knew it could be so much more than what it was and it didn’t reflect our personal home style. With the spring season approaching, it was the perfect time to transform it into a little oasis for our guests and another part of our home we love. And my, oh my, did that happen! We’ve caught ourselves hanging out in there and you’re about to see why.

The Story Behind the Design
I wanted to take what was a very farmhouse inspired bedroom and transform it into a bold, moody, and organic that reflected more of our personal style. Being the guest bedroom, I wanted it to be a functional and cozy space for our guests but also for us as a family when we don’t have visitors so that we can enjoy it as well.
I had a few things in mind to make that happen. I wanted to bring nature indoors especially with having sliding glass doors leading out to our outdoor patio. This would naturally allow both spaces to flow and be used together. I also wanted to create a seating area in the guest bedroom to up the cozy factor and give the room more purpose. From there, I knew everything else would fall into place as far as design and decor. I immediately listed and sold everything on Facebook Marketplace to start with a blank slate.

For this bedroom makeover, I headed to IKEA to create a sanctuary without breaking the bank. Let me tell you, IKEA did not disappoint. Added bonus? All of the decor and the furniture fit in my car for the entire bedroom. Ready to see exactly what I used from IKEA? Let’s go!
**Before I dive into the space, two of the dramatic changes you’ll see has nothing to do with furniture and decor. We created a wood slat accent wall and added a bold pop of deep olive green with an unfinished, raw edge around the room. I’ll have a tutorial for both soon!
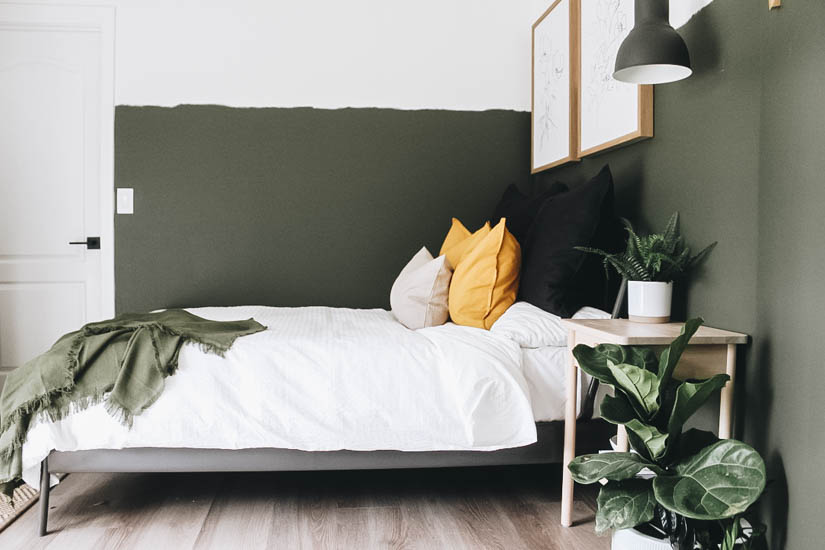
Bed + Textiles
The previous bed in the guest bedroom (which also happened to be an IKEA bed) was a queen and a little too big for the space. It felt like it took over the entire room. For the new bed we went with the KOPARDAL bed frame in a full and it made such a difference. The clean lines and powder-coated steel frame allowed it to be very versatile with the rest of the decor and textiles. It was very easy to put together and I recommend having someone to help you with this one!


One of the best things about walking around IKEA is seeing how they pair items and everything that they have available. I thought I was going to have a hard time choosing a duvet cover for the bed but spotted the OFELIA VASS right away. The white is the perfect color against the dark olive green walls and the texture adds a beautiful element to the guest bedroom. Paired with bold and neutral pillows and a stunning ODDRUN olive green blanket, the bed and textiles came together beautifully. I went back and forth on the pop of yellow but they certainly added a little richness.


The BJÖRKSNÄS nightstand softened the space a bit while providing an organic touch that tied in with the wooden slat wall. It’s these little little things that truly help to bring a space together. My favorite part was deciding to hang the HEKTAR pendant light above the nightstand versus a traditional lamp. It balanced out this side of the room being next to the wall art and adds an element of surprise as you walk into the bedroom.


Seating Area
Right when we started planning the guest bedroom, I sold the old dresser and decided that another one would not be coming back in. Our guests typically don’t use one and I just knew I could make better use of the space. And that’s when I became overly excited about creating a seating area in the guest bedroom. My goal? To create an unexpected area that will help guests relax and provide a place to drink their morning coffee or read a book. This is where I decided to build and create the wooden slat wall to help define the seating area as well.

I had my eye on the KOARP Armchair in beige ever since I spotted it in the IKEA showroom a few months ago. It almost didn’t make it in the bedroom with it being sold out all over the Florida locations. But magically it was available the day I went to pick everything else up in store. It adds a modern element to the guest bedroom and it is beyond comfortable! There’s even a hidden pocket in the back of the chair to add a few magazines for our guests to enjoy. The two ALSEDA Stools stacked together allows anyone sitting in the armchair to officially kick their feet up and relax.


Do you want to know something I’m always thankful for when I’m traveling? A full length mirror wherever I’m staying. So you better believe one made it into the guest bedroom. Although this NISSEDAL Mirror can be hung, I decided to use it as a floor mirror. Guests can easily get a full look of their outfit of the day and use it to get ready. I also love how it opens up this space even more.

Now, the seating area wouldn’t be complete without some sort of lighting. I’ve been searching for a space to use the LAUTERS Lamp in my home so I was very excited when it made it home with me. The base is adjustable to make it the perfect height for your space and it also has a way to hide the cord. It’s pretty much perfect for any home and any space.

I did step it up a notch by using one of IKEA’s TRÅDFRI remote control kits. It comes with a E26 LED light bulb that is controlled by the remote. With the touch of a button, guests are able to turn the lamp on, adjust the brightness and switch it from warm to cool light. The remote is secured to the wall above the nightstand but can also be removed so that guests can move around the room with it. Talk about VIP treatment!


Additional Decor
It was worth getting rid of the dresser but I knew a little bit of storage would still be needed. I found the perfect little cabinet that’s small enough to fit on the wall opposite of the bed but large enough to work as storage. This is the perfect spot for me to place towels, toiletries, or anything else guests may need. Guests can also use this cabinet during their stay.


I have a lot of favorites in the guest bedroom and the SKÅDIS Pegboards made the favorite list as well. Wanting to incorporate more natural wood tones in the bedroom, the pegboards were the perfect addition. Using a few accessories, the pegboards quickly came together as I added houseplants, artwork, and even my favorite DIY tool: paintbrushes. The dried paint on the paintbrushes are actual colors we’ve used throughout our home which I thought was a fun touch. This wall will be a lot of fun to easily switch out throughout the seasons.


Adding greenery is never a bad idea when it comes to decorating a space.The pegboards were a fun way to get more houseplants into the room while I added some on top of the cabinet and beside the nightstand. I love how they instantly make a space feel like home and bring the outdoors in.


Right when you walk into the room, the wall on the right has three of the SKUGGIS wooden hooks. I was blown away with how easily these installed and how cute they turned out to be. This can be a place for guests to hang their jackets, purses/bags, umbrella or even a place to hang fresh flowers. Are you already looking around your home to figure out where you can place a few of them?


Finishing Touches
Since the guest bedroom has a set of sliding glass doors, it was important to hang curtains for privacy. I decided on the RITVA Curtains in white paired with a RÄCKA black curtain rod. I went on and on about this curtain rod on my Instagram stories the other day. First off, it was only $8.99. It comes with grips to prevent the curtain rod from sliding when opening and closing the curtains, can be installed a few different ways, the rod can be moved further away or closer to the wall, a piece is included to beautifully hide the screws, and you can double hang curtains. Although the curtains soften the space, the curtain rod is the real MVP.

The last finishing touch were the rugs. Trying something a little different, I paired the HELLESTED runner with a round rug in the seating area. I layered a portion of the rugs for an element of surprise. Ryan and I are split with this design element. I love it and he isn’t so sure about it. Either way, the runner helps to define the bed area while the round rug helps to define the seating area. Overall, they both help to bring the entire space together.


Well, my friends, that’s our guest bedroom makeover with IKEA and I couldn’t be more proud and thrilled about it. I’m actually writing this blog post sitting in the guest bedroom armchair with the sliding glass doors wide open to let a little breeze come in. It has truly become a space not only for our guests to enjoy, but one for us to enjoy as a family. I can usually find Oliver playing on the rugs with his toys, I enjoy the seating area on a daily basis and it’s only a matter of time before Ryan takes a nap in here.


All of the home decor and furniture pieces I used from IKEA have gone beyond what I already knew was going to be great. There were elements of surprise with each product where I knew right away the designer put so much thought into the design and execution of the piece. All products at IKEA are created with a Democratic Design which is: form, function, affordability, quality and sustainability in mind.


If you’re planning to makeover a space in your home, I urge you to check out IKEA as you do. They literally have everything you’ll need, you can shop online or in store, it’s very affordable, and you have 365 days to return any items that didn’t work out. Who’s coming with me on my next IKEA shopping trip?


Links to IKEA Products and Furniture
KOPARDAL Full Bed Frame
OFELIA VASS Duvet Cover and Pillowcases
ODDRUN Olive Green Throw
GURLI Cushion Pillow Cover 20 x 20
AINA Cushion Pillow Cover 26 x 26
HILLARED Cushion Pillow Cover 16 x 26
BJÖRKSNÄS Nightstand
HEKTAR Pendant Lamp
SKUGGIS Hook
TRÅDFRI Remote Control Kit
UPPVAKTA Plant Pot
FEJKA Faux Fern
KOARP Armchair
LAUTERS Floor Lamp
NISSEDAL Mirror
RÄCKA Curtain Rod
RITVA Curtains
ALSEDA Stool
HELLESTED Runner
SKÅDIS Pegboard
SKÅDIS Pegboard Accessories
EKET Storage
Let’s keep in touch!
We have a brand new community over on Facebook, House & Home, where we’ll be chatting, sharing, and helping one another when it comes to home decor and projects. Come join us! Check it out here.
Like on Facebook || Follow on Instagram || Follow on Pinterest

[…] Heritage Park. This unfinished edge is to look like ripped paper, and is heavily influenced by Liz’s guest room! I have loved it since I saw it years ago and knew I wanted to re-create it […]
Beautiful!! Where did you get the minimalist framed flower pictures? I love those!
Hi Emily! I found them at my local HomeGoods. I’ve seen them a few times since then so keep your eye out!
So beautiful! Where did you get the art of the flowers above the bed? I have been searching for a week now with no luck. Thanks!!
Hi! I found them at HomeGoods but they’re by Petal Lane Home!
I am wondering where you got the flower artwork in this room!
Hi! They’re from HomeGoods by Petal Lane Home.
What green paint color was used in this room?
I would like to know that too.
Dark Olive by Benjamin Moore.
Thank you!
Dark Olive by Benjamin Moore.
[…] Want to see more IKEA inspiration? Check out our guest bedroom reveal! […]
[…] can also check out the full reveal of the guest bedroom and the DIY Wood slat […]
So beautiful I love it all!! Everything is so good. Where did you get the framed flower pictures? I have been looking forever and I LOVE those! Thanks!!!
Oh my! The dark color, the rough edge, the wood slat wall, and then you fill it with so many great products from Ikea! I love it all!
Perfection and so inspirational! ????????
This room looks so good! Everything you do is perfection!????????????
This room looks so good! Everything you do is perfection!????????????
????????
It all looks really good. Love the chair too! ????????
Stunning! I love the wall! ????????
I love it all so much!! Even the unfinished paint edge that would normally give me nightmares ????
Great job, love ikea always!! ❤️❤️
That slatted wall and the art work Are my faves in your room. WELL DONE! ❤️????
Not gunna lie, my OCD and I were giving you the side eye about the unfinished paint line, but OMG it’s amazing. Do you find that bold color choices only work in spaces with great natural light? My house has awful natural light and I am afraid to make it a cave but so bored of blah neutral colors. ????????
I don’t know why I’m surprised, but you blow me away each time you do a reveal!
It’s SO good!!
Great job!! I love the wood slat wall. The color is fabulous too. ????????
Such a beautiful room! So fun to follow along on your stories ????????
So cute and cozy! I LOVE Ikea!!!!!
Still have you door handles saved for a future budget item!
I love the bedding and paint color/style choice!!! Getting ideas for my own bedroom refresh. ????????
Thank you for sharing so many pictures… it’s always nice to get the full view of the room hehe, it looks amazing. Great great job!!! ????????
Thank you for sharing so many pictures… it’s always nice to get the full view of the room hehe, it looks amazing. Great great job!!! ????????
Love the after shots ????????
Amazing! It looks so much bigger now, too. Love the wood slats wall! The color is so soothing and relaxing. ????????
Gorgeous, as always! ♥️♥️
Girl cmon. How lucky are your guests?!?? Nothing was left undone. You nailed this. So dang beautiful fresh moody relaxing!!!
It’s moody but also bright – I love the contrast. Those leather pulls are my favourite – they give such warmth to the drawers. I’m also a sucker for the armchair. It’s absolutely gorgeous!
Well done! ????????
Love it!! So serene and peaceful looking ????????
Love it so much!!
Absolutely beautiful! Love everything, from the pillows to the area rugs. Such a beautiful job!
Looovvveeee this! Love that you’re able to step outside your comfort zone, makes me rethink always staying inside mine. ????????
Goodness, I absolutely love what you did with this space! Gorgeous!
So beautiful ????????