


One Room Challenge Week 3: New Walls Plus a Setback

We’re beyond excited to be a part of the One Room Challenge as guest participants. This has been on our home bucket list for a few years now and finally the timing was right for us to participate. Over the next six weeks we’ll be giving our outdated guest bathroom the attention that it deserves. . . finally. We’re taking it down to the studs and creating an entirely new space. We hope you enjoy watching the process just as much as we enjoy creating a new space.
PREVIOUS WEEKS
Hello, my friends! I keep telling myself there’s no way we’re already heading into week 3 of the One Room Challenge. But, here we are! Which means it’s either smooth sailing for us right now or were starting to slightly panic. I’d like to say it’s a sprinkle of both. This past week we were very productive but also had a slight set back.
We ended week 2 with our first demo ever taking off without any major issues. We were actually surprised with how far we got after 2 days of demo but were clueless of how much more we had to go. Maybe that’s a good thing because we were just beep bopping through the demo just as happy as we could be trying this for the first time.

Things got a little messier before it got cleaner. The biggest item we checked off our to-do list was knocking down the drop down ceiling. It truly didn’t serve a purpose and has opened up our bathroom so much!

It took the better part of the day and we were chasing daylight to get it done so we could install the new ceiling in the same day. And you know what? It happened! I still need to give it texture and paint it.

The shower walls were next and I can’t even begin to tell you how excited I was about this. How many times have you watched a show on HGTV as they rip down walls and you think to yourself you really want to try that? I can tell you I’ve thought that many times and it did not disappoint. Knowing what’s to come made it even more exciting to see those studs.

As Ryan was installing the new drywall in the shower, I started patching the holes on the remaining walls with spackle. It’s pretty much the adult version of Play-Doh just a little messier and dries faster. We opted to do this versus replacing all of the drywall to be able to stay within our budget and stay on our timeline.

Things quickly came to a stop when we realized we wouldn’t be able to finish all of the dry wall due to the bathtub faucet not budging off the pipe and wall. The screw to take it off was corroded and stripped which meant it pretty much wasn’t going anywhere. That mixed with old copper pipping we decided to call a plumber to successfully remove and update everything before we did more damage than good.

Only problem? It was Saturday and we’d have to wait until Monday to get someone out which ended up being Tuesday. The plumber then had his own issues when the main water valve outside broke as he was turning it off and we had to call the city to come fix it. A 2 hour job turned into 4 but it’s done and worth every penny to hire him! We also had him go ahead and update the other plumbing valves as well since he was already there.


The only thing we didn’t get to was leveling the floor to prep for this week’s tile. So we’re pulling the late nights after Oliver goes to bed to get that done, adding the last piece of drywall in the shower, and doing one more coat of spackle to even out the walls. Our goal this weekend will be to complete all of the tile (which will also be a first).

Here’s the progress we made this past week:
- Removed remaining mortar.
- Repaired plumbing
- Installed new drywall
- Removed molding
- Repaired holes
- Finalized paint colors
- Ordered light fixtures and faucets

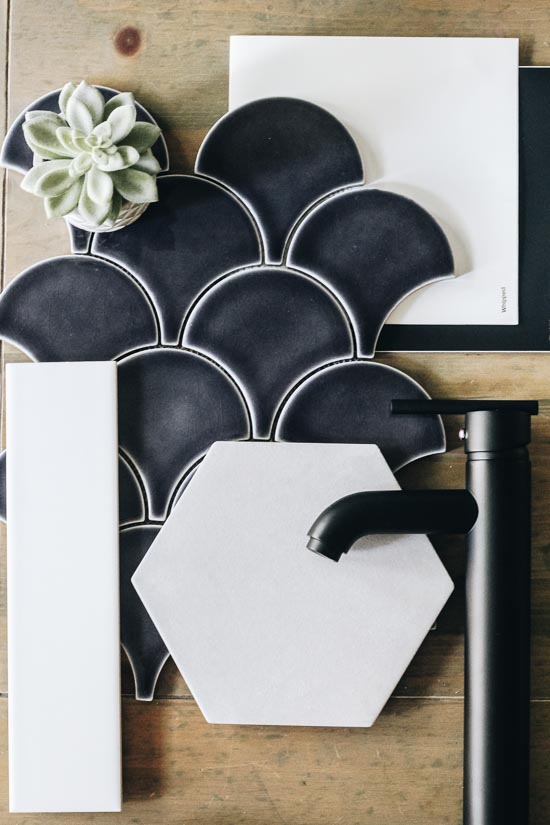
I’m so proud of what we’ve done so far but also stressing just a little knowing we’re halfway through the One Room Challenge and have a bare bathroom. Literally, nothing in there except for the tub. This week will have to be a big week of making a lot of things come together! So make sure to follow along over on Instagram for behind the scenes. Meanwhile, here’s a little sneak peek of the tile and a few materials we’re using in our guest bathroom!

Don’t forget to check out the the other participants One Room Challenge progress!

Let’s keep in touch!
We have a brand new community over on Facebook, House & Home, where we’ll be chatting, sharing, and helping one another when it comes to home decor and projects. Come join us! Check it out here.
Like on Facebook || Follow on Instagram || Follow on Pinterest

It’s so fun following your progress!
First things first – your design plan is absolutely delicious! I am loving that tile! And secondly, we have had the same stuff happen to us on our week 3. We were hoping to start tiling, but that has been pushed off ANOTHER week. Fingers crossed that we reach the end.
Rooting for you from our bathroom and can’t wait to see you at the finish line!
Great pattern play with the variety of shapes. The scalloped tiles are gorgeous!
Glad you got it off! Snags are a given in all house hold projects right? I can’t wait to see how you use those mermaid scale tiles!