• Home
  • ABOUT
  • WORK WITH ME
  • Paint Colors
  • Shop Our House
    • Guest Bedroom
    • Front Living Room
    • Living Room with Fireplace
    • Previous Second Living Room
    • Current Playroom
    • Prior Playroom
    • Dining Room
    • Laundry Room
    • Oliver’s Bedroom
    • Guest Bathroom
    • Covered Lanai
    • Patio
    • Master Bedroom
  • CONTACT
    • Facebook
    • Instagram
    • Pinterest

Within the Grove

Join the list to receive occasional news and special updates!

One Spot DIY // Snowflake Coasters

December 22, 2016

DIY Snowflake Coasters from Target's One Spot

Hey everyone! I’m so excited to be sharing with you another Target One Spot DIY! Like I said in my previous post, how can you not walk through the One Spot when entering to Target? They know exactly what they’re doing by putting all the cute home decor, office supplies, and kitchen items in one little area for under $5. The other day I found adorable wooden coasters but wanted to add something extra special to them. I decided to create my own set of winter themed coasters to use even after the holidays. With the $1 stamp and the $3 coasters I found in the One Spot, I have custom home decor for less than $5! Here’s how you can make your own set in less than 20 minutes. 

Supplies:

Wooden Coasters from the One Spot || Snowflake Stamp from the One Spot || Modge Podge || White Paint || Small Paint Brush

The How-To:

Step 1: Using your small paint brush, carefully apply the white paint to on the stamp. Do your best to only get it on the raised snowflake. 

Step 2: Using a flat surface, firmly press the stamp down on the coaster. Repeat Steps 1-2 until you have your coaster covered in snowflakes.

Step 3: Once your paint has dried on all the coasters, apply one even coat of Modge Podge. It will dry clear! 

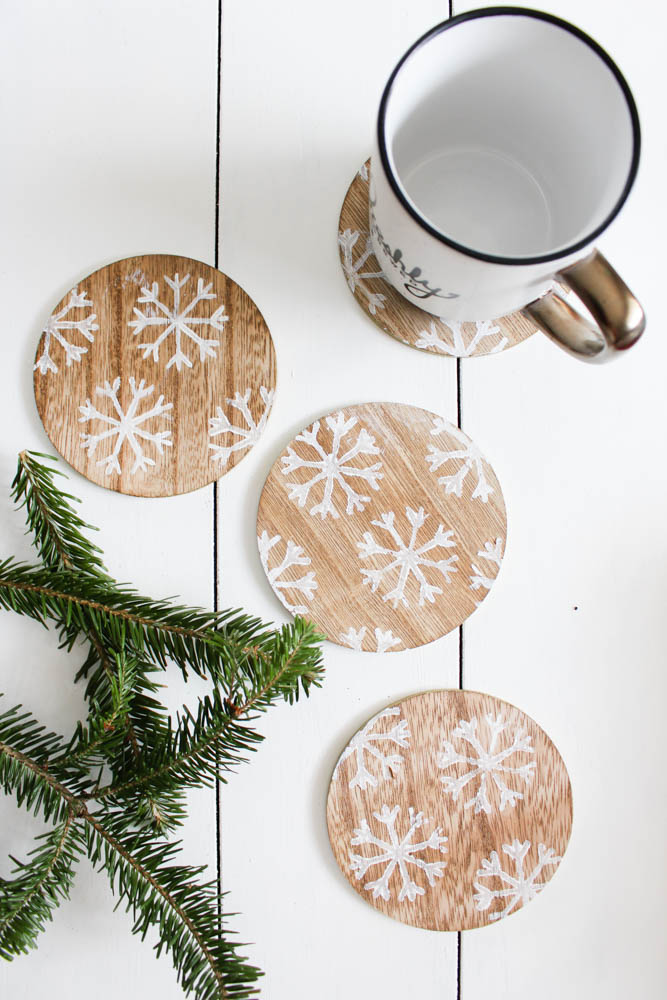
Your coasters are now ready to use!

These snowflake coasters turned out super cute and will be perfect to use during these winter months! Plus, it doubles as festive home decor. There were a variety of stamps to choose from so maybe you’ll try a different design on your coasters or use a different paint color. Make sure to share with me what you create by tagging me on Instagram or leaving in the comments below. 

Let’s keep in touch!

We have a brand new community over on Facebook, House & Home, where we’ll be chatting, sharing, and helping one another when it comes to home decor and projects. Come join us! Check it out here.

Like on Facebook || Follow on Instagram || Follow on Pinterest

Share this:

  • Click to share on Twitter (Opens in new window)
  • Click to share on Facebook (Opens in new window)

Related

Filed Under: Christmas, DIY Tutorial, Home Project

« WTG Shops // Bright Light Paper
DIY // Honeycomb Tote Bag for the New Year »

Trackbacks

  1. 17 Charming DIY Winter Decor Initiatives To Do Earlier than Christmas says:
    November 26, 2020 at 4:11 pm

    […] Tutorial […]

    Reply
  2. Admirable DIY Winter Decoration Ideas That You Can Use More And More Again - GODIYGO.COM says:
    November 19, 2020 at 11:36 pm

    […] Source […]

    Reply
  3. 14 Süße DIY Winterdekorideen 2020 | Deko Ideen says:
    January 3, 2020 at 3:13 am

    […] Tutorial […]

    Reply
  4. 15 idées de décoration hivernale à bricoler à mettre en place avant la saison des fêtes Budget-friendly says:
    December 2, 2019 at 8:53 am

    […] Didacticiel […]

    Reply
  5. 14 Sweet DIY Winter Decor Ideas 2020 | Decorating Tips says:
    December 1, 2019 at 4:23 pm

    […] Tutorial […]

    Reply
  6. 17 DIY Winter Decorations for After-Christmas Decorating says:
    January 1, 2019 at 11:00 am

    […] withinthegrove […]

    Reply

Leave a Reply Cancel reply

Your email address will not be published. Required fields are marked *

This site uses Akismet to reduce spam. Learn how your comment data is processed.

Looking for something?

withinthegrove

The garden is cleaned up, prepped, and ready for t The garden is cleaned up, prepped, and ready for the summer crop. What started as a single garden box has transformed to this garden space over the past few years. Favorite thing about it: being tucked away in this cozy corner with the winding paths throughout it. One thing I would do differently: using pea gravel instead of the granite rocks we went with. These rocks hurt! Pea gravel is smooth enough to comfortably walk barefoot on.
The grass is in! Saying BUH BYE to the dirt around The grass is in! Saying BUH BYE to the dirt around the pool for the first time since December when we broke ground. We spent the past few weeks installing irrigation throughout our backyard and around the pool. Yesterday we finally had the sod delivered and within a few hours it got us one step closer to finishing our backyard oasis. We still have a long ways to go, but my goodness does it feel good to see this part done! And we can finally check off the final inspection for the pool build.
What does it cost to fill a 16,000 gallon pool wit What does it cost to fill a 16,000 gallon pool with a garden hose? Our total came to $229! Does this total surprise you? This of course can greatly vary depending on where you live and your situation. For us, we live in Florida and on county water. We only pay water fees and not sewage. The water company did not give us a discount. We filled the pool right at the start of our billing month so this is it! Have you filled up a pool before? I’d love for you to share your cost, pool size, and location if you feel comfortable doing so!
We have a 16,000 gallon pool and filled it up with We have a 16,000 gallon pool and filled it up with a single water hose. And we for sure had some questions! Answering them here:

• Why not use a water truck? We weren’t in a rush, it was the best way to end this project watching it fill up, and it would have been more expensive. 

• Why not use our local fire station? Our local fire department doesn’t do this and it isn’t very common that most do. We wouldn’t ask if they did. 

• Did our water company give us a discount? Nope. Most water companies will take off the sewage fee but we only pay for water and not sewage where we live. We did notify them so they wouldn’t turn our water off thinking it was a leak. 

• What is that on the end of your hose? We added a filter on the hose to help reduce iron, scale, any other heavy metals and containments to help give our pool a fresh start. 

• How long did it take? 51 hours 

I’ll be sharing the cost soon so make sure to add your guess in the comments!
Pizza nights are back! And one thing we’re addin Pizza nights are back! And one thing we’re adding since our screen enclosure is gone, are these Bitefighter LED String Lights by @tikibrandproducts . You’ve seen us use them in our playset area and now for our patio area. They give us the ambiance we need at night while helping to fight off the mosquitoes as a 2 in 1 solution. There’s no odor, no mess, and they will last all season long. Cheers to the summer nights ahead! #ad #TIKIbrand
Protecting outdoor furniture for the summer!

It’s time to give your outdoor furniture the best start for summer and to help it last long term. Here are some things you can do to protect your outdoor furniture as we enter the summer season:

1. If you have wood furniture, it’s time to seal it! I use Thompson’s Waterseal on all my outdoor wood furniture except for teak. This protects it from moisture, sunshine, and mold/mildew.

2. Easiest way to help keep cushions clean is by spot cleaning throughout the season. I use 30 Seconds Outdoor Cleaner for quick, fresh looking cushions. 

3. To really protect cushions, Shield H2O provides a water repellent treatment that repels moisture and spills, which in return helps prevent mold and mildew. 

4. Have teak furniture? Use a teak SEALER and not an oil. Teak oil is a short term solution and easily washes out with rain. Time to seal it to last long term! 

I have everything I used in my Amazon storefront under outdoor.
We were told 16 weeks for our pool install but it We were told 16 weeks for our pool install but it ended up taking exactly 12 weeks. Broke ground on December 16th and started filling it with water on March 16th. I’m sharing all the pool details over on my blog. Including the answer to the number one question: How much did this cost? Covering how we picked a pool builder, the construction process, the materials we went with and why, what we splurged on and where we saved, and so much more. Save it for future reference! It’s a good one!
We have an outdoor dining space again! It’s some We have an outdoor dining space again! It’s something we have missed the most these past few months while under construction with the pool. I’m such a visual person so being able to walk into @homesense_us and see exactly what we could use to create our outdoor dining space was amazing. There was so much to choose from at a great price point and something for every style. I’m noticing more Homesense Stores opening around the US so check to see if there is one near you! #HomesensePartner #DiscoverHomesense

Here are a few tips for creating an outdoor dining space:

1. Choose a table that fits the space with at least 4 feet around each side. 
2. Plenty of seating. Extra seats if you have the space.
3. Add an option for shade.
4. Select a style + decor that suits you 
5. Use outdoor furniture that’s easy to maintain. 
6. Enjoy your new outdoor space!
Are we lounging poolside or beach side? It’s har Are we lounging poolside or beach side? It’s hard to tell without our sod installed yet but regardless, loving this new addition to the pool area. Just need to find some cute side tables and this part of the pool area is done. Should I go with teak or black ones?  I’ve linked everything on my LTK through the link in my profile!
Load More... Follow on Instagram

Sign up here to have our fresh posts delivered to your inbox!

Enter your email address:

Delivered by FeedBurner

Copyright © 2023 Within The Grove • Customized by Brave Creative Design · Log in

  • Privacy Policy
  • Terms and Conditions
  • Disclosures + Photo Usage
 

Loading Comments...