


 I can’t wait to share my outdoor space with you today! Welcome to another part of our new home where we enjoy reading books we simply can’t put down, a weekend cocktail, and enjoying a delicious dinner.
It use to be a space that I avoided upon moving into our new home. It was bare, neglected, dark, and lacked appeal. Thank goodness the previous owners ripped up the burgundy carpet before we bought the home! Just take a look at what we were dealing with at first:
 I wanted to create a space that was completely new, refreshing, and reminded me of my hometown in South Carolina. I also needed to make this possible on a budget. I did a complete flip of this space for $100. Please keep in mind, I already had the patio furniture, some paint, and the rug.

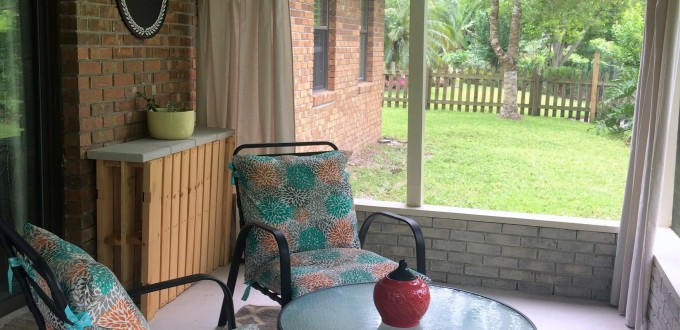
Take a look at the before picture and the mess that was left behind on the bricks. This was the perfect opportunity to white wash the bricks on the lower wall. With white paint I already had in the garage, water mixed into the paint {small portions mixed at a time}, a brush, and paper towels, I had a new look to my brick. They went from drab to fab in about 20 minutes. I ended up doing two coats due to the first coat sinking in too much into the brick.
 With the brick white washed I was ready to tackle all of the unappealing brown that made the space feel closed in. All of the wood {the posts and on top of the brick} and the wall above the screen were all given a fresh coat of paint in antique white. What a difference that made!
 Now for my most exciting transformation within my patio: the ceiling! I was born and raised in Myrtle Beach, South Carolina. Weekend trips to Charleston were a must! That is when I fell in love with all of the southern porches of historical homes with their ceilings painted a light blue/teal color, or as Southerner’s say a haint blue. You can find out the history behind this blue color in Charleston by clicking here.

I then wanted to make one more big change. Remember the burgundy carpet I mentioned earlier in the post? Thank goodness it was gone but I had the aftermath on the concrete to fix.
 After sweeping, scrubbing, and repeating those steps again, I took the chance and painted the concrete using concrete paint. It took a little longer than expected to get two coats painted because of the afternoon thunderstorms here in Central Florida. I went with a light grey/cream color and fell in love with it! You can see the color difference by looking at the first picture in this post.
The last few details dealt with decor. I wanted outdoor curtains that were airy, made the space intimate, and inviting all at the same time. My goodness, outdoor curtains are expensive though! I’ll let you in on my little secret: I used canvas drop cloths {yes, the ones painters use} as my curtains! They are durable, cheap, and the perfect color for my space! I used clip rings, a dowel rod, and hook screws to hang each curtain.
I also found two beautiful pallets being thrown away. My husband helped me screw them together to create an outdoor bar space to enjoy when we have company over. I’m still not done with this area.
 I also added lighting by hanging these rustic and chic hanging lights from Pier 1 Imports. They work perfect in the far corner of the space and come with a remote so that they can easily be turned on and off.
 I can’t forget about my cushions that gives this space a pop of color! These are the type of cushions you sit on and it takes every ounce to get up again! I found the fabric on Etsy and sewed the cushions to add my own special handmade touch to the space.
 I hope you enjoyed a detailed look into the process of making over my outdoor patio as much as I enjoyed creating this space.

Resources:
|| Hanging Lights: Pier 1 Imports || Drop Cloths: Home Depot || Clip Rings: Home Depot || Fabric for Cushions: Etsy || Outdoor Rug: Target || Cement and Latex Paint: Home Depot || Letter R Wall Art: Hobby Lobby || Patio Set: Lowes
Let’s keep in touch!
We have a brand new community over on Facebook, House & Home, where we’ll be chatting, sharing, and helping one another when it comes to home decor and projects. Come join us! Check it out here.
Like on Facebook || Follow on Instagram || Follow on Pinterest

[…] I had an ‘aha moment’ after remembering how we painted our front concrete porch and screened in patio. I knew there was transparent stain for concrete in red and that is exactly what I decided to do. […]
[…] with my sewing machine lately} and immediately thought about the curtains I made on our patio out of drop cloths. Why couldn’t I do the same thing but turn the drop cloth into a blanket and add a splash of […]
[…] some more, painted, and designed. I love the end result! I also did a blog post on this space: Patio Space Makeover. It is now a space we enjoy on a daily […]
Looks great!
Thank you so much Meghan!