• Home
  • ABOUT
  • WORK WITH ME
  • Paint Colors
  • Shop Our House
    • Guest Bedroom
    • Front Living Room
    • Living Room with Fireplace
    • Previous Second Living Room
    • Current Playroom
    • Prior Playroom
    • Dining Room
    • Laundry Room
    • Oliver’s Bedroom
    • Guest Bathroom
    • Covered Lanai
    • Patio
    • Master Bedroom
  • CONTACT
    • Facebook
    • Instagram
    • Pinterest

Within the Grove

Join the list to receive occasional news and special updates!

Home Project // Outdoor Patio Space Makeover

September 16, 2015

September 16, 2015

Outdoor Patio Space Makeover

This past June I had a wonderful time spending almost two weeks with my mother and brother when they traveled to Florida for a relaxing getaway.  Little did my mom know the yard work that was ahead.  Just to make it clear, it was her idea to work in 95 degree weather for several hours a day {with the daily thunderstorm}.  Some people read, go to the beach, or enjoy a glass of wine to relax.  My mom does yard work and I’m forever thankful she passed that passion down to me!  That is what leads me to our outdoor patio space makeover.

Playing in the Florida rain.

My husband and I knew that we had a corner patio in our backyard that we thought was the shape of a square.   To my surprise this space was much bigger than what we thought and ended up being a bell shaped patio after a little cleaning up and digging around it one afternoon.  My mom loved it!  Me? Not so much.

Patio Space Makeover

Patio space before

The bricks were in perfect condition and the kind you can’t buy at Lowe’s and Home Depot anymore.  I waited until my mom left to dig up the patio and sent her the following image with one word: “whoops”.

The process of building a new patio.

My mom thought we were crazy for digging up the existing bricks only to place them back down.  We had a vision and we were running with it!

Here’s a video of our progress from the beginning to end of making over our patio for a quick glimpse before we get into all of the details:

We created a herringbone pattern which also meant cutting a lot of bricks down to custom sizes.  We knew we wouldn’t be cutting brick after creating this patio so went old school.  By we, I really mean Ryan!

Chiseling bricks to fit in a herringbone patterned patio.

Herringbone design patio

We went through a lot of trial and errors that we will do differently next time.  Of course, if there is a next time with this type of patio.  We got a lot of our materials at Home Depot and Lowe’s.  For our next patio directly behind our house we will probably be going to a local nursery to get supplies in bulk.

Shopping at lowe's for materials to build a new patio.

We were thrilled when the bricks were all finally placed after working on the patio for two full weekends.  We brushed sand between the bricks and applied polymeric sand to seal the bricks (turns into a concrete type substance once water is applied).

Here’s the deal though: I will never use polymeric sand again!  If you take any tips away from this DIY patio, this is the advice to follow!  It was a major lesson learned for Ryan and I.  After applying this product and sweeping and using a leaf blower to remove the excess polymeric sand from the top, a disaster occurred. Our beautiful vintage bricks were all of a sudden stained with concrete.  Talk about crying.  You can see in the image below the white areas where the bricks were stained.  I believe I stomped my feet and jumped up and down a many times.

How to stain bricks on a patio.

I immediately researched how to fix this problem.  Many blogs and websites recommended scrubbing, using a power washer, or that I was simply out of luck.  I had an ‘aha moment’ after remembering how we painted our front concrete porch and screened in patio.  I knew there was transparent stain for concrete in red and that is exactly what I decided to do.  I stained all 750 bricks while being careful not to get the stain in the cracks.  It’s unbelievable the difference it made!

before and after of staining bricks.

Staining bricks for a clean look.

Then work suddenly came to a halt on our patio project.  While we were dancing the night away at a friend’s wedding, a severe thunderstorm came through our town resulting in a tree falling in our yard.  And you guessed it.  Right in our new patio area.  We were very fortunate that the tree didn’t land on the brick but delayed us from continuing work for about a week.

Thunderstorms in Florida

 Cleaning up the patio space.

Once the city removed the tree, we spent two full days pulling up weeds, roots, vines, buried bricks, old pipes, and tree stumps from around the patio.  One thing that I’ve learned about living in Florida: vines are everywhere, ruthless, and so hard to get rid of!  Hoping that we controlled them around our patio area after all the hard work {only time will tell}.  We also placed landscaping fabric around the patio as a precaution.

Landscaping around a patio.

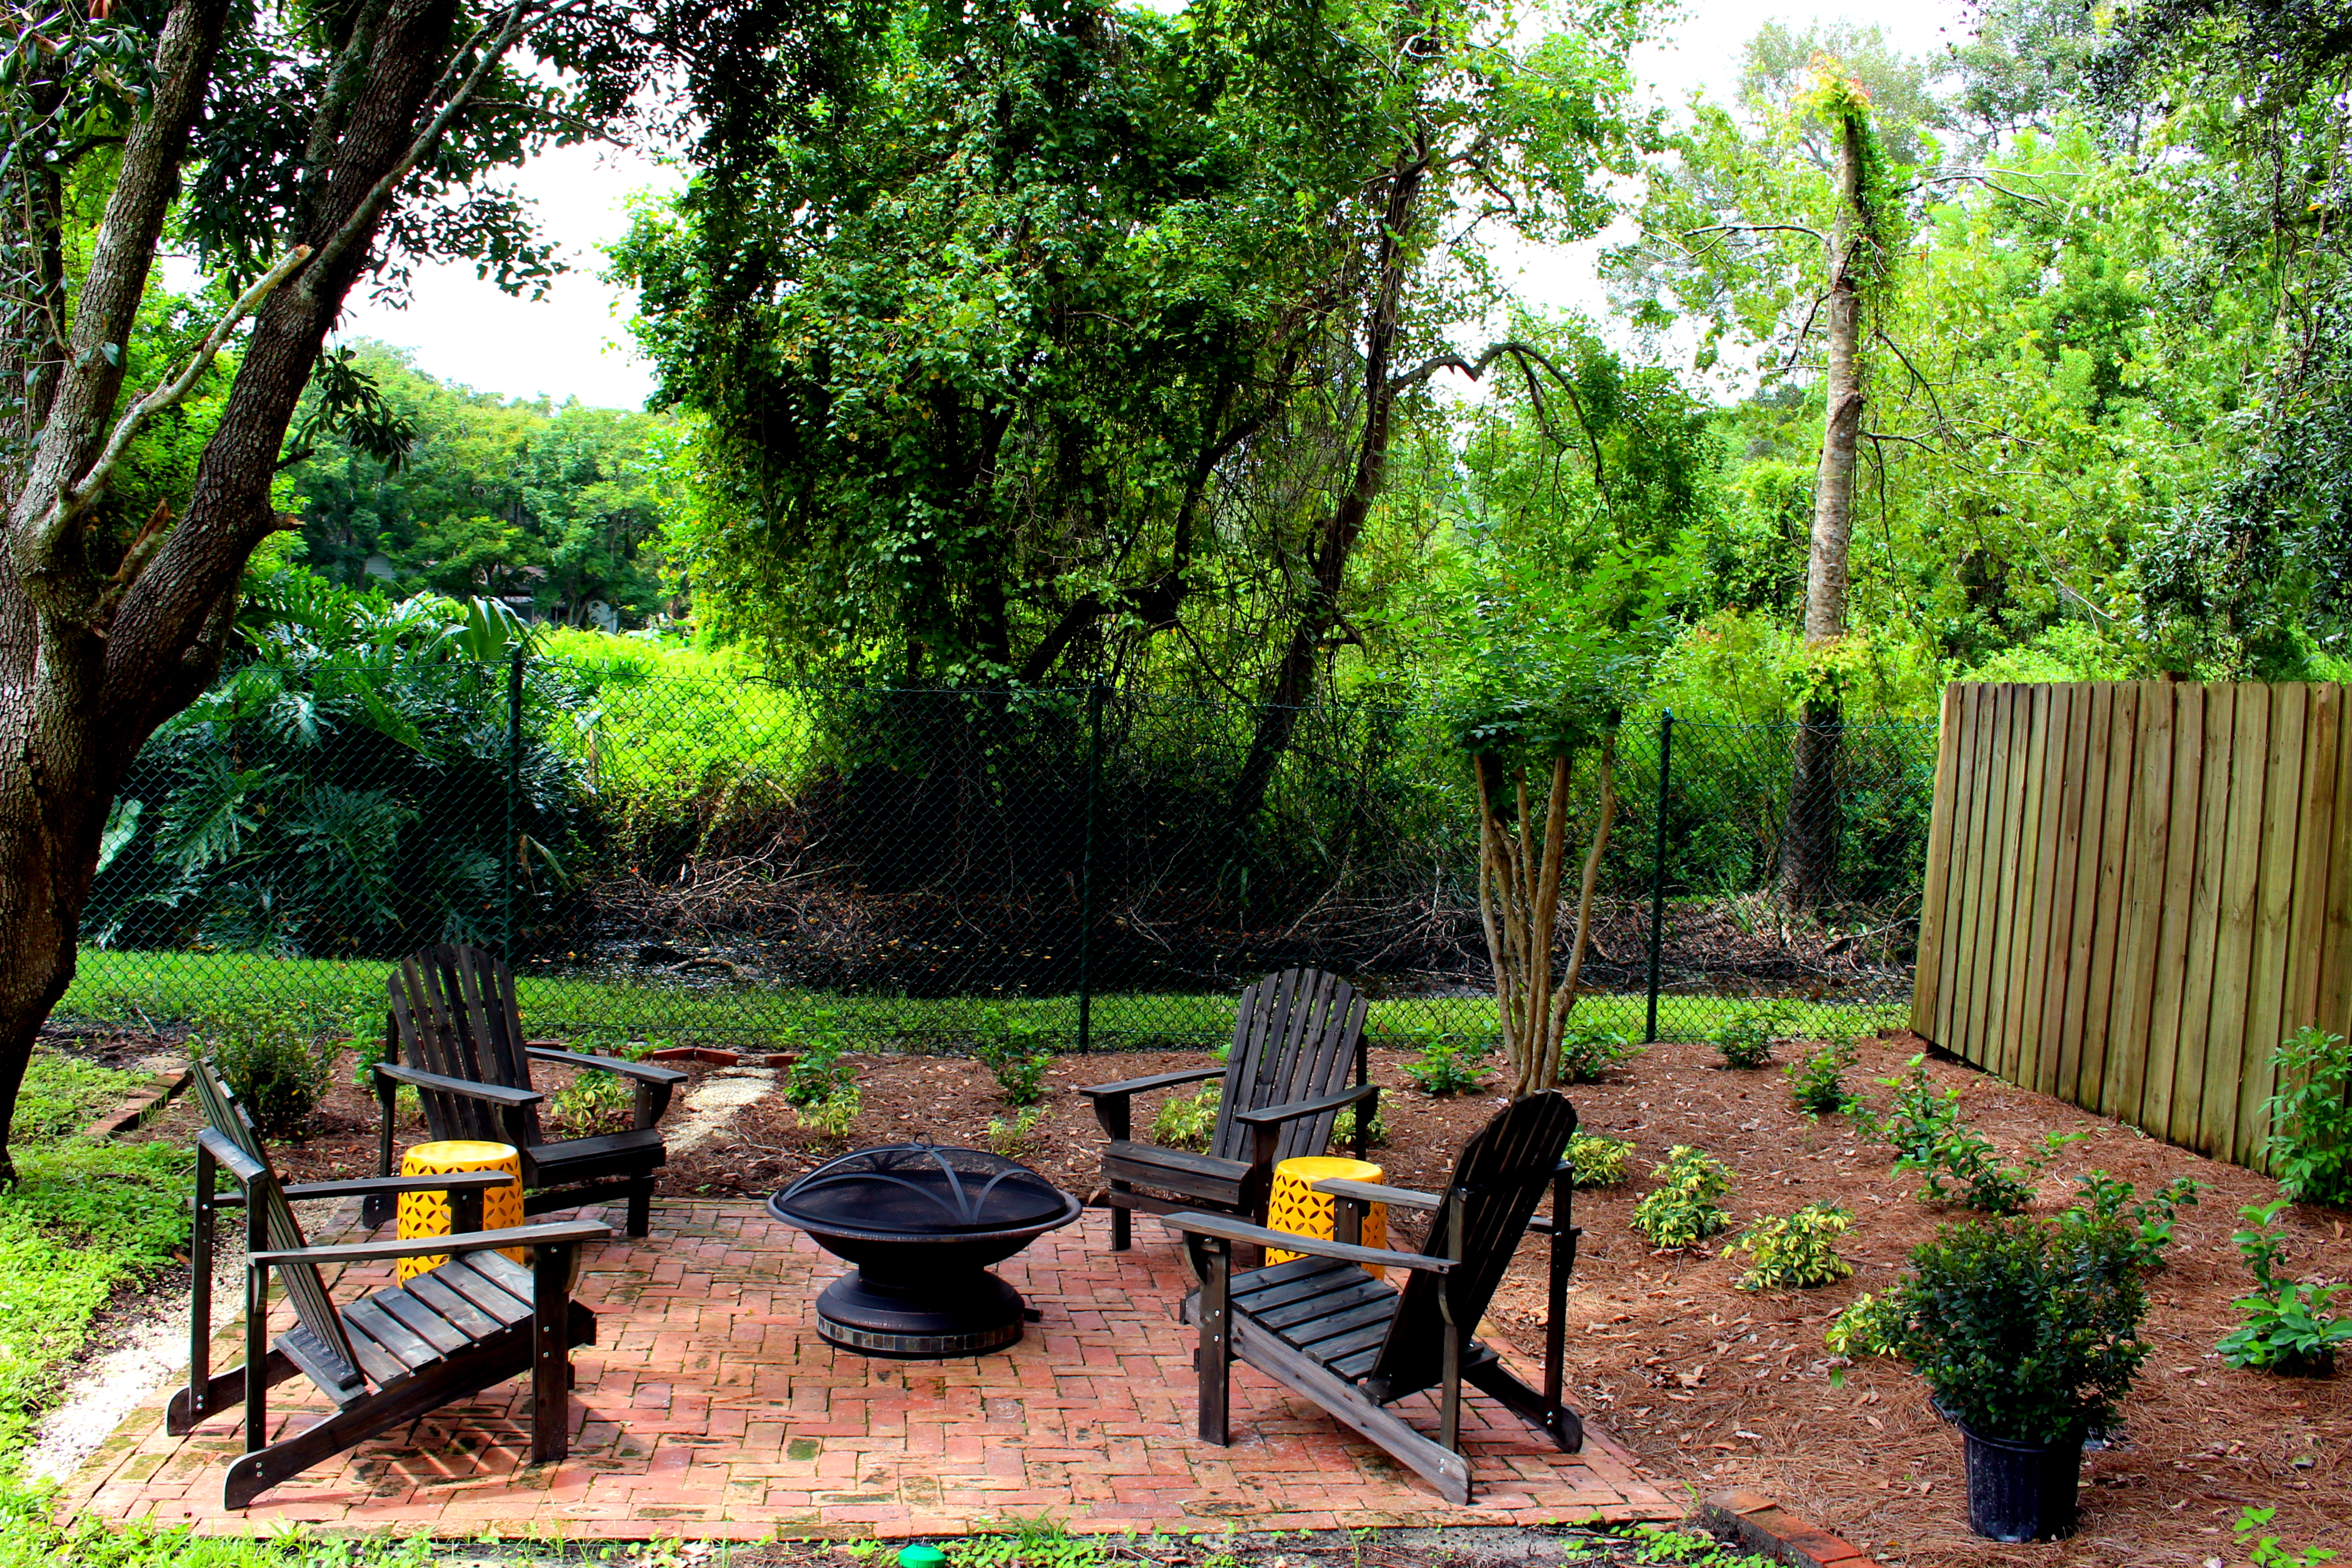
We’ve added more landscaping since this picture to our outdoor patio space {refer to the first picture in this post}.  We are hoping in the coming years to have a tiered shrubs to add depth and simplicity to this space.

New outdoor patio

There is so much more to be done to this space {pillows, lights, and outdoor decor}, but we wanted to share all that we have gotten accomplished so far!  Working through high temperatures, drinking gallons of water, pure heavy lifting, working in the rain, and placing down and painting 750 bricks, we have a new patio with new landscaping. It’s not for the faint of heart but enjoyed every second of this process.  Will we build another patio out of brick? Probably not.  We will try another patio with bigger stones?  Absolutely!  If you have any questions on our exact process, don’t hesitate to get in touch with your own outdoor patio space makeover!  Have a screened in patio space?  Take a look at ours after a weekend long makeover:  Patio Space Makeover. 

Ariel shot of a patio before.

Ariel shot of a patio after.

Let’s keep in touch!

We have a brand new community over on Facebook, House & Home, where we’ll be chatting, sharing, and helping one another when it comes to home decor and projects. Come join us! Check it out here.

Like on Facebook || Follow on Instagram || Follow on Pinterest

Share this:

  • Click to share on Twitter (Opens in new window)
  • Click to share on Facebook (Opens in new window)

Related

Filed Under: Home of the Rishels, Home Project, Our Home Improvements

« WTG Explores // Modern Calligraphy Workshop
Decor Daydreams // Laundry Room Storage »

Comments

  1. Ann McGlone says

    August 19, 2020 at 9:22 am

    I know this is an older post but any chance you remember what you used to stain bricks?

    Reply
  2. Gina says

    September 17, 2015 at 11:10 am

    That patio looks fantastic! I never would have known about the polymeric sand. I don’t have outdoor space yet to have a patio. But, I will keep this in mind for when I do! 🙂 I found you on the Think Creative Collective Facebook group.

    http://www.themultitaskingmissus.com/

    Reply
    • ElizabethRishel says

      September 17, 2015 at 6:59 pm

      Thank you so much Gina! The polymeric sand might work better for others, but I will for sure find an alternative next time. Love that you traveled over to my blog from the Think Creative Collective group. Can’t wait to dive into your blog!

      Reply
  3. renee says

    September 16, 2015 at 6:17 pm

    The patio is the coolest! And you house is beautiful!!

    Reply
    • ElizabethRishel says

      September 17, 2015 at 6:54 pm

      Thank you Renee! 🙂 Now it’s time for you to enjoy the patio!

      Reply

Trackbacks

  1. Home Project // Outdoor Patio Tables - Within the Grove says:
    October 21, 2015 at 6:45 am

    […] wood, purchased the citronella candles, and gathered the outdoor lights to start enjoying our new outdoor patio space with the cooler weather that is finally arriving here in Central Florida.  I realized a few weeks […]

    Reply

Leave a Reply Cancel reply

Your email address will not be published. Required fields are marked *

This site uses Akismet to reduce spam. Learn how your comment data is processed.

Looking for something?

withinthegrove

The garden is cleaned up, prepped, and ready for t The garden is cleaned up, prepped, and ready for the summer crop. What started as a single garden box has transformed to this garden space over the past few years. Favorite thing about it: being tucked away in this cozy corner with the winding paths throughout it. One thing I would do differently: using pea gravel instead of the granite rocks we went with. These rocks hurt! Pea gravel is smooth enough to comfortably walk barefoot on.
The grass is in! Saying BUH BYE to the dirt around The grass is in! Saying BUH BYE to the dirt around the pool for the first time since December when we broke ground. We spent the past few weeks installing irrigation throughout our backyard and around the pool. Yesterday we finally had the sod delivered and within a few hours it got us one step closer to finishing our backyard oasis. We still have a long ways to go, but my goodness does it feel good to see this part done! And we can finally check off the final inspection for the pool build.
What does it cost to fill a 16,000 gallon pool wit What does it cost to fill a 16,000 gallon pool with a garden hose? Our total came to $229! Does this total surprise you? This of course can greatly vary depending on where you live and your situation. For us, we live in Florida and on county water. We only pay water fees and not sewage. The water company did not give us a discount. We filled the pool right at the start of our billing month so this is it! Have you filled up a pool before? I’d love for you to share your cost, pool size, and location if you feel comfortable doing so!
We have a 16,000 gallon pool and filled it up with We have a 16,000 gallon pool and filled it up with a single water hose. And we for sure had some questions! Answering them here:

• Why not use a water truck? We weren’t in a rush, it was the best way to end this project watching it fill up, and it would have been more expensive. 

• Why not use our local fire station? Our local fire department doesn’t do this and it isn’t very common that most do. We wouldn’t ask if they did. 

• Did our water company give us a discount? Nope. Most water companies will take off the sewage fee but we only pay for water and not sewage where we live. We did notify them so they wouldn’t turn our water off thinking it was a leak. 

• What is that on the end of your hose? We added a filter on the hose to help reduce iron, scale, any other heavy metals and containments to help give our pool a fresh start. 

• How long did it take? 51 hours 

I’ll be sharing the cost soon so make sure to add your guess in the comments!
Pizza nights are back! And one thing we’re addin Pizza nights are back! And one thing we’re adding since our screen enclosure is gone, are these Bitefighter LED String Lights by @tikibrandproducts . You’ve seen us use them in our playset area and now for our patio area. They give us the ambiance we need at night while helping to fight off the mosquitoes as a 2 in 1 solution. There’s no odor, no mess, and they will last all season long. Cheers to the summer nights ahead! #ad #TIKIbrand
Protecting outdoor furniture for the summer!

It’s time to give your outdoor furniture the best start for summer and to help it last long term. Here are some things you can do to protect your outdoor furniture as we enter the summer season:

1. If you have wood furniture, it’s time to seal it! I use Thompson’s Waterseal on all my outdoor wood furniture except for teak. This protects it from moisture, sunshine, and mold/mildew.

2. Easiest way to help keep cushions clean is by spot cleaning throughout the season. I use 30 Seconds Outdoor Cleaner for quick, fresh looking cushions. 

3. To really protect cushions, Shield H2O provides a water repellent treatment that repels moisture and spills, which in return helps prevent mold and mildew. 

4. Have teak furniture? Use a teak SEALER and not an oil. Teak oil is a short term solution and easily washes out with rain. Time to seal it to last long term! 

I have everything I used in my Amazon storefront under outdoor.
We were told 16 weeks for our pool install but it We were told 16 weeks for our pool install but it ended up taking exactly 12 weeks. Broke ground on December 16th and started filling it with water on March 16th. I’m sharing all the pool details over on my blog. Including the answer to the number one question: How much did this cost? Covering how we picked a pool builder, the construction process, the materials we went with and why, what we splurged on and where we saved, and so much more. Save it for future reference! It’s a good one!
We have an outdoor dining space again! It’s some We have an outdoor dining space again! It’s something we have missed the most these past few months while under construction with the pool. I’m such a visual person so being able to walk into @homesense_us and see exactly what we could use to create our outdoor dining space was amazing. There was so much to choose from at a great price point and something for every style. I’m noticing more Homesense Stores opening around the US so check to see if there is one near you! #HomesensePartner #DiscoverHomesense

Here are a few tips for creating an outdoor dining space:

1. Choose a table that fits the space with at least 4 feet around each side. 
2. Plenty of seating. Extra seats if you have the space.
3. Add an option for shade.
4. Select a style + decor that suits you 
5. Use outdoor furniture that’s easy to maintain. 
6. Enjoy your new outdoor space!
Are we lounging poolside or beach side? It’s har Are we lounging poolside or beach side? It’s hard to tell without our sod installed yet but regardless, loving this new addition to the pool area. Just need to find some cute side tables and this part of the pool area is done. Should I go with teak or black ones?  I’ve linked everything on my LTK through the link in my profile!
Load More... Follow on Instagram

Sign up here to have our fresh posts delivered to your inbox!

Enter your email address:

Delivered by FeedBurner

Copyright © 2023 Within The Grove • Customized by Brave Creative Design · Log in

  • Privacy Policy
  • Terms and Conditions
  • Disclosures + Photo Usage
 

Loading Comments...