


Are you thinking of starting seeds indoors but have no idea where to start? You’ve come to the right place! I’m sharing all my tips and tricks with starting seeds indoors so that you’re well on your way to having the summer garden of your dreams. Let’s dive in!

- Benefits of Starting Seeds Indoors
- Choosing Easy Seeds to Start Indoors
- Selecting Containers and Soil for Starting Seeds Indoors
- Different Types of Containers for Indoor Seed Starting
- Best Seed Starter Mix to Use for Starting Seeds Indoors
- 3 Best Methods for Starting Seeds Indoors
- Seed Starting Kit Using Peat Pellets
- Seed Trays with Seed Cells Using Coconut Coir
- Soil Blocking Using Coconut Coir
- Planting Seeds and Caring for Seedlings
- Depth to Plant Seeds
- Setting up a Grow Rack
- How to Water Seedlings
- When and Why to Adjust the Lighting
- Planting Seedlings in Bigger Pots
- Transplanting Seedlings to the Garden
- Planting Seeds Indoors FAQ
Benefits of Starting Seeds Indoors
You might be wondering what the benefits are of starting seeds indoors. One of the main ones is living in a colder climate and getting a head start on your summer garden. This means you can move up your harvest date and get cut flowers sooner. Those vegetables that require a longer growing season, you’re also able to try if you live in a short-season climate by starting indoors first.
Another benefit of starting seeds indoors is having the most control over your seedlings. You can see which ones germinate, germinate successfully, give warmth and water as needed, and are less prone to pests and diseases at this delicate, early stage. Living in Florida, I can directly sow in the garden, but I still start mine indoors. I have the best success with starting my seedlings indoors and then transplanting them to the garden. You’ll want to start growing seeds indoors 6-8 weeks before your last frost in your area. But it’s never too late to start depending on your growing season length!

Choosing Easy Seeds to Start Indoors
If you’re starting seeds indoors for the first time, I would suggest starting with ones that are easy to germinate. Here are some of the best and easiest seeds to start indoors.
Best Seeds to Start Indoors
Vegetables
- Tomatoes (Sweet 100 is a favorite around here!)
- Squash
- Cucumbers
- Peppers
- Okra
- Kale
Flowers
- Zinnias (My FAVORITE)
- Cosmos
- Marigolds
- Sunflowers
- Celosia
- Morning Glory
- Sweet Peas
- Calendula
Some seeds don’t do well with starting indoors and transplanting into the garden. They do better directly sown into the garden. For example, radishes and arugula do very well with the seeds planted directly into the garden. Fun fact: radishes are one of the fastest vegetables to harvest. Only takes 25 days from sowing to harvest! When it comes to flowers, poppies are better sown directly into the garden. This flower doesn’t do well with transplanting. If you’re unsure about a vegetable or flower, it takes just a few seconds to look it up to see if starting it indoors or in a garden is better.

Where to Purchase Seeds for Indoor Planting
There are plenty of places where you can purchase seeds. For your most common vegetable and flower seeds, you can find these seeds at your local home improvement stores like Home Depot, Lowe’s, and Ace Hardware, to name a few. Those are going to have your most common vegetable and flower seeds. If you want a different variety of vegetables or flowers, to try something very unique, or you didn’t find what you wanted in the store, you’re best to buy your seeds online. There are plenty of places to purchase from, but here are my go-to places to buy seeds online:
- Floret Flowers – This is my favorite place to buy my flower seeds. They offer such unique varieties. The only downside is that they release their seeds once or twice a year, and they sell out quickly!
- Park Seed – I buy vegetable and flower seeds from Park Seed. Fun fact: they’re one of America’s oldest and largest mail-order seed and plant company. It was founded in 1868 by 15-year-old George W. Park. I love how each packet of seeds also tells you where it was harvested from.
- Johnny’s Selected Seeds – Great for both vegetables and flowers. Each packet of seeds tells you the germination success rate.
- Baker Creek Heriloom Seeds – If you’re looking for unique or rare seeds, look here!
- Renee’s Garden – This is a garden-to-table seed company that only offers non-GMO varieties. Each packet of seeds was a beautiful watercolor portrait of the flower or vegetable. I’ve also used their cover crop during our off-season, which was amazing!
- Ferry Morse
- Burpee

Selecting Containers and Soil for Starting Seeds Indoors
Different Types of Containers for Indoor Seed Starting
You can certainly upcycle containers that you have to start your seeds. Things like egg cartons, plastic jugs cut in half, etc. I love to use seed starting trays that I use year after year. Most of them also come with a lid which helps with the germination process. I’ll dive more into these options below!
Best Seed Starter Mix to Use for Starting Seeds Indoors
You don’t want to use potting mix or soil to start your seeds. The growth medium you want to use is a seed starter mix that doesn’t contain any soil. Soil is dense, and you want to use a lightweight growth medium that doesn’t weigh down the seeds, allows the roots to grow easily, provides airflow, and provides drainage yet retains enough moisture to allow germination.
Germination doesn’t require any nutrients. Just air, water, and light while providing an easy way for the roots to grow. You can find bags of seed starter mix that you can use. I will show you two other growth mediums below that I use.

3 Best Methods for Starting Seeds Indoors
There are a few different methods I’ve used when it comes to starting seeds indoors. As far as picking which one to use for yourself, it’s ultimately the best and easiest way that works for you. Make sure to label your seeds either using plant labels or creating a diagram to refer to. I’ll mark on the corner of the tray a symbol and the same symbol on my diagram to keep track.

Seed Starting Kit Using Peat Pellets
When we started gardening years ago and tried seeds for the first time, I started by using seed-starting kits using peat pellets. The kit includes the base tray, peat pellets, and the lid to help lock in moisture.
All you do is add water, and the peat pellets will expand. It’s the coolest thing to watch! There’s a pre-made hole in the center of each one where you can plant your seed. Make sure to tear the fine netting around the peat away from the top. You can use trays that hold 36 plants up to trays that hold 72 plants. It’s one of the easiest ways to get started! You can also save the trays and buy just the peat pellets for the next growing season.


Seed Trays with Seed Cells Using Coconut Coir
Another growth medium you can use is coconut coir seed starting mix. It’s made from the fiber found between the husk and the outer shell of coconuts which is pretty cool. This year I used these compact coconut coir blocks that expanded to 16 quarts of growing medium after adding water.


It’s a pretty decent amount, especially if you want to start a lot of seeds. Even if you don’t use all of it, you can place it in a container to use later.


For this method, I used seed trays with seed cells where I could easily place the coconut coir. They’re officially seed ready! These particular trays also come with the base tray to allow for bottom watering and a dome lid to help keep moisture and heat in for germination.


Soil Blocking Using Coconut Coir
The third method is still using the coconut coir growth medium but doing soil blocking. I’ve wanted to try this for years, and this is the year I’m going for it! What is soil blocking? It’s starting seeds in cubes of the growth medium vs in a seed cell or pot. This method allows for better airflow which in return creates stronger and healthier root growth and won’t become root bound. It’s also less stressful on the roots and you don’t have to worry about damaging them when transplanting to the garden.


You’ll need a soil blocking tool which comes in various sizes. I’m using a soil blocking tool that creates 2″ x 2″ cubes. After you’ve added the water to the coconut coir and it has expanded in a container, you’ll fill the seed blocking tool with the coconut coir. Make sure it’s compacted in there.


You’ll then press it into your seed starting tray. I placed mine on a mesh bottom tray and placed that in a seed tray with no holes in it to allow for bottom watering. You’ll also want to make sure you have a lid.

Planting Seeds and Caring for Seedlings
Depth to Plant Seeds
Whichever method you decide to go with, the important thing is how deep you plant your seeds. This all depends on the size of your seed. The general rule of thumb is that a seed should be planted at a depth two times the width of the seed. There are some seeds like poppies, snapdragons, and lettuce that shouldn’t be covered at all with how small they are. You sprinkle them right on top.
Setting up a Grow Rack
The next important thing to set up for your seeds is a grow rack. Remember, seeds need air, water, and light to germinate. A grow rack is the most efficient and consistent in germinating and growing seedlings. Depending on the amount you’re trying to germinate, this can determine your growing rack system.
During our first few years germinating seeds, I used this grow rack setup (and still use it). It’s quick to set up and doesn’t take up a lot of space. You can fit two full seed trays underneath it. And I love how the light is easily adjustable.

When germinating a lot of seeds, you might want to consider making this grow rack system. I followed Urban Farmstead’s tutorial for a DIY LED grow rack. It has worked great for us! We’re able to fit a lot of seed trays, it can easily be moved, the lights are adjustable, and it breaks down for easily for storage.

You’ll notice that heat mats and fans are also recommended. The heat mats help with the germination process. The fans help keep the plants cool plus mimic wind. I don’t use either of these and I’ve had success with growing seedlings. But this might be something you want to consider or try when starting seeds indoors.
How to Water Seedlings
For the seeds to germinate, you want to keep the soil moist and the seeds damp. The lid you place on the seed tray usually keeps a succulent amount of moisture in. I typically fill the seed tray until it’s about a quarter full of water. By bottom watering, you won’t wash away the dirt, the seeds, or disrupt with germination process.
I check on them daily but find that I’m only adding water every few days. The lid makes such a huge difference with this! Keep in mind, too much water can cause mold and fungus so just keep an eye out. Even once the seedlings have sprouted, continue with the bottom watering.

When and Why to Adjust the Lighting
Your seedlings are going to need about 14-16 hours of light every day, turning them off at night for rest. Which is another reason why a growing rack system is so beneficial for starting seeds indoors. Lighting is going to make the biggest difference with growing strong, healthy seedlings. But not adjusting your lighting or using it properly, can cause your seedlings to become leggy and possible not survive.
You want to position your grow lights a few inches above the seedlings. If you place the lights higher than that, then your seedlings are going to reach for light causing them to become leggy. It’s not that they are not longer healthy, it’s just not ideal. You want the stem of the plant to be strong. As your seedlings grow, adjust your lighting. Also keep an eye out for any burnt leaves. If you notice that, you have your lights too close.

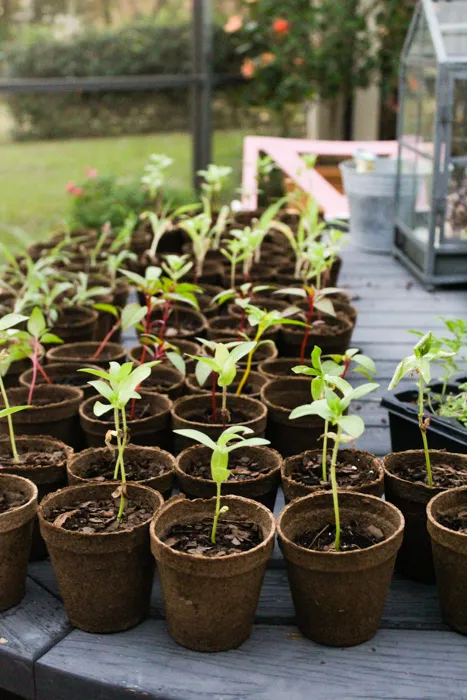
Planting Seedlings in Bigger Pots
You’ll start to notice that your seedlings might need a bigger pot in order to continue healthy growth until it’s time to plant them in the garden. BY transferring them to a bigger pot, this will also make sure that the root system continues to have plenty of room to grow. This usually happens about 3 weeks after they’ve germinated, you start to notice two sets of true leaves, they seem crowded, and the root system is starting to become root bound.
At this point you can officially start adding potting mix when transferring your seedlings to the new container. To help the transition, I’ll use half potting mix and half the coconut coir in the new container. I use these plastic containers that I use year after year and write the name of the plant directly on the container. Keep them growing under the grow lights after transferred to the new containers.

Transplanting Seedlings to the Garden
Determining the Right Time to Transplant
You don’t want to transplants your seedlings to your garden too early or even too late if they’ve gotten used to the container. So when is the best time? When you notice that your seedling has 3 to 4 sets of true leaves, it’s time to transplant them. But there’s one more step before planting them in the garden.
Your seedlings have had the perfect, controlled environment to grow in. No pests, no diseases that can reach them, and no harsh winds or thunderstorms to bend or break their stems. It has allowed them grow into the healthy little plants that they are. But immediately transplanting them into your garden. They will most likely go into shock from the wind and could get burned by the sun. All that hard work growing your seedlings could be lost within a day or two.

Preparing to Transplant Seedlings to the Garden
To prepare your seedlings for transplanting to the garden, you’ll want harden them off and gradually get them used to their new outdoor environment. You want to acclimate them to their new environment. You’ll want to do this about 1-2 weeks before planting them in the garden and when the temperature is consistently 45 degrees. Follow this simple guide:
Day 1: Place plants outside for 1 hour, not in direct sunlight. Bring back in after one hour.
Day 2: Place plants outside for 2 hours, not in direct sunlight. Bring back in.
Day 3: Place plants outside for 3 hours, not in direct sunlight. Bring back in.
Starting on Day 4: Start placing the seedlings in an area where they’ll receive morning sun for a few hours. Then after a day or two, start exposing them to more direct sun. Remember, this is also as you gradually increase their time spent outside. As they’re able to handle the increasing amount of sunlight, if it’s above 50 dregs at night, you can start to leave them outside.
After 7-14 days of hardening them off: They’re ready to be transplanted to the garden! I’ve learned from experienced this is best done on a cloudy day if possible and water them well after transplanting.

Planting Seeds Indoors FAQ
- What happens if you start seeds indoors too early?
The main issue with starting seeds too early is that it can result in bigger plants. At first thought, that sounds great. But when it’s still too cold to transplant outside, they could reach maturity indoors and cause them to bolt or not grow properly. It can also come down to a space issue. The bigger the plant, the more room you need for them to grow and still receive the adequate amount of light. - Should I start seeds in paper towel or soil?
You’ll want to start your seeds in a growth medium if indoors or directly sown in the garden. Soil or a growth medium is going to provide the best natural environment for a seed to germinate and grow. - Is it better to start seeds in soil or water?
If you want to speed up the germination process, you can presoak seeds in water overnight. It allows the seeds to be ready to sprout as soon as they’re planted in the soil or growth medium. - Should seeds started indoors be covered?
You’ll want to place a cover on the tray to help keep moisture in. As soon as the seedlings sprout, remove the cover for airflow.
- Can you put seeds straight into soil indoors?
Yes! But instead of of using soil, you’ll want to use a growing medium like coconut coir or a seed starting mix. - Should you soak seeds before planting indoors?
Research the seed you’re about to plant. Most seeds to just fine planting directly into soil or a growth medium. But there are some seeds that do better by doing a 24 hour pre-soak in water first. - What happens if you don’t soak seeds before planting?
Your seeds will still germinate and sprout without soaking them before planting. A benefit of pre-soaking the seeds first is that the germination time decreases and the rate of germination increases. - How late is too late to start seeds?
It all depends on the seed and your climate. You’ll want to check that back of the seed packet to see how long it takes the seed to germinate. Then check time frame from the time you plant the seed to harvest.


Looking for more gardening inspiration? See how to plant a container garden, what we planted last year in the garden, planting a pollinator garden, and how to create a butterfly and bee garden.

fed up and the garden arrangement is very nice