• Home
  • ABOUT
  • WORK WITH ME
  • Paint Colors
  • Shop Our House
    • Guest Bedroom
    • Front Living Room
    • Living Room with Fireplace
    • Previous Second Living Room
    • Current Playroom
    • Prior Playroom
    • Dining Room
    • Laundry Room
    • Oliver’s Bedroom
    • Guest Bathroom
    • Covered Lanai
    • Patio
    • Master Bedroom
  • CONTACT
    • Facebook
    • Instagram
    • Pinterest

Within the Grove

Join the list to receive occasional news and special updates!

Home Project // Backyard Patio Makeover

August 23, 2016

Backyard Patio Makeover Reveal

When we moved into our home a little over two years ago, we knew that the patio space directly off of our house would be a slow work in progress. Fast forward to this past June when we decided to finally flip the space and make it a patio for us to enjoy.  Did I mention I was 28 weeks pregnant when we started and it took about 4 weekends {and a couple week days} to complete this project?  And oh yeah, we picked the middle of the summer to complete this massive project.  

But let me tell you, it was worth every second in the Florida heat! We’re in love with our new outdoor space {in addition to our other outdoor patio space and our screened in patio flip from last summer}. We can’t wait to share how the process of creating our new space.  Here’s a glance at the before and after:

Before and After of a backyard patio makeover

About a year ago I removed about 3 feet in width of bricks along the length of the patio.  That’s when we realized the daunting task this was going to be. We gave those bricks away, call us crazy, and pushed the patio makeover on the back burner.  That was until our boho inspired baby shower was planned to be hosted at our home. We knew we had to once again start and finally finish the patio.  Thank goodness we started with a month to get it done.  

Our patio was pretty horrible.  Weeds growing left and right, bricks shifting {probably from last year when we removed part of the patio}, random paint stains, and overall just ugly.  But hey, it makes for a great before:

The patio before the makeover

Before making over the patio

We recruited a few family members and we got started right away removing the bricks.  Sounds easy until you realize you have 800 bricks to carry off to the side of the house and stack.  But we did it!

Removing brick from the old patio

Recycling brick from an old patio

Along the way though, we certainly found some interesting finds:

Cleaning out the patio space

The most intriguing of them all?  A sidewalk. Let me say that again, a stubborn, unappealing, make us stomp our feet sidewalk found hidden underneath the bricks and dirt.  We called it a day after we found the sidewalk. We felt defeated knowing we had to remove it {which put us about a week behind}.  

Ryan was a trooper! He hammered away, lifted, and hauled off 2000 pounds of concrete.  Rewind back to me being 28 weeks pregnant and not being able to lift that amount of weight.

Sidewalk hidden under the brick patio

We were good to go from there {fingers crossed}.  We measured the new dimensions for our patio space, edged it out, and leveled out the dirt.  Good news about the sidewalk?  Because we had to remove it, we didn’t have to remove any dirt to make enough room for the new pavers.

Leveling the area for a new patio

Weekend number two was underway. We had Pebble Junction {best place ever} deliver coquina in order to provide a rock base and drainage for the new patio area. It’s important for any patio space, especially in Florida.  I have to admit that I got a good chuckle when I saw the size of the truck versus how much coquina we ordered.

Having coquina delivered to the house

Pebble Junction delivering sand

Help arrived and we got started spreading the coquina throughout the patio space.  A little leveling and another part of the patio process was done.  At this point, the patio was already better than the before picture. I do believe we paid in fudge brownies this particular day.

Digging into the coquina

Leveling the coquina

As weekend number three arrived, we drove to Pebble Junction to purchase leveling sand and pick out the rock to place between the pavers. This place is like an outdoor playground for the yard and patio enthusiast.

Buying rocks and sand at Pebble Junction

By placing leveling sand over the coquina, it allowed us to make sure the entire patio space was level and to easily adjust pavers as Ryan placed them down. Why just Ryan? The pavers that we found at Home Depot {best price for the size} weighed 54 pounds each. There was no way I could help lift the pavers. So needless to say, Ryan lifted and placed 66 large pavers. We adjusted as we went along using the leveling sand if a paver was unbalanced or moved. We also used a 3 inch piece of lumber to make sure there was a 3 inch perimeter around each paver. It was a lengthy process but it was worth every minute of taking our time.

Placing pavers down

Finally, the last weekend we would have to work on our new patio arrived.  We made the last trip to Pebble Junction to purchase small river jack rocks. With the help of amazing family and our new neighbors, we were able to pour the river jack rocks between all the pavers and install edging along the side of the patio.  We collapsed in the grass as we all gazed at the new patio after weeks of working on it.

Placing river jack between the pavers

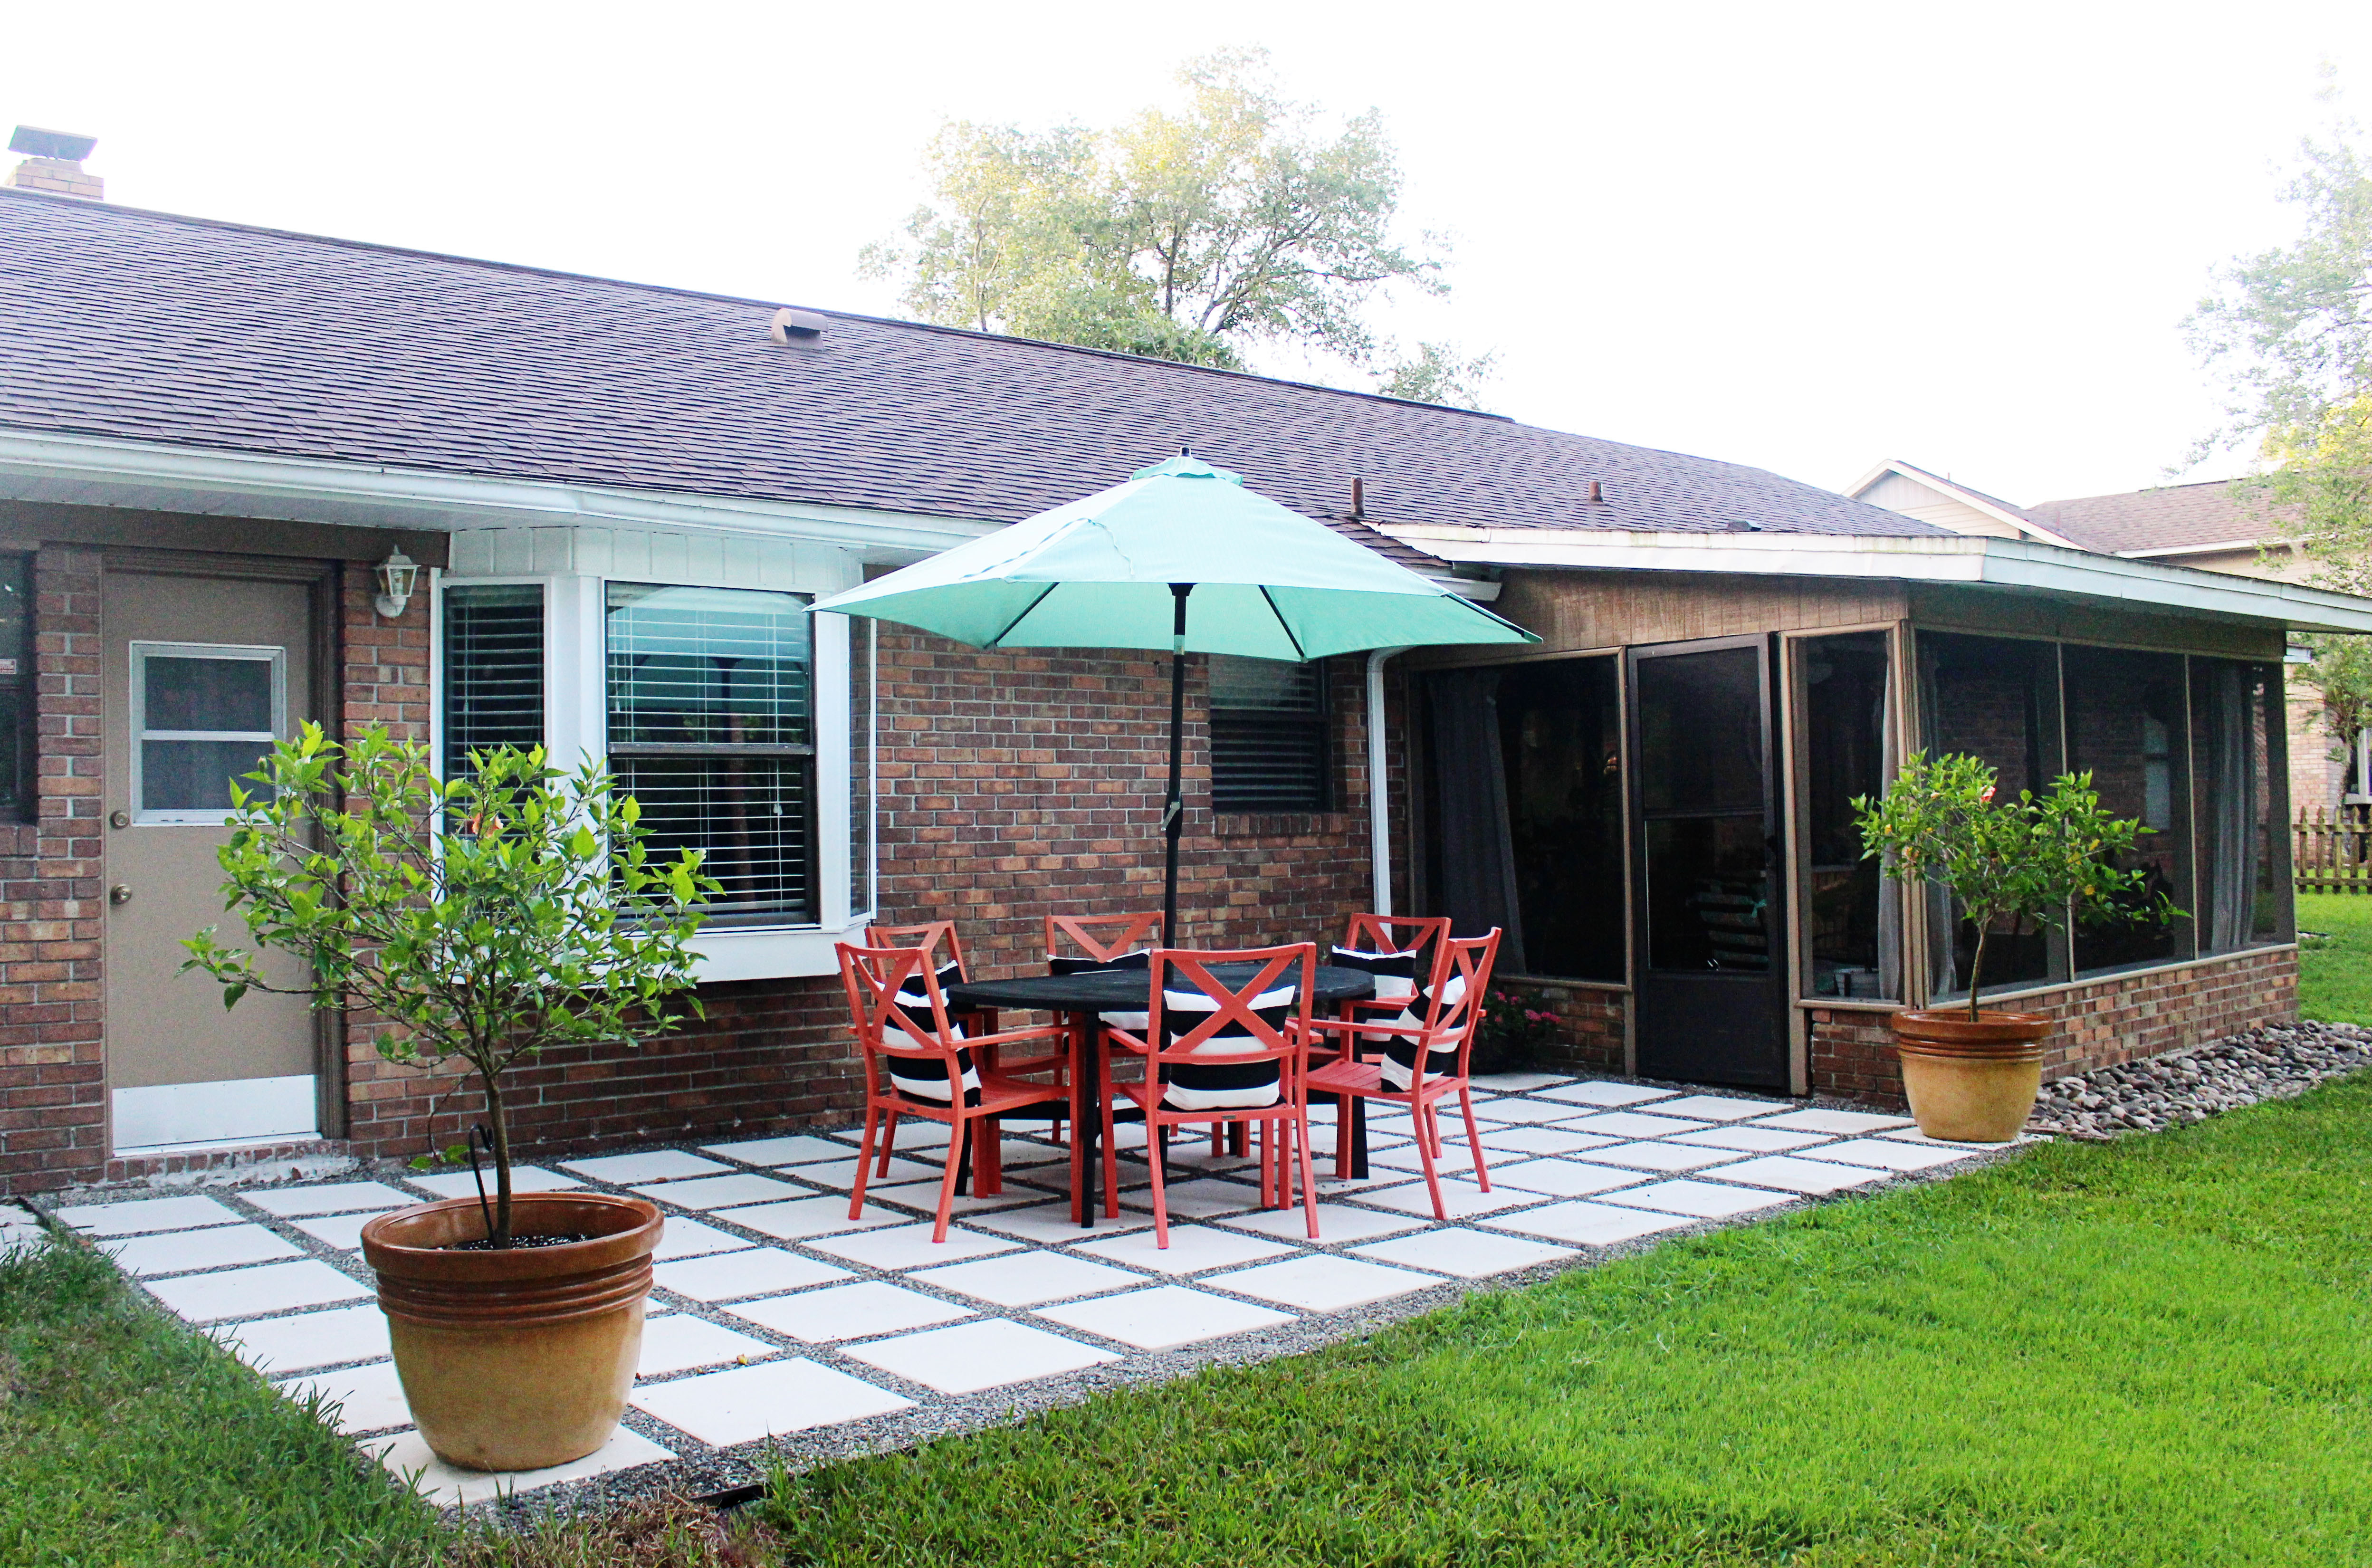
Was it easy? Goodness no.  Was it worth every single hot summer day spent on it? Absolutely! I’ll let the images of our finished patio do all the talking! You’ll also find where I found and/or made each item on the new patio space at the end of the post.

New patio table

Patio design

Outdoor pillows for patio

Building a Patio with Pavers and Rocks

Patio Pavers with rocks

Flower pots on patio

Patio After

After picture of the patio

20″ x 20″ pavers: Home Depot || River Jack Pebbles: Pebble Junction || Patio Table: Found curbside || Coral Chairs: Target {on clearance too!} || Seafoam Umbrella: Target Clearance || Black and White Pillows: Made with fabric from Jo-Ann ||

Let’s keep in touch!

We have a brand new community over on Facebook, House & Home, where we’ll be chatting, sharing, and helping one another when it comes to home decor and projects. Come join us! Check it out here.

Like on Facebook || Follow on Instagram || Follow on Pinterest

Share this:

  • Click to share on Twitter (Opens in new window)
  • Click to share on Facebook (Opens in new window)

Related

Filed Under: Home of the Rishels, Home Project, Our Home Improvements

« WTG Explores // Dreamy Greenhouse Maternity Photos
September 2016 Be Where You Are Wallpaper // Free Download »

Comments

  1. Renee rishel says

    August 23, 2016 at 7:39 pm

    Ryan is a beast!

    Reply

Trackbacks

  1. Planning Our Outdoor Oasis - Within the Grove says:
    July 19, 2020 at 11:27 pm

    […] outdoor inspiration with patios? Check out a few of our past projects.Adding Lighting to Our PatioInstalling a PatioQuick and Simple Outdoor […]

    Reply

Leave a Reply Cancel reply

Your email address will not be published. Required fields are marked *

This site uses Akismet to reduce spam. Learn how your comment data is processed.

Looking for something?

withinthegrove

This pretty much sums up the progress of making 25 This pretty much sums up the progress of making 250 cement tiles. But I’m halfway through! The moment I finish the last tile is the moment I knock out the old tile. Let’s do this!
Time to bet on my DIY skills! I’m attempting to Time to bet on my DIY skills! I’m attempting to make my own cement tiles for our outdoor front door area. Mainly because of what I’m saving vs buying them. Won’t be saving much on time but I’M MAKING TILES! Never thought I’d hear myself say that. Make sure to follow along because if this works out, I have a feeling a lot of you are already eyeing a spot in your home to try your own DIY cement tiles. 
 
Thank you @vintagerevivals and @abby_roadhome for showing it’s possible with your gorgeous bathroom tiles! 

#CementTiles #DiyCementTiles #DiyProject #DIYonABudget #DIYProjects
We got the call that the pool build is starting! W We got the call that the pool build is starting! Which had me scrambling to dig up all the plants that were in the way in an effort to save them. Literally down to the last second before the crew showed up. Exciting day but you know what’s even more exciting? Knowing the next crew will officially be breaking ground with the excavation phase of the build.
This time of year is full of organizing and purgin This time of year is full of organizing and purging to bring spaces back to life. But sometimes all a space needs to feel refreshed is, well, a refresh and a little attention. Your number one requested space was the living room. So I gave mine a refresh with some unique and gorgeous finds from @homesense_us . I found a few fun pots for my houseplants, a gorgeous magnifying glass, and a few other items for our coffee table and couch.

I never know what I’m going to find when I walk into Homesense since it’s always rotating with amazing finds. But I do know I’ll walk out with a few new favorites for my home at affordable prices. If you haven’t yet, I urge you to check and see if you have a Homesense near you! #DiscoverHomesense #HomesensePartner
2022, you were awesome. But I’m determined to ma 2022, you were awesome. But I’m determined to make 2023 even better! And I hope you join me! We can be one of our biggest cheerleaders, but together we’re going to do big things. Go ahead and write down a big, small and a few in-between projects you want to get done this year in your home. Kicking it off with intention and that reminder that we can do this. Ready to get started?! Let me know in the comments the first project you want to tackle!
We finally got the Christmas/winter edition of the We finally got the Christmas/winter edition of the window projection up and running! It was a hit for Halloween and just as fun for this time of year as well. I built frames wrapped with a plastic drop cloth but you can also secure the drop cloth over the windows using command strips. The videos are from @atmosfx and we use a mini projector to play them on the screen. Place a Bluetooth speaker outside and you’re in business! Such a fun addition this time of year for the exterior of your home.
It’s the last little bit of the demo we needed t It’s the last little bit of the demo we needed to do in order to give the green light for the pool to start. And 2,456 pavers later, it’s done! This was exhausting but worth the money we saved doing it ourselves. And why remove them? We’re using a different stone around the pool and we want it to be cohesive up to the house. Don’t worry, someone got one heck of a deal on these pavers, we made a little money, and someone else got them out of our driveway. I’d say that’s a win-win. Stayed tuned for the entire pool process as we enter 2023. It’s going to be pretty exciting to watch!
Our patio space has served us so well over the yea Our patio space has served us so well over the years and now it’s time for a change because we’re getting a POOL!! Sharing this with you makes it even more real because just a year ago I would have told you it isn’t in the cards for us. We’ll be breaking ground soon but first we have to remove the screen enclosure. Spoiler: we won’t be putting one back up around the pool. It has already made the biggest difference visually and SO much natural light pours into our home now with it gone. It’s going to be so exciting seeing this all unfold so stay tuned! Up next: removing the pavers.
This holiday season we were able to travel to my h This holiday season we were able to travel to my hometown for the first time in awhile. We were greeted by the most beautiful sunset on the beach. Fast forward to this week as I headed to @homesense_us for some holiday shopping, and I ended up finding a few pieces for our home that remind me of that core memory on the beach. The beautiful wicker bench caught my eye first followed by the comforter and toss pillows. Everything at amazing price points while not sacrificing style and quality. #HomesensePartner

Mixing a thrill of a find with a core memory, I guarantee you'll fall in love with your home even more as you go to decorate. Decorating your home isn't grasping on to the newest trend or what you think others would do. It's what YOU want to do. And sometimes that's based on an emotional connection. Oh, the stories your spaces will be able to tell as you decorate each one. Start with seeing if there’s a @homesense_us near you! #DiscoverHomesense #HomesenseSarasota
Load More... Follow on Instagram

Sign up here to have our fresh posts delivered to your inbox!

Enter your email address:

Delivered by FeedBurner

Copyright © 2023 Within The Grove • Customized by Brave Creative Design · Log in

  • Privacy Policy
  • Terms and Conditions
  • Disclosures + Photo Usage
 

Loading Comments...