


Working with a small patio or want to decorate the outside of your home with plants? Creating a DIY vertical wall garden is a space-saving idea that’s easy and affordable!
I’m always trying to find a way to add plants to my outdoor spaces. Over the years, we’ve spent a lot of time working on the landscaping of our yard, creating an outdoor play area, a garden, a pool and more. But adding more plants to our patio space is another favorite project of mine.
Sometimes the hard part about incorporating plants on a patio is the limited space. But I have a great small patio design solution: creating a DIY wall-mounted vertical garden.
This post is sponsored by HomeRight and contains affiliate links for your shopping convenience. As always, all thoughts and opinions are my own. Click here to read my full disclosure policy.
Our Wall-Mounted Vertical Garden Design

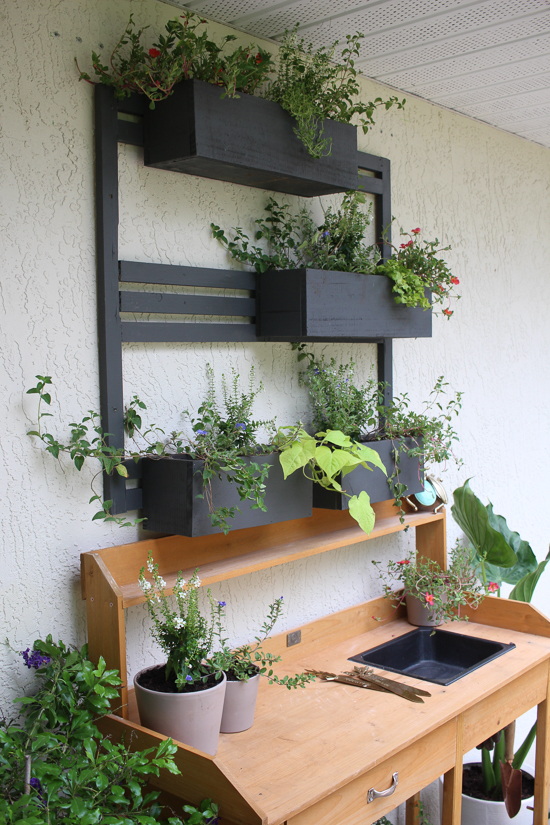
Rather than making a free standing vertical garden, we wanted to build one that would hang on the wall above our potting station. Not only would it allow us use our potting station more, but it brings a piece of decor to the patio that you can see from every angle.
And as you can see, here’s the vertical wall garden design we came up with.

The best part? This is perfect for any type of space since you can build it to meet your custom measurements. So, how exactly did we build this vertical wall garden? Allow me to share our process with you!

DIY Vertical Wall Garden Materials
Tools Needed:
Materials Needed:
- Exterior latex paint
- 1 x 2’s
- 1-inch nails for the brad nailer
- Wood glue
- Pocket hole screws
- Fence pickets
- 60 grit sandpaper
- 1-inch screws
- Dirt
- Flowers + herbs
- French cleats
- Concrete screws
How to Make a Vertical Garden
First we determined the size of our vertical wall garden. I had my heart set on a size that would give me an abundance of flowers but our vertical wall garden went through a few changes.
We realized after building the original design (that you’ll see in the step-by-step), that the weight was just too much with using wood. We cut it down to a little over half the size and it ended up being the best decision! The final size is one that provides a huge impact but isn’t overwhelming.
The great thing about this project, though, is that you can create a similar design in any size you need or want for your space. If you want to fill an entire exterior wall, you can do that! If you want to create a small wall-mounted vertical garden for your patio, you can do that too.
Follow along with the step-by-step instructions for how to build this DIY wall garden below.

Step 1: Create the Frame
We started by cutting out the top, bottom and two side pieces for the frame of our vertical wall garden using 1 x 2’s. Using a Kreg Jig, we drilled a pocket hole on both ends of the side pieces. We attached all four pieces together using pocket hole screws while also applying wood glue on the ends.


Step 2: Create Slat Design
Next up we cut the remaining 1 x 2’s to fit on the inside of the frame creating a modern design. You want to look at these like the slats of the vertical wall garden. I quickly and easily attached them by using the kreg jig once again on the ends and screwing them into the side pieces.


Step 3: Build the Planter Boxes
Once the frame was done, we started on the DIY planter boxes. We decided to build these out of fence pickets since they’re durable for weather conditions and a very affordable option. I used painter’s tape to map out the placement of the planter boxes and to help determined the size I wanted each one.

For each planter box we cut out two side pieces, a front piece, back piece and bottom piece. The boxes varied in length but were the same with the depth and height for a clean, overall look on the vertical wall garden. To make it simple, we used the width of the fence picket as the height for the planter boxes. We then cut the side pieces to the depth we wanted each planter box. For the bottom piece, I measured the inside of the box from left to right and front to back. This gave us an exact measurement for a snug fit which is best done with a table saw for this piece.

Using wood glue, I applied it on both short sides of the bottom piece and attached the side pieces using the brad nailer. Then followed the same method to attach the front and back piece. These planter boxes are really that simple to piece together. You just want to make sure you’re nailing the pieces into the side of the bottom piece so that it doesn’t show at the bottom.


Step 4: Paint Your Vertical Wall Garden
This next step has to be my favorite because of how enjoyable painting projects have become. It wasn’t always this way and used to take hours to paint something like this. But ever since I invested in my HomeRight Super Finish Max, painting projects take a quarter of the time. Honestly, the clean up sometimes takes longer.

So, with my HomeRight Super Finish Max in hand, I loaded it with Iron Ore by Sherwin-Williams and painted the frame for the vertical wall garden and all of the planter boxes. The best part about this paint sprayer is that I don’t have to thin out the paint. I just pour, secure and go!

This is all thanks to the interchangeable tips it comes with (I used the green one for latex paint) and the 450 watts of power it provides. I’m sharing over on HomeRight’s DIY blog how I prepped and quickly painted this project if you’re wanting more of a detailed tutorial on it.


Step 5: Fill the Planters & Hang
Once the paint dried, I planted my flowers and herbs in the planters. I figured this would be easier to do before I attached them to the frame. Once everything was planted, I held a planter box up against the top slat of each section and made sure it was level. As I was holding it in place, Ryan screwed it to the slat using a few screws.

Step 6: Mount the Wall Garden
With all the planters in place, we hung the vertical wall garden on the wall using a French cleat that can hold 100+ pounds. Just remember to take your time with this step to ensure that the frame will be centered where you want it on the wall.

The Finished Product
Even though there were a few learning curves along the way with this project, I’m beyond excited about the final look of the vertical wall garden. It’s the finishing touch I was looking for when it comes to this corner of the patio. Plus, it motivated me to finally decorate and utilize the potting station that has just been sitting there.

I’m looking forward to watching the flowers grow in abundance (if I can keep up with this summer heat and watering) over the next couple of months. I can’t forget about the herbs either that we’ll be using while we cook some fresh meals out here on the patio. There’s something about creating a pretty, yet functional, space that I just love!

Best Plants for a Vertical Wall Garden
There are so many options for flowers and edible plants to grow in a wall-mounted vertical garden! Any plant that would grow well in a window box or small container can also grow well in a wall garden!
The most important thing to consider when choosing your plants is where your garden will be located and how much sun it will get. Whether your garden will get full sun, partial sun or mostly shade will impact the kinds of plants that will grow best.

Here are some plant ideas for your wall-mounted vertical garden!
Full-Sun Plants
Succulents: Varieties like Sedum, Echeveria, and Aloe thrive in full sun and are perfect for vertical gardens because they have low water requirements.
Herbs: Basil, rosemary, thyme, and sage are not only delicious but also add some great scents to your patio space.
Partial-Sun Plants
Ferns: Boston Ferns and Maidenhair Ferns are excellent choices for areas that receive partial sun. They really help make your patio feel like a backyard oasis.
Begonias: These colorful blooms are perfect for brightening up shaded areas with their vibrant hues. Choose varieties like Dragon Wing Begonias or Rex Begonias for a pop of color.
Full-Shade Plants
Hostas: With their lush foliage and striking textures, Hostas thrive in shaded areas. Choose different varieties to add visual interest to your wall garden.
Caladiums: Caladiums are shade-loving plants that come in a variety of colors and patterns, adding a tropical flair to your vertical garden.
We used a mix of flowers, greenery and herbs in our wall garden and I absolutely love the way it looks in our patio space!
Frequently Asked Questions
What is the best material for a vertical garden?
There are lots of different ways to build a DIY vertical garden. I’ve seen people make them from PVC and other materials, but we opted to build ours out of wood. Because ours is under a covered patio, we didn’t have to worry too much about the elements, but you can always seal your wood using exterior sealant to protect against moisture and weather. We did opt for fence pickets to build our planter boxes because we knew those would withstand the moisture from the soil and watering of the plants.
Are vertical gardens hard to maintain?
They’re not harder than any other garden! If you build a huge wall garden it could become a bit overwhelming to maintain, but as long as you’re prepared to care for the size of your vertical garden then it shouldn’t be difficult to keep your flowers blooming and your herbs thriving.
How do vertical gardens get water?
There are many different ways you can water a vertical garden. Personally, because my wall-mounted garden is small, I just use a watering can and mister or bring my hose right over to my patio for watering. But there are also ways to build DIY drip irrigation systems for vertical gardens if you want something more hands-off.
How often should you water a vertical garden?
How often you water a vertical garden really depends on the plants you choose. Herbs typically need to be watered about every other day, while some flowers can go a few days in between watering. I like to group my plants so that plants with similar watering needs are in the same planter box, which makes it easier to make sure all my plants are getting their specific needs met.
Build Your Own DIY Vertical Wall Garden
The best part about this vertical wall garden is that you build it to fit your space. So yours may be larger or smaller than mine. Either way, I’d love to see it if you re-create it for your home by tagging me on social media.

Want to see another way I’ve used the HomeRight Super Finish Max for our home projects? You can check out our AC unit/trash can storage, side yard privacy fence, and our faux cabinet for the utility sink projects.

We have a great community over on Facebook! We chat, share and help one another when it comes to home decor and projects. Come join us! Check it out here.
Like on Facebook || Follow on Instagram || Follow on Pinterest
