


DIY Modern AC Unit Cover and Trash Can Storage

This post is sponsored by HomeRight and contains affiliate links for your shopping convenience. As always, all thoughts and opinions are my own. Click here to read my full disclosure policy.

Ever since we purchased our home, we’ve had it on our home improvement list to spruce up our side yard. More specifically concealing our AC unit. It’s large and sticks out like a sore thumb. Not exactly what you would call curb appeal. When HomeRight reached out about using their Super Finish Max Paint Sprayer, I knew the perfect project: an AC unit cover.


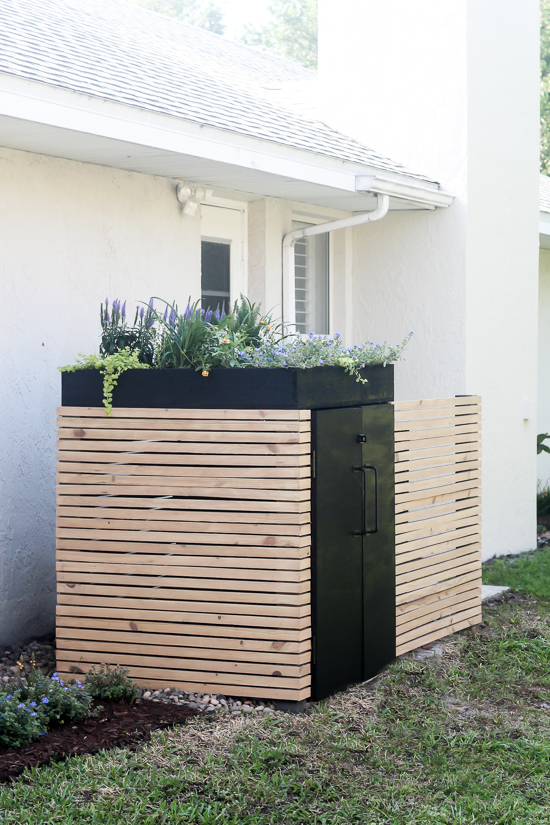
But why stop there? We also decide to build a trash can storage area that’s connected to the AC cover with a cut flower garden on top. Reason being? To get the stinky trash can out of the garage. So, not only did we conceal our AC unit but we also built the most adorable trash can storage. In my mind the flowers on top help conceal any lingering smells. A win, win right?

When beginning this project I knew our Super Finish Max was going to save us so much time with a flawless finish when staining the project. You guys have heard me rave about this tool time and time again! But what I didn’t know was that it was really going to save me time.

I stained the wooden slats with our original stain color we picked out (and thought we loved) only to end up disliking it. So much I striped the stain, sanded everything and re-stained the wooden slats to a stain color we truly love. I honestly don’t know if I would have tackled the re-do if I had to stain everything by hand. It took several hours to strip the original stain and only 20 minutes to re-stain it.

We love how it turned out! The modern design hides the AC unit perfectly, you’d never know the storage area is holding a trash can and the flowers on top add even more to our landscaping and curb appeal. Ready to dive in and build one of your own? Let’s do this!


Supplies
- HomeRight Super Finish Max Paint Sprayer
- 5 – 4 x 4 posts @ 6 feet (this may vary depending on how high you want yours)
- 1 x 2 posts for the walls – We used twenty 10 foot boards
- 3 – 2 x 4’s
- 2 – 1 x 6 fence pickets
- Black outdoor paint
- Outdoor stain of choice – I used Baja Beige by Sherwin Williams
- Post hole digger
- Quick setting concrete
- Level
- Miter saw
- Measuring tape
- Brad nailer
- 2 inch brad nails
- Plywood for doors and top
- Wood Glue
- 2 – door handles
- 4- door hinges
- Lock/latch
- 2 inch construction screws
- Flex Seal
- Caulk
- Dirt + Flowers
- Pavers
- Rocks
The How-To
If you’re like us, you’ll have to clear the area where you’re building the cover and storage. Make sure to get rid of all the grass and weeds. You don’t want to be dealing with any of this later!

Setting the Posts
Begin by determining where your 4 x 4 posts will go and the height you need them. You want to place the ones that will create the walls around the AC unit at least a foot away to allow for airflow. We only covered our unit on the left side and front so it didn’t impact the performance of our unit. Refer to the images below for the placement of our posts. We made sure our placement would 100% conceal the AC unit and allowed enough room for a trash can.


Use the post hole digger to dig down 2 feet for your posts. Make sure to place a level on top to make sure your posts are all the same height with exception of the back two. They’ll be 1/2 an inch lower for drainage if you’re adding the garden box. Once they’re all level (including the sides) secure them with the fast setting concrete. I took this time to also paint our posts black.


Building the Walls
Start with the front facing posts at the top. Measure the distance from one outer edge to the other. You’ll cut your 1 x 2 boards to that length and attach with a brad nailer using the 2 inch brad nails. Don’t forget to add a little wood glue and to make sure the first one is level.


Remember to create the same spacing between each board. We used a 1/4 inch board to help create the spacing for us. You’ll repeat this step with each wall as you secure the wooden slats on the outside. Leave the front of the trash can storage open for the doors.

Now, for the small section on the left front facing post, you’ll cut the small pieces of wood with a straight edge on the right side and a 45 degree angle on the left side. The boards meeting these pieces on the adjoining wall will also be cut at a 45 degree angle. This will create an eye-appealing and clean corner.


**Tip: Before you start attaching the wood slats, go ahead and stain the backside of the ones that will be facing the AC unit. You won’t be able to get to them once they’re attached. Keep reading to see how I use my Super Finish Max Sprayer.
Staining

Staining was my favorite part of the project even if I did have to start over! Mainly because you see your project start to come to life and something that would normally take hours took under 30 minutes. You’ll load your Super Finish Max with your stain color. We went with Baja Beige by Sherwin-Williams in their WoodScapes line. You will literally aim, press the trigger and keep a steady hand. Don’t forget to get between the slats! I’m sharing over on HomeRight’s website how I exactly prepped and used my paint sprayer for this project.

Within 15 minutes you’ll have your first coat of stain done! Can you believe that? Besides saving time, one thing I noticed about using the Super Finish Max is that it provides a better, consistent coverage versus applying it by hand.

The Doors
Measure the height of the two facing posts and cut a 2 x 4 for each one. Attach the 2 x 4 to the inner side of the post using two hinges (one at the top and one at the bottom.

Next, you’ll measure from the 2 x 4 to the midpoint of the two posts. You’ll use this as your measurement to build the rest of the door frame. You may have to subtract from the total width just a little bit to allow the doors to open and close.

Once your frames are up, cut a piece of plywood that’s the width and height of each door frame. Paint the door fronts and frames your desired color before attaching. Secure the plywood with wood glue and with a construction screw in each corner. Attach your handles and lock to the front.

Garden Box
To support the weight of the garden box on top, attach a 2 x 4 between the posts on the right and left. Connect the two with another 2 x 4. For the garden box itself, place a piece of plywood on top of the storage unit. Trace along the perimeter on the underside of the board. This will be the base of your garden box. We attached 6 inch fence pickets for the sides.

Before you place your garden box on top, you’ll need to protect it from the dirt and water. Caulk the interior seems and apply flex seal along the bottom and interior sides. This will prevent water from leaking out the sides and rotting the wood from moisture.

Place your garden box on top and plant away! I’ll have a blog post for you soon showing you how to create the drainage and how to successfully plant the cut flower garden.

Finishing Touch
To make it easier to push and pull out your trash can, evenly place pavers on the ground. Place rocks where the pavers don’t cover. This has made the biggest difference with accessing our trash can easily.

Whew! That’s it! We’re thrilled with how ours turned out. No more eye sore! Not only is this the start to a better looking side yard, but we officially have the trash can out of the garage! Thank you to HomeRight for partnering with me on this project. I can’t tell you how thankful I am for my Super Finish Max after staining this project two different colors.
Want to see other ways you can use a Super Finish Max on your home projects? Check out HomeRight’s blog where there you can find a lot of inspiration and even more tutorials.


We have a great community over on Facebook! We chat, share and help one another when it comes to home decor and projects. Come join us! Check it out here.
Like on Facebook || Follow on Instagram || Follow on Pinterest

[…] lining a patio and so much more! We recently decided to build a container garden on top of our trash can storage unit and it as the best […]
[…] DIY MODERN AC UNIT COVER AND TRASH CAN STORAGE […]
[…] way I’ve used the HomeRight Super Finish Max for our home projects? You can check out our AC unit/trash can storage, side yard privacy fence, and our faux cabinet for the utility sink […]
Great project! I watched your progress on Instagram and it turned out fabulous. Quick question though: I clicked the link for the pressure treated 1×2’s and according to the website, stores in the midwest (I live in ND) do not carry these – and they cannot be delivered?!?! Would you know why? And is there another option that would work? Thank you!
Well done, it turned out great! Looking forward to seeing more projects from you this year! All the best, Carolina at Ironmongery Experts.