


Our Custom In-Ground Pool Design

Our in-ground pool is done! It took exactly 12 weeks from start to finish and it was a very smooth and enjoyable process. Going into this, we were told to be prepared for major delays, hiccups, and headaches from others who had a pool installed. But to be honest, besides a few hiccups that were corrected quickly, it was a wonderful process!

I’m excited to be sharing all of our pool details from how we picked our contractor, to the materials we used and why, what the process looked like, the cost of our pool, and everything else in-between. In other words, let’s dive in!

- Choosing a Custom In-Ground Pool Contractor
- The Custom Pool Design and Construction Process
- Construction Process for the Pool Build
- Screen Enclosure and Patio Pavers Removal
- Removing Landscaping and Scalping the Area
- Excavation for the In-Ground Pool
- Rebar and Gunite Install
- Decking and Waterline Tile Install
- Plaster Install for In-Ground Pool
- Pool Reveal
- Choosing our Custom In-Ground Pool Design Elements
- Saltwater Pool
- Custom Pool Costs
- How Much did the Pool Cost?
- What Did We Splurge On?
- Where Did We Save on our Custom In-Ground Pool?
- Monthly Maintenance Costs
- Future Backyard Projects
- Common Questions About Building a Custom In-Ground Pool
Choosing a Custom In-Ground Pool Contractor
Choosing a contractor and/or pool builder to build your custom in-ground pool is a big decision. You’re trusting someone to bring your vision to life and to do the job correctly and beautifully. And let’s be honest, at a hefty price tag. Sometimes it’s hard to even know where to begin and who to trust when hiring out. So for us, we asked a few friends who they used for their pool build and researched local pool companies. From there we made an appointment with 4 different pool companies where they came out to our home, took a look at our property, we shared what we were wanting with the pool design and decking, and from there they gave us a quote. Generally, these quotes are free (all of ours were).

This gave us a starting price point with what it would cost us to build a custom in-ground pool and allowed us to see how these companies operated. Some of the things we looked for when receiving these quotes were their customer service, if they showed up on time (or if they called if they weren’t going to be on time), their professionalism, being able to answer our questions, and turn around time with the quote (we had one company take 3 weeks to send us a quote after following up with them three times). If red flags already popped up during an estimate, it was an easy decision for us to mark that company off the list.
We ultimately went with Dreamscapes Pools and Spas for our custom in-ground pool build if you’re local to Central Florida. After receiving a general rendering of our custom pool, we met in their design studio to further design our pool, the size, any features we wanted to add, and the materials we wanted to use. From there it was about a 5 week waiting period before they could break ground on our pool.

The Custom Pool Design and Construction Process
From the second we broke ground, we were told it would take about 16 weeks to build the pool from start to finish. We broke ground on December 16th and started filling the pool with water on March 16th. Exactly 3 months to build our custom in-ground pool! One month ahead of their schedule.
Construction Process for the Pool Build
Watching the pool being built was so fascinating to watch! Our pool company subcontracted out each part of the pool build. Which, could be a little nerve-wracking not knowing what quality of work we were going to get with each phase of the pool, but 95% of the crews were phenomenal. And if any issue arose, our point of contact with our pool company handled it immediately. The pool construction did a number on our yard which we knew it would do but not to the extent of what it ended up being. The double gates on the right side of our house were used as the access point to get the machinery to the backyard. So from the front of our house, down the side yard, around the back portion of the backyard, and then up to the middle portion of our backyard became a construction zone. These areas became nothing but divots and piles of dirt.


Screen Enclosure and Patio Pavers Removal
Before we could even give the green light to break ground on the pool, we had to remove the screen enclosure and patio pavers. Our pool company would do this but at a cost of $5,000. This was something that we could tackle ourselves, save some money, and make some money by selling the patio pavers. We were able to remove the screen enclosure over the course of a weekend and donated the aluminum frame.
Next were the pavers. This took another weekend to remove and we were exhausted. We needed them all gone because the pavers getting installed around the pool will go all the way up to the house to make it cohesive. We removed 2,500 pavers total and were able to sell them to a local family who is now using them around their pool.
Removing Landscaping and Scalping the Area
We gave our pool company the green light to start on the pool and within a day they were out there scalping the area. Which is removing the top layer of grass where our pool and decking will be going. We weren’t ready for it and scrambled to remove the bushes and plants to transplant them. Made it but barely!
Excavation for the In-Ground Pool
Excavation day quickly came just a few days after a crew placed the layout of the pool. That first dig was such an exciting moment! It only took this crew a few hours to dig out the hole for our pool. You’ll notice the area for the sun shelf and stairs to the right. To watch them maneuver the excavator with so much precision and so quickly was mind-blowing. This was also when I quickly realized how much our yard was going to take a hit from the construction. The dirt had officially taken over.
Rebar and Gunite Install
After the excavation was completed, the rebar and the start of the plumbing pieces were installed by another crew. It was starting to take shape! During this time, we also had a few trees removed—one that was dead and two smaller ones that would be right in the middle of the decking. We got a call that we were on the tentative schedule that day for the gunite. Being it was the same day as the tree removal, we had to reschedule them. The gunite crew came over the weekend (the crews typically didn’t work on weekends) and had the gunite sprayed and shaped within a few hours. I couldn’t look away from watching this installation process. To watch them spray this concrete and then shape it by hand was truly an art form! At this point, we were about a month into the pool build.
Decking and Waterline Tile Install
After the gunite, the waterline tile was installed. This was where we had the most trouble with our pool build. When the waterline tile was installed, it was not level along the top and the pieces were not flush. We had to put a work order in to have this fixed, which was done right away. But just as we got over one hurdle, we faced another. Instead of black grout getting installed, the contractor installed light gray grout. Which then had to be removed. This waterline tile process took a month due to the contractor showing up only once a week for only a few hours at a time. But we finally got the black waterline tile and grout we designed!
Once the waterline tile was done and the installation of the plumbing, it was time for the decking install. This was another favorite part of the pool build to watch and where everything started coming together! We installed limestone going around the pool and up to the house. It took the crew 6 days from start to finish and worked full 8-hour days. The results are STUNNING. These waterline tile and the decking took place over the course of weeks 5-10 of the pool build.
Plaster Install for In-Ground Pool
The last step of the pool build was the plaster install. It happened over spring break so the whole family got to see it. We went with a plum color (more on that below) and a pebble tech material to achieve a certain look with the water color. It took the crew about 4 hours to apply the plaster and shape it. The next day was the acid wash. Followed by the official start time of 4:00 pm with starting to fill with pool. It ended up taking a total of 52 hours to fill the pool with the hose.
Pool Reveal
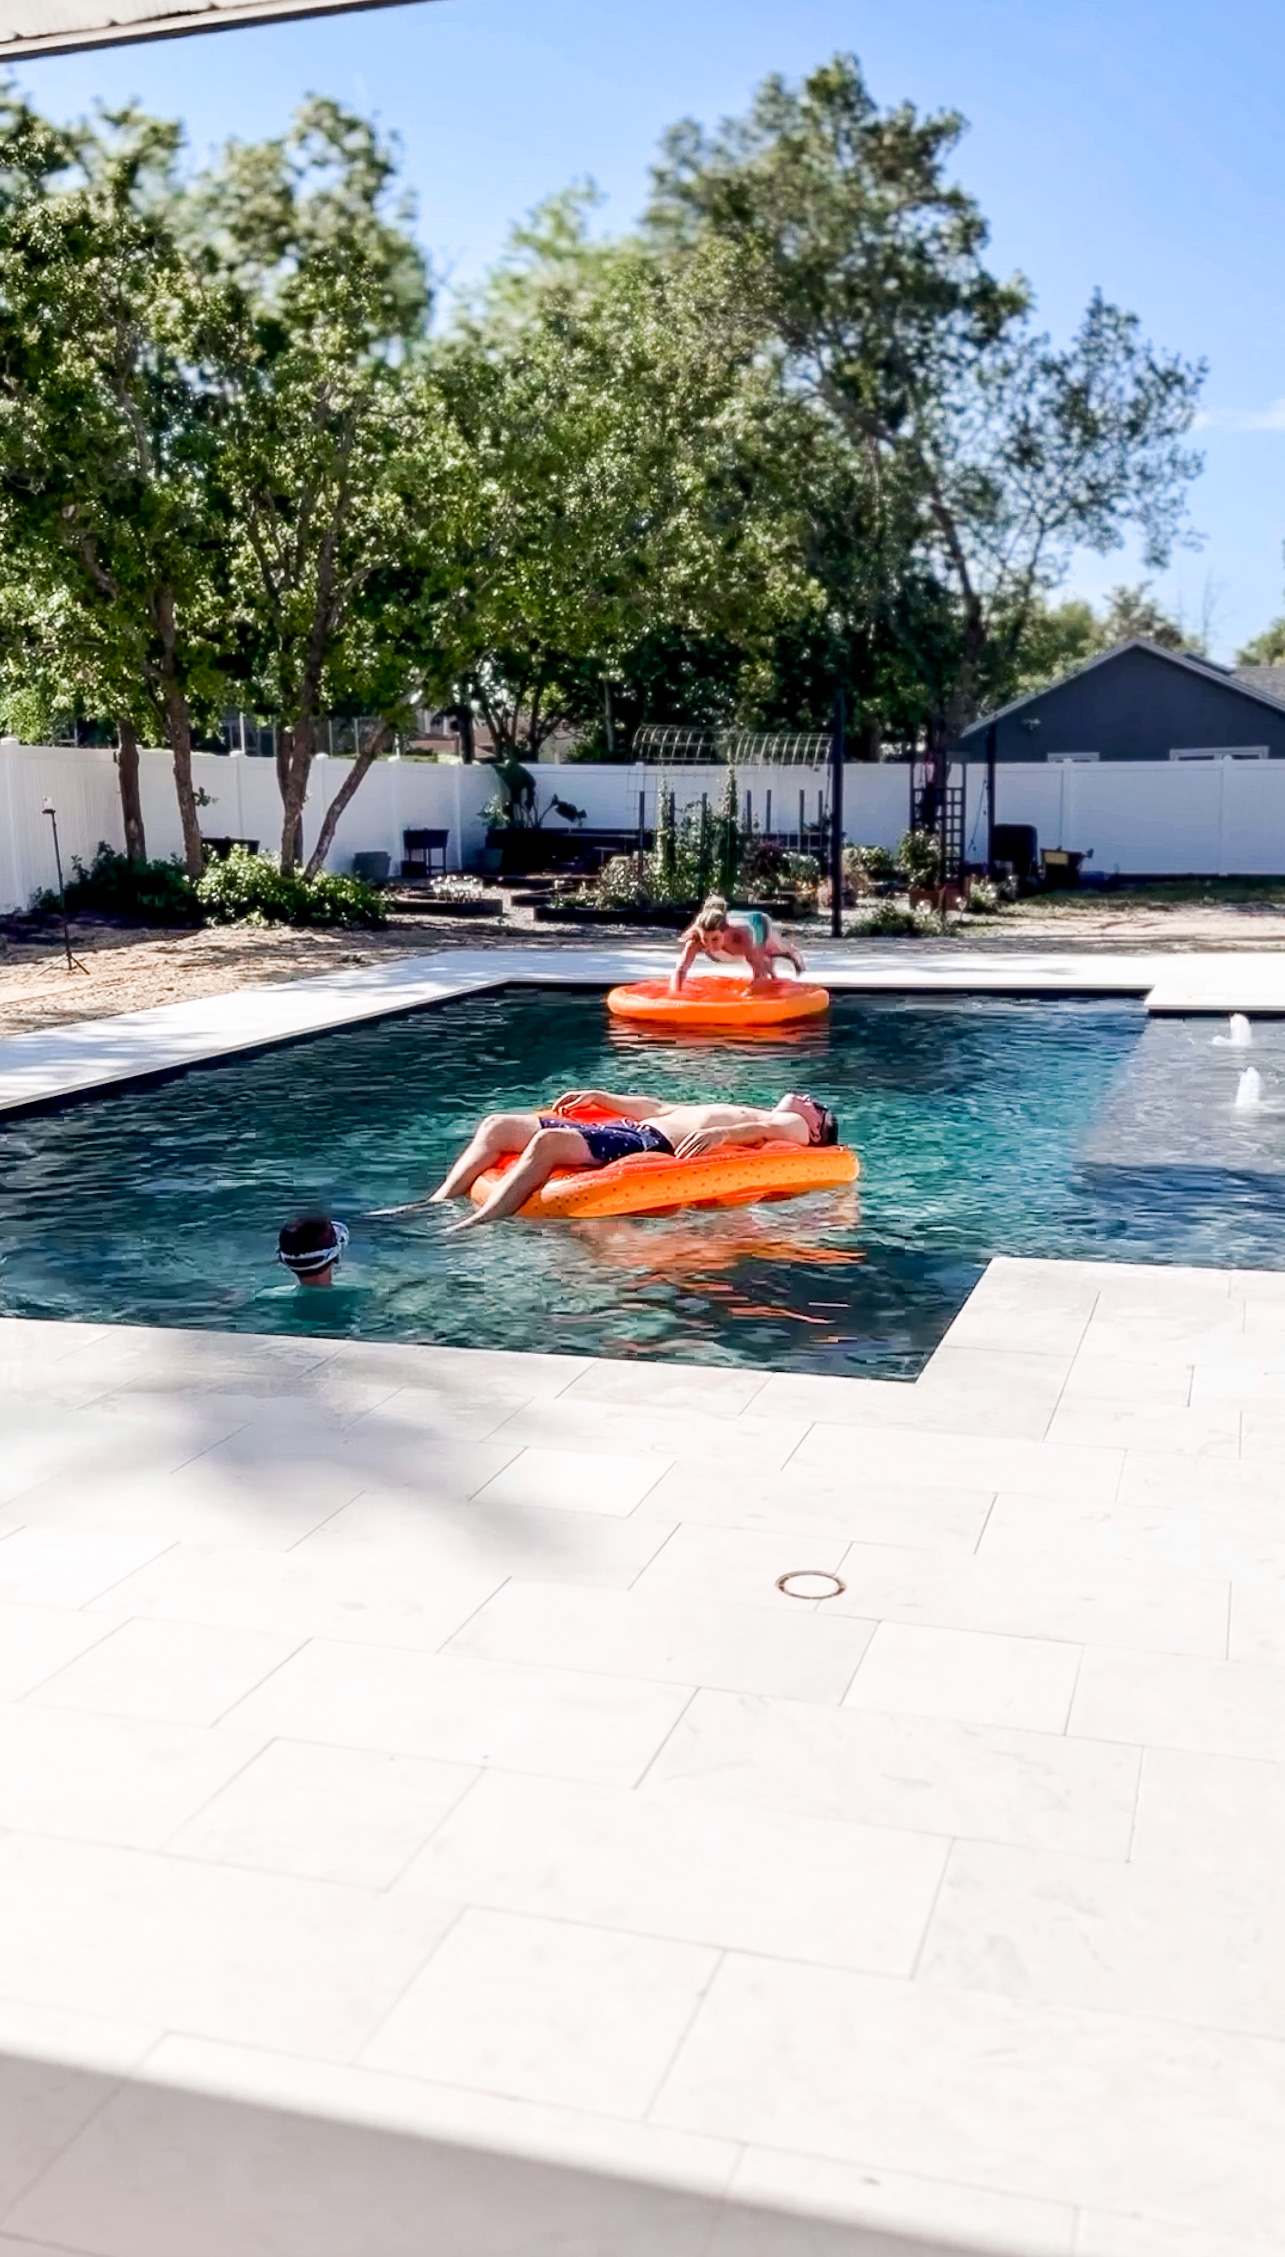
After 12 weeks of watching our custom in-ground pool getting built, it is finally done! We still have landscaping to complete and the furnishing of the pool deck but we can officially break in the pool just in time for summer.
Choosing our Custom In-Ground Pool Design Elements
Overall Design Inspiration
When we started researching pool design and materials, we knew we wanted it to beautifully flow as an extension of our home. Also, for it to flow with the rest of our yard eventually connecting it all together. I gathered a lot of inspiration, which I chatted about in this blog post, with what our goal was for the final look of the pool.
Layout and Size of the Pool
Given that we have a larger backyard space and a unique shape to the back of our house, we had a lot of space to work with while still keeping a lot of our yard. For that reason, we decided to go with a larger than average pool. My only must have for the pool was a sun shelf where we’ll eventually be placing loungers. After seeing Carmeon Hamilton’s pool shape that included a sun shelf, I knew this would work perfectly for our layout as well.

The main part of the pool is 15 x 30 feet with the sun shelf and stairs area being 6 x 20 feet. It’s also in the perfect location because from every room inside of the house, there’s a beautiful view of the pool. Something else we took into consideration when designing the pool. The depth of the pool goes from 3 1/2 feet to 5 1/2 feet. Along the deeper end, there’s a bench that goes along the width of the pool. There has to be some sort of bench along the deep end for safety reasons (this replaces the traditional ladder you used to see in pools) and we decided to make ours go the width of the pool.

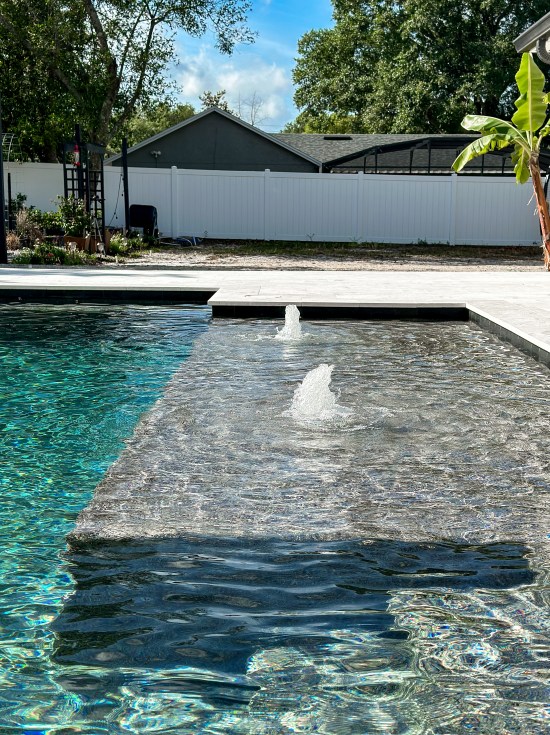
Along the top of the sun shelf, there are two bubblers which is a fountain like addition in this shallow area. It visually adds a fun element to the pool and we love the sound that they make. We do have the option to turn them on and off. As far as lights, we have two lights along the long side of the pool and one light along the front side of the sun shelf.
Waterline Tiles
One of the design elements I knew I wanted from the very beginning were black waterline tiles with black grout. These are the tiles that go along the top of the interior of the pool. The design studio with our pool company had so many shades of blue, beige, and stone choices. Not a single black tile. So not wanting to settle, we found a pool supplier about an hour away with black tiles and secured them.

We went with a 6 x 6 matte black tile. We wanted a seamless look with the tiles and didn’t want to see each individual tile which is where the black grout comes into play. This would create a more updated, modern look that we were going for. Not to mention it goes with the black gutters on our home connecting the two together for that extension of our home vibe we are going for.

Interior Finish
As you can see, we went with a concrete in-ground pool with a plaster finish. The other options you can go with are a fiberglass pool or a vinyl pool. There’s plenty of information out there on each type of pool, but we ultimately went with a concrete pool because we could design our own custom-shaped pool, it’s the most durable material, and it has a lifetime warranty through our pool company. The pool’s concrete shell is called gunite which is a dry concrete mix that mixed with water at the nozzle as it was sprayed in.
The plaster is called Signature Matrix Premium Pebble Finish in the color plum. We picked the interior finish color of our pool sight unseen. They didn’t have a sample of the actual pebble tech in the showroom but could show us what the water color would look like and that was the ultimate goal. You pick the interior color based on what you want your pool water color to look like. We didn’t want a crystal clear blue look that you typically see but something more along the lines of a lagoon look. Dark but not too dark (where you can still see the bottom). I didn’t even know this was a thing until I saw Shavonda of SG Style install a black interior for her pool creating a darker water color.


The Signature Matrix Pebble Finish is made of white cement, smooth pebbles in various sizes (all smaller), and a plum pigment mixed together. The combination of all these elements work together to create this beautiful water color. The pool doesn’t actually look plum but this darker, turquoise, lagoon color. The magical of color theory when adding water! The pebble finish also gives the pool a more natural look and they are smooth. Of course they’re going to give some sort of texture, just like regular concrete would, but it’s a very smooth texture that will only get smoother over time.

Saltwater Pool
As far as the type of pool when it comes to saltwater or chlorine, we have a salt water pool through the use of a salt chlorine generator. Salt is added to our pool where the electrolytic cell connected to the generator and pool pump converts the chloride contained in the saltwater into chlorine. From what we’ve researched, this is an extremely efficient, cost-effective, and more of a natural way to sanitize a pool.

Decking
For our decking, we went with limestone in myra white with some natural beige variations in it that went around the pool and then continued up to the house for a continuous look. For the coping around the pool and the border along the outer edge, 12 x 24 inch limestone pavers were used. Throughout the rest of the decking we did a running bond pattern using 12 x 24 and 12 x 12 limestone pavers. And it’s all one continuous level now which is very exciting. We used to have two foundation areas under the covered portions where there was a step down. The pool was designed to be built to the height of the foundations so that we could have one level throughout the entire outdoor area.

We went with limestone for several reasons. Aesthetically because we love the white, natural look of this stone. We also knew the pool water color would be stunning against this white stone. Not to mention all the lush green landscaping installed with this white limestone. It’s going to be gorgeous!
From a functional standpoint, there are a lot of reasons! For one, limestone is resistant to mold and bacteria which is huge for us here in Florida. With the constant humidity, mold and algae is something we’re always battling without outdoor spaces.

Limestone is very porous and soaks in water within seconds when not sealed. But when sealed, which we will be doing, it is stain resistant and they become very low maintenance. And when sealed properly, it won’t alter the coefficients of friction, or slip factor. They aren’t overly slippery when wet and barefoot but of course aren’t as resistant compared to a concrete paver. One of the biggest advantages with going with limestone, is that they stay cool underfoot. On the hottest day in the middle of the summer, the pavers are still going to be cool. It can also withstand extreme heat and freezing conditions.
Custom Pool Costs
If you’re considering installing custom in-ground pool or simply curious what it would cost, there are so many different variables that contribute to the cost of a pool. Things like features added, where you live, the size and depth of your pool, heated or not heated, the type of material used for the interior and for the decking, supply and demand, etc.

How Much did the Pool Cost?
For our pool, the total cost was $89,000. This price includes everything involved with the pool build: the design plan, permits, inspections, every sub-contractor and crew hired to complete each phase of the pool build, the waterline tile, pebble finish, limestone decking, plumbing, the pool pump, the salt chlorine generator, pool lighting, a maintenance kit (vacuum, skimmer, etc.), and our custom features added to the pool.
What Did We Splurge On?
There were a few things that certainly added to the cost of the pool. The number one being the limestone decking. After taking out the old pavers, we didn’t want to replace them with the exact same paver just in a different color. And ultimately it wasn’t the finished look we wanted. To go with concrete pavers, the cost would have been $16,000 for our decking area. By going with limestone, it added an additional $14,000 to our overall cost. This was certainly an upgrade. Of course this can vary project by project depending on how much decking you’re installing. We had almost 1,500 square feet of limestone pavers installed which is a lot!
We also designed a pool that’s larger than your average sized pool. Our pool package covered a pool up to 300 square feet. With the dimensions of our pool, we went over by 270 square feet totaling 570 square feet, which added an additional $12,000 to our pool cost.
Here are some other features we added that added to the pool cost:
Sun shelf: $2,000
2 Bubbler Fountains on the sun shelf: $770
3 LED lights: $2,100
Salt Chlorine Generator: $1,550

Where Did We Save on our Custom In-Ground Pool?
For the interior finish, we went as dark as we possibly could with the options that had available. If we wanted to go any darker with our interior finish, it would have been an additional fee. We were very happy with the darkest interior they had available that would give us our end goal of the color we wanted with the water.
The deepest the pool could have gone was 6 feet. Anything deeper than that, additional costs were involved. Our pool goes to 5 1/2 feet due to not wanting a drastic slope in the pool. We also decided not to get our pool heated. It’s something that we can always add down the road but saved on that cost for now.
As you can see, we don’t have a spa. And that’s because we simply didn’t want one. But if we had decided to include a spa, it was going to be an additional $25,000 to add one just to give you an idea. We also removed our old screen enclosure with zero plans to add one back around this pool. By not installing a screen enclosure around our pool, it saved us another $25,000.
We also saved money when we demoed the old screen enclosure and removed the old patio pavers ourselves. For our pool company to add this demo to the contract, it would have been another $5,000.

Monthly Maintenance Costs
We’re just a few weeks into our new pool so we don’t have the cost quite yet on the difference with our electric bill and water bill. I’ll make sure to update this in a few months. We did decide to hire out weekly maintenance with the pool because at the end of the day we want to protect our investment. It’s also required to maintain our lifetime warranty. We have to show that we’re getting the pool serviced by hiring it out or by us going to a pool company to get our water tested at least once a month. We’re paying $125 a month weekly service.
Future Backyard Projects
The pool is just phase 1 of our backyard makeover and it was a big one! The next phase of our backyard makeover is installing irrigation through the back yard and around the pool so that we can then complete the landscaping. It’s going to be a huge undertaking with the landscaping and one we’re excited about! It’s going to become a tropical outdoor oasis that we’re never going to want to leave.

Common Questions About Building a Custom In-Ground Pool
- Will you be adding a screen enclosure?
We will not be adding a screen enclosure around the pool. This is something you commonly see with older homes or homes next to water/wetlands here in Florida. Since we aren’t next to a body of water, we have zero concerns for alligators. Another reason some decide to put a screen enclosure up is to keep leaves, yard debris, and mosquitoes out.
For us, we didn’t want our yard to become a “cage”. With the size of our pool and decking, our backyard would be nothing but a screen enclosure. It isn’t the look or feel we want at all with our pool area. We want to be able to look out and see our yard (especially with our future landscaping plans), the spaces to flow as one, and we didn’t want a screen enclosure blocking all the beautiful natural light from pouring into our home. There are ways to battle mosquitoes during that hour they come out at dusk. And we look at it this way, we don’t have a screen enclosure over our garden and playset area. So it honestly comes down to personal preference.
- Do we need fencing around the pool?
For us here in Florida, our white fence that full encloses the backyard meets code. And we have a Poolguard, an in-ground pool alarm, that sits on the edge of the pool. A fence directly around the pool is not required with those two things in place.
- Is a heated pool needed?
This all depends on where you live if you think you’ll benefit from a heated pool or not. We have two things going for us: living in Florida where it’s hot pretty much year round and going with a darker interior. Having a darker interior finish will naturally heat our pool up faster and keep it heated. If we find in the cooler months that we could really use one, we can add it then. But we would get a system that heats and cools our pool because in the summer there’s a chance it will get too hot to where it isn’t enjoyable.
- Will patio furniture be added?
Yes! I am so excited about adding some new outdoor furniture and recently did with our lounge chair area. We’ll be adding patio furniture as we find pieces that we truly love so stay tuned!
- Is there anything we would have done differently?
We are extremely happy with how everything turned out! The only thing that I would change at this point in time, is I wish we would have added an umbrella hole and a light on the sun shelf. - How did you decide on the color of the water?
Shavonda was a huge inspiration for me with going with a darker interior because I love how her pool turned out. From there, I started pinning pools I loved on Pinterest and found that we did indeed gravitate towards pools with a darker interior to create a lagoon look with the water. When you go to design a pool, the design studio or showroom will show you different water colors and the interior you need to go with to achieve that color.
Take a look at our design inspiration and more before photos before we broke ground on the pool.

This looks like an awesome project and the price tag came out to be on par and lower than some of my designs thank you for sharing.
Pool is an absolute essential for summertime fun be it with friends or family!!
Really found this article helpfull also garden furniture would match the pool and pass the vibe check!
looking forward for more informational reads.
Cheers!
A great deal of pool. This is best option for spend time with family in summers.
all of the details in your blog post is extremely helpful. your details will allow us to gauge the pool bids we are about to acquire. We are in St Pete FL and our pool dimensions will be much smaller so we shouldn’t be receiving quotes as high as we were during the height of the pandemic…here’s to round 2 of getting bids. thank you for sharing!
We had ours built as an upgrade with our new build home. We added it in May of 2020 and it was completed after we closed in March of 2021. Going this route saved us about 5k because the dug the pool before walls were installed around our house. We were also able to add it onto our mortgage because of this. It’s a standard 14×28 pool with pebble tech and tile. We upgraded two things. The electrical so we can place our pool pump and such farther away from homes and we added a basketball hoop. Total cost in Phoenix AZ was 35k.
We are in Boise, ID. Out estimates are coming in at $119k-$225k for 15’ x 25’ concrete, standard concrete 3’ decking. Nothing elaborate. For fiberglass we were quoted $145k for a 16’ x 40’ with spa. We have noticed since moving here contractors have inflated pricing.
That’s an amazing price for all the things. We have a fairly basic liner 16×32, salt water with concrete deck and it was over 75k. Finished in November. Does not help that there are only two pool companies locally (eastern nc), so no competition. Gunite were starting at 90k here. I love it but absolutely wish the prices didn’t double/triple since 2020.
This has been so fun to watch! Thank you for all of the details you shared. We are also in Orlando, and we just put a pool in as well. It is 27×14 (deepest is 6 ft) with a sun shelf (with 1 bubbler) and spa (with 6 jets) that sits flush with the deck and spills into the pool. It has a salt system and is heated with electric (I do wish we had gone gas). We went with a fairly standard paver for our decking, though we opted for a style that was a bit larger. We also had them screen in our patio area that is off the deck, but left the pool area open. Total cost for that was $70k, and then we spent another $10k-ish to redo the sod, add additional sprinklers, and add palm trees and rock around the pool. Overall we were happy with our builder, and we also had a very fast turn around, though we are currently dealing with some ongoing spa and finishing issues, so I wouldn’t say we are fully “done” just yet. But we absolutely love the pool, and it has completely changed our home and lifestyle. Enjoy!!
We built inground pool with hot tub with waterfall into pool, 1300 sq feet of stamped concrete, heated pool 20 years ago, for $50,000. Your pool is beautiful!! You did a gray job! Teri Carrone
I live in Lawton Oklahoma, my pool is almost finished we paid 62,000 for a 16×32 with a sunshelf with 3 deck fountains and a heater all of our coping and decking is stamped concrete this goes from 8 feet to 3 plus sun shelf with a diving board and slide pad.
Texas…Ours was finished around beginning of March. 18×30, with a spa. Propane was installed to heat spa. Pool is able to be heated but we chose not to because of the cost to do so. All in all, with cement sidewalks, propane and all, it was about $93,000.
Forgot. Sports pool, 3 1/2, 4, 4 1/2. Chlorine.
We built a 17×34 gunite pool with 12 inch raised spa and screen enclosure for 140,000. Used French gray pebble tec for plaster , one bubbler and 5 LED lights. We live in Sarasota Fl :)) it turned out beautiful ???? did a flowcrete deck in belgian white. Salt as well .
We built a 17×34 gunite pool with 12 inch raised spa and screen enclosure for 140,000. Used French gray pebble tec for plaster , one bubbler and 5 LED lights. We live in Sarasota Fl :)) it turned out beautiful ????
I’m in central CA. We finished our in ground gunite pool in April 2022. Our total cost was $64k. We have solar heating and pebble interior. We have a cabo shelf with umbrella hole. We have a flagstone wall with water feature. We upgraded to two LED lights. All equipment is controlled with an app. We have stamped concrete deck of 500sq of total concrete. I don’t know the size off hand but it’s an average size free form pool.
Your pool is gorgeous!!! We live in Ocala, Florida. We contracted to have a fiberglass pool (San JuanPool) put in last February 2022.
The contractor was a nightmare (EML Pools, Inverness,FL)!! They broke ground July 2022 and it’s April 2023 and they still need to do the final inspection and 2nd coat on deck!
We got the Mandalay Bay model which is 11’.8” x 25’ 1”.
Depth is 3”-5’7”
This pool has a sun shelf and spa connected to it. It’s a smaller pool only holding 6,600 gallons of water.
We also added a 3ft rock waterfall waterfall.
The pool with the concrete deck which is 19’x30’
The cost was $60,526 which includes a heater for the pool.
We also had a different company put the screen enclosure on and that was another $20,000.
I honestly would have paid more to have better service and to have it done in a timely matter. This project shouldn’t have taken over 12 weeks but the company is ridiculous. I would definitely recommend staying away from them.
We built a pool and saved some of that info to an IG highlight at house_on_nine –
We had a pool done fall of 2019, thank goodness because everything shut down the next year and we lived – school – and worked from home! I don’t recall exact dimensions (and went with a Freeform shape) and also did a similar style with the gunite (I’d rather smooth plaster but then you don’t get the cool colors – and hubs wanted gunite for its durability). We had friends who did saltwater and recommended not to ????????♀️ so we went with chlorine but it’s not ever like a public pool to where it stings your eyes!
Our decking was minimal as we already had a huge patio poured. We got a sun ledge with bubblers which no one much ever uses, if I’m sitting it’s in the hot tub so no loungers for me ☺️.
We got a raised hot tub with my favorite feature – a rounded edge water line tile. It is so nice to have they against your back! We did a built in table in the pool with umbrella hole and bench seat with 2 underwater stools. I wissssh I had thought /known to add more seats along edges – and watch out for dead spaces – we have one tight corner and it’s a waste. Our designer was terrible and most what we got were ideas we brought from seeing friends pools.
We also got a ledge wall down one whole side and it has 2 columns mid way with a trio of waterfalls between them and we plumbed sprinkler through the columns so we can have large planters.
We paid $69,000 for all of it and our friends took the same plan and to the same builder last year and we’re told it would be 100k (and they live 30 minutes from us)!
I’m sad at prices these days but thankful to have a pool. If I lived north I might not see the need but we live in Texas and we spend 3/4 of the year enjoying the pool or hot tub!
I loved watching your whole build process! I learned so much!
We are installing a 18 x 20 ft pool using the same plaster finish. We have a spa, sun shelf, 2 bubblers, 3 lights and a bench in the 6’ end. Our cost with the travertine around the pooledge is about $130k
We are in NC on the inter coastal waterway
Your outdoor space is beautiful! We are in Central Ohio and got a quote from a big box company. For a liner pool, basic cover (not auto because that was $25K), heater, salt, two lights and hardly any concrete was $125K. Obviously we are paying for their big showroom, consultants to come out and measure. We contacted a guy who is well respected and highly recommended who does this out of love, not for the money, quoted us for a liner pool, heater, salt, lights, concrete patio and concrete around the pool.. $40K. He doesn’t have a show room, he doesn’t use fancy lasers to measure. It’s amazing the cost difference. All of his references are really good. Summer 2024 we will be swimming in our pool. Your backyard is absolutely gorgeous and my inspiration for our space. Xoxo
We did a custom, gunite, saltwater pool & spa combination in Northern California last year. We had to have several trees removed and we built on what was actually quite a gnarly hill. The pool is 20×40, saltwater, gunite, pebble finish, stamped concrete decking and stairs, heated (heat pump), with an attached spa and a gas heater, waterfall, slide, and a deep end that is 8.5 feet deep (that actually wasn’t our choice, it was the slope of the hill that dictated the depth). You can see pictures of the (mostly) finished project here: https://imgur.com/gallery/jpIRcXf
All in costs were just shy of 140k and took about 5 months (not including the 5 months it took to get the permits to remove the trees).
Love the lagoon color! I waffled back and forth between that and the bright turquoise I finally went with. We live in NC and used a small local builder. Built ours in 2017, 14×36 kidney-shaped gunite w/waterfall, baja shelf with umbrella stand built in, deep end seat, led color changing light, depth 3 ft to 6 ft. We can comfortably fit 20 people. It cost $36k. Came with 250 sq ft concrete decking.
We are in Kentucky. We had an in ground steel wall with liner pool installed in 2020. It is 20×40 with a tanning ledge, 8’ deep end with slide & diving board. It is a salt water pool with a natural gas pool heater. Total cost including surrounding concrete and fencing was $63,000.
We have an above ground pool, 28′, we had it installed in June 2012 and it was a little over $5000. We are in Central Ohio. We love it and use it so much. We do not have a heater on it, we have a sand filter and use regular liquid chlorine.
Ours is still under construction in Frisco, Texas, it will end up costing $125K, but its everything we wanted – travertine decking, 16ft weeping wall, grotto waterfall, baha shelf, spa, and 3 in-pool barstools – 28×25 freeform, 17,000 gallons
We built our pool in Tucson, AZ in the summer of 2020 & went with a reputable, but smaller pool company (no big showroom, elaborate 3d renderings, etc) and I really feel like that helped the cost. Gunite, rectangle 12’x25’ pool that goes to 5.5’ deep with lagoon shelf on one end. No heating or salt water, and 2’ travertine decking all the way around with 16’x8’ travertine deck on one end— $37k.
Love this! Love the plum pebble finish. So unique. We are on the same path with our backyard projects. Can’t wait to see what landscaping you will be doing. We’ve done our irrigation now waiting for sod to be dropped off for this weekend of laying fun! haha.
Saw on Instagram you wanted to hear from others on their builds. We had our pool recently built last year, finished October. We are in Jacksonville, Florida. Our pool was approximately $70,000, not including the electrical panel upgrade in the house or the demo of the old concrete patio or moving some plumbing (2 drains) from the back septic to the front. That probably was in total $7,500 in additional costs. Our pool is 15′ x 28′ overall, which includes a 7’x15′ sun ledge, a L-shape bench in deep end, 6 foot deep end and a 36″ sheer waterfall feature. It also has a salt chlorinator system, has separate connection for vacuum and autofill. 2 color changing led lights. We added the ability to hook up a heater later down the road. It also has wifi connectivity, so we can check the pool stats from anywhere. The pool deck is where I feel we splurged. Like you I wanted a more light modern feel, so I selected a 12×24 white marble with leather finish paver that looks very similar to the limestone you selected. It was around 1500 sf in pavers, or about $17,000. We can’t wait to use it to the full capacity this summer, as it is still a bit cold in the 70’s. However its been nice on those hot days working in the yard to cool off real quick.
Enjoy your summer, I know we will.
Your pool cost is actually much better than a quote we got last year for a similar sized pool. Our quote did not include custom decking and it was for a liner-style pool. I’m sure that the prices here are different than FL because of demand. So happy for your family to have a fun feature in your back yard!
Great deal! We have a salt water pool in Denver, CO and average cost is about $100-$110k for a 15×30 rectangle pool with basic concrete decking. Even with higher price point, still the best investment we’ve made to our yard.
My daughter works for a pool cover company that is very well known . They provide a variety of custom made covers . The company is Aqua Matic Pool covers in Gilroy California. Google them . They are very professional and have techs that can come to your home if there are any issues.