


Plant Summer Flower Pots that will Thrive


Have you ever walked around a nursery looking for the perfect flowers for your summer pots or containers? And 30 minutes later you either have only one flower in your cart or too many because you can’t make a decision. The struggle is real and I’ve been there time and time again!
Over the past few summers I’ve experimented with different flowers in flower pots and killed a lot along the way. And when I say a lot, I mean pretty much all of them. That is until I found the ones that worked for me in full sun and how often to water. I don’t want you to suffer like I did and having to say bye to so many plants. So, I’m spilling all the secrets on what I plant and why, where to place them in the pot, and how to care for them once they’re planted.

Keep in mind, the flowers I’m sharing with you today may or may not be found at your local nursery or home improvement store. Nurseries are stocked with plants according to the zone they thrive in. For example, living in Central Florida, we’re located in zone 9b. You can find your zone by entering your zip code here. If you can’t find the ones I’m sharing today, I’m hoping I share enough information so that you can still successfully plant summer pots.
Planting Method

As you’re picking out your flowers for your summer container, you want to keep three words in mind: thriller, filler, and spiller. This will help you create visually appealing flower pots because the flowers will consist of varying heights. This is a method I love to follow.
The thriller is the plant that will stand the tallest that adds height to your container. The filler is where you can have a lot of fun with color. These plants will fill in the gaps of the pot between the thrillers and the spillers. Are you still with me?? Okay, good! Finally, the spillers (which are my favorite). These are the gorgeous plants that spill over the side of the pot and cascade down.
Flowers Used

Ready to see what I used in my flower pots? I’m breaking down each thriller, filler, and spiller plants I used and why. I’ve found the most luck with keeping these alive and they all require the same amount of sunlight and water. They’re also gorgeous when you first plant them and as they continue to grow. Here are my go-to plants for summer planters.
Thrillers
Dracaena Spike Plant – This plant adds beautiful height to any container garden and the greenery of this plant won’t droop. They’re also very easy to care for, require soil that is evenly moist, and prefers a sunny spot.

Corkscrew Rush – Giving height just like the spike plant, this is also a great choice because of the texture and uniqueness it brings to any pot. This particular plant produces spiral and twisted foliage and can grow in partial shade or sun. It’s love for moist environments makes it a perfect candidate for a container or pot! Honestly, I originally tried this plant because of how fun it looks!

Fillers
Confetti Lantana– There are many different colors of lantana but my go to is always the confetti! With varying shades of pink, yellow, purple, and orange, this variety is gorgeous planted as a filler. And lantana also attract butterflies! Which is my main reason for using this in my summer pots. They require being watered often and love full sun.

Mexican Heather – I noticed Mexican heather in my local nursery last year and it really grew on me. Pay it attention and it flourishes with deep green leaves and gorgeous little purple flowers. This goes great with the confetti lantana without it getting lost or blending in too much. It does best in full sun or partial shade with evenly moist soil. As it grows, it will bunch out and slightly spill over the container.

Spiller
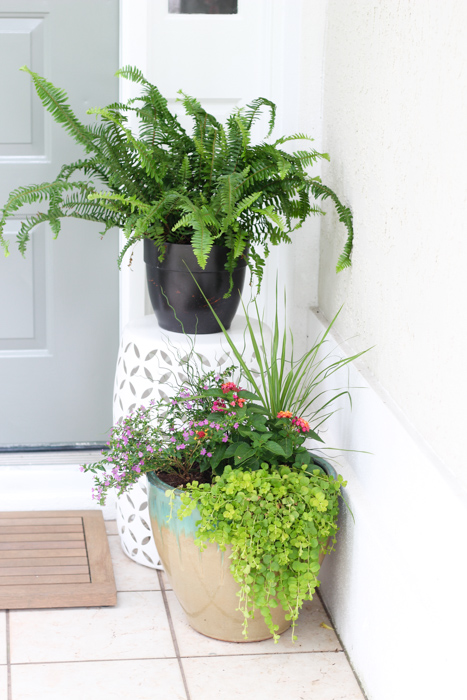
Golden Creeping Jenny – This spiller is stunning as it cascades over the side of a container. The vibrant golden green is a great contrast against the deep green of the Mexican heather and the kelly green of the other plants. It prefers full sun and evenly moist soil but make sure not to make it too saturated.

Placement of Flowers

The size of your container will determine how many of each plant you’ll need. For an average size container, about 18 inches in circumference, you’ll use one of each plant which is what you see pictured in this post. Fill your container with potting soil leaving a few inches open at the top to place your flowers. Don’t overfill or you’ll be removing dirt to plant your flowers.
With each plant still in the original plastic container, place them in your pot that is already filled with soil. This will allow you to move them around, see if they will comfortably fit, and figure out exactly where you need to dig the holes.

I started with my thrillers and worked my way forward with until I ended with the spiller. Once you have them in place, time to plant! Make sure to use potting soil and to fill in around the plants with the soil once you have them planted.

General Care
There are things that you can do to make sure that your summer flower pots not only survive, but thrive! Here are a few things that I do to keep them growing in abundance.

Sun – Make sure they’re receiving plenty of sunlight. I suggest placing them in a spot that gets at least 6+ hours of sun a day.
Fertilizer – As you plant your flowers, apply a fertilizer to give them the nutrients they need to flourish. My go to fertilizer is Plant Tone Organic Plant Food. This particular one can be used on flowers, vegetables, trees, and shrubs. You’ll apply the fertilizer every 2-4 weeks. But be careful! Apply it too often and it could burn your plants.
Deadheading flowers– Any dead flowers or blooms that are starting to fade, pinch or cut off the flower just above the first set of leaves below the flower. This will promote new growth. Otherwise, if you leave the dead flower on the stem, it will signal to the flower to stop producing new blooms.

Snipping dead pieces– Don’t forget your thrillers and spillers. If you see any dead or brown pieces, make sure to cut them off to keep your plants growing and your pot looking vibrant.
Check soil every day– As you leave for work or as you come home, check the soil of your pots by pressing one finger into the soil. If it’s dry to the touch, you need to water your flowers. With the flowers shared in this post, the soil should always be moist!
Yellowing of leaves – This possibly means two different things: under-watering or over-watering. Adjust accordingly to get your leaves back to their healthy green look.
Rain – If your pots are located in a spot where rain doesn’t fall on them, place them in the rain so they can enjoy fresh rain as a storm rolls through. It’s amazing how much plants perk up and look 10 times healthier after getting a little bit of fresh rain.

So, there you have it! Plants that thrive in summer sunshine, how to plant/style them in a pot, and how to care for them so they last all summer long. Get ready for some gorgeous blooms and plants that will create a gorgeous display on your patio or front porch. Do you have a go-to flower you always plant in your pots during the spring and summer seasons? Share with me in the comments below! I’m always looking to try new flowers.

Let’s keep in touch!
We have a brand new community over on Facebook, House & Home, where we’ll be chatting, sharing, and helping one another when it comes to home decor and projects. Come join us! Check it out here.
Likeon Facebook || Follow on Instagram || Followon Pinterest

[…] have your container full of potting soil, place your plants where you’d like them. Using my thriller, filler and spiller method, I was easily able to place my plants where I wanted them. I did add a few spiller plants along the […]
[…] needed to grab with the number of pots I was using and the size of them. You can check out my post here that shows what types of plants to get in order to create beautiful pots for your […]
Thank you for the reply. Good job and it looks amazing (: