


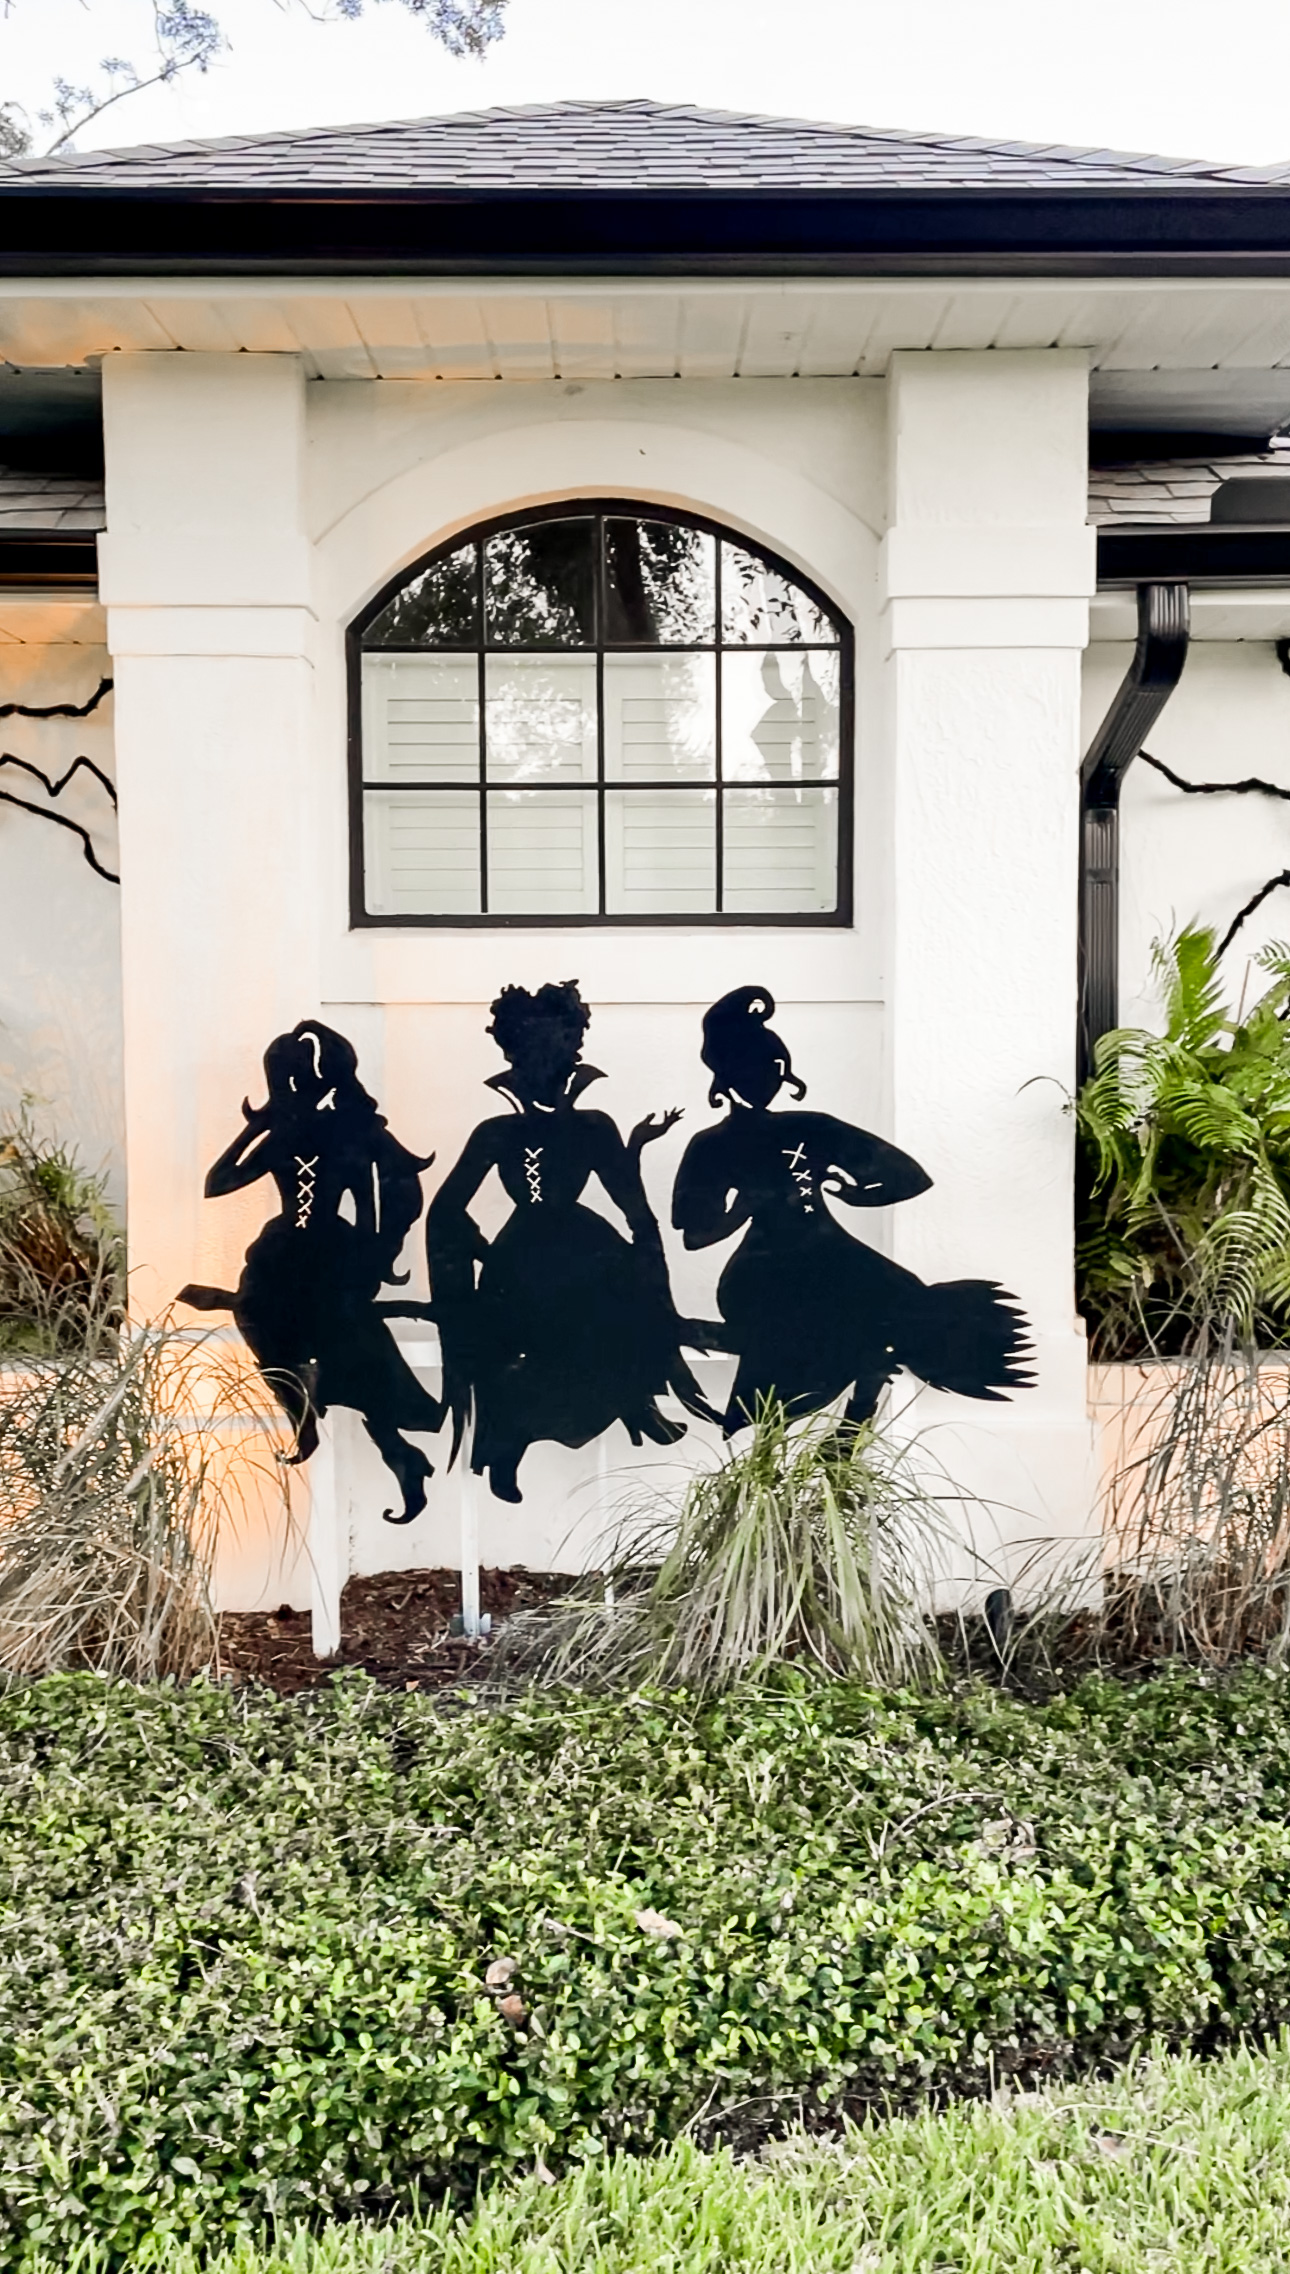

If you’re a fan of the classic Halloween movie, “Hocus Pocus,” then you’re probably very familiar with the iconic Sanderson sisters – Winifred, Sarah, and Mary. Their silhouettes are instantly recognizable and are the perfect addition to your Halloween decor. That’s exactly what I did with making our Sanderson Sisters silhouette to display as outdoor Halloween decor.

I’ll be taking you through the steps of creating your own Sanderson sisters silhouette for you to display this Halloween season that gives a whimsical and fun touch. Get ready to light up your Halloween with this enchanting project!

Materials You’ll Need for DIY Sanderson Sisters Outdoor Decor
- Template from Barberella Home
- ¼” sheet of plywood in a 4 x 8
- Jigsaw
- Dremel
- Sandpaper
- Flex Seal in black
- Outdoor lights – Enough to cover the back of the silhouette.
- Staple Gun
The Etsy shop where you find this Hocus Pocus witches silhouette comes with an amazing step-by-step guide. That’s what I followed and will be sharing that process here. If you aren’t a fan of the Sanderson Sisters but want something else for Halloween or another holiday, Barberella Home has a lot of different templates they offer.
How to Make a Plywood Sanderson Sisters Silhouette
Prepping the Silhouette
First you’ll print out the template at 97% and layout the template on your 4 x 8 sheet of plywood. They’re numbered so it makes this part super easy!

Then tape the pages together to secure all of the pages together outline of the Sanderson Sister silhouette.

You’ll then cut out the silhouette and center it on your piece of plywood. Using a pencil, trace the silhouette onto the plywood and don’t forget about the small details throughout the template. To make it easier for when you go to cut it out, trace over the pencil outline with a permanent marker.


Cutting Out the Sanderson Sisters Silhouette
Wearing protective eyewear and ear protection, use a jigsaw to cut out the outline of the Sanderson sisters. By clamping the piece of plywood to the table as you cut it out, will help a lot with stabilizing it. You will have to unclamp and clamp it again as you move around the outline. I choose not to clamp it down only because I moved it around so much. You can also use a router for this step as well which can be easier with the curves and sharp turns. It’s whatever you’re more comfortable working with.

For the smaller details that are a bit more intricate, you’ll want to use a Dremel or a router with an ⅛” bit on those areas. For closed-off areas, you’ll either use the Dremel to create a hole in the center and then work your way to the outline. Or you can use a drill with a large drill bit to create a hole in the middle to access the outline. Once again, whatever tool you’re most comfortable with, just like using a jigsaw vs router for the main outline.

After you’re done cutting, lightly sand down the edges to make them smooth. They don’t need to be super smooth but enough to where you won’t get a splinter handling the cutout.

Sealing the Sanderson Sisters Silhouette
Once you’ve cut out the Sanderson Sisters, it’s time to protect plywood from the outdoor elements. If placed outside without sealing, the plywood will warp. You’ll roll on a thick layer of black Flex Seal on the front and back, and all of the edges to completely seal it.

This is a rubber liquid, which once dry, will repel rain and moisture. Another added benefit of using the Flex Seal is that it will also give the silhouette a black, slightly shiny finish perfect for this Halloween DIY. If your plywood piece will be under a covered area where it won’t be rained on, you can certainly use an outdoor black paint to seal the plywood.

Adding Lights
This Sanderson Sisters Halloween decor looks amazing during the day but you also want it to show off at night. To do that, attach outdoor lights to the back of the silhouette using a staple gun being careful not to staple the actual string of lights.

Keep an eye out for any lights that stick out past the silhouette. You’ll want all the lights to hide behind it to truly give it that glowing effect. Also, make sure to also use lights rated for outdoor use. Orange and purple are great choices but you really can’t go wrong with the purple for these spooktacular witches! I used one 20 for strand of lights for each witch. You can certainly use one long, 100 ft strand for this but I used what I had on hand.

Displaying the Silhouette
I opted not to attach the silhouette to our home. Instead, I created a wood frame that I hammered into the ground to attach the silhouette to. I attached three scrap pieces of wood to the frame so the lights wouldn’t be squished against the frame once attached.


Once it was hammered into the ground, I screwed the Sanderson Sisters from the front into the wooden frame and high enough to make them look like they’re floating. I then painted the screws black so you can’t see them. You also want to make sure you place the silhouette close enough to the house so the lights make a glow around the silhouette and not lighting up the entire wall.

You can also attach a few pieces of scrap wood to the back of the silhouette (to keep it off the wall) and attach it to the wall using sawtooth hangers on the back of the silhouette and the appropriate type of hanger for the wall depending on if you have stucco, brick, etc.

You’re now ready to plug in the LED outdoor lights and watch as these iconic witches come to life in the dark. It’s a magical, whimsical, and spooky decor all in one. The LED lights will create a captivating and eerie effect that’s sure to impress those who drive by to enjoy your decorations.

DIY Hocus Pocus Outdoor Decor FAQ
How did you print out such a large template?
The template you purchase can be printed at home on 8 x 11 inch sheets of printer paper. You piece it together like a puzzle and tape the sheets together to get them to stay.
Can I only use a dremel or a router to cut out all the details of the silhouette?
Yes! You can use just a dremel or a router to cut out everything. A jigsaw isn’t necessary. At the end of the day, use what you are most comfortable with when cutting out the silhouette.
Can you use a projector to trace the Sanderson Sisters silhouette?
Yes! Just light it up on your piece of plywood and you can trace the silhouette that way. Just make sure to trace the fine details as well.
What type of string lights did you use?
I used regular outdoor holiday lights, 100 count, for the back of mine. If you’re limited with outlets outside and don’t have a way to plug them in, you can use battery operated lights.
How the Sanderson Sisters Silhouette Held Up a Year Later
I made this Sanderson Sister silhouette a year ago and officially using it again for the second Halloween season at the time of this blog post. I’m excited to report it’s just as good as day one! Being out for a month in our rainy, humid weather, it didn’t warp at all while on display and zero bubbling of the flex seal. We kept it in our storage unit that is climate control since last Halloween with the lights still attached to it. Happy to report the lights are working as well. Which, of course, those can be an easy fix if those ever go out.

Looking for more Halloween projects to try around your home? Make sure to check these out!
DIY Broom Parking Sign
DIY Witch Broom
Halloween Artwork for Your Smart TV
Halloween and Fall Front Door Decor

That silhouette of the Anderson Sisters turned out pretty well, if I may say so. You did a great job, and I really like your DIY projects.
Your DIY Sanderson Sisters Silhouette Light-Up Decor project is absolutely enchanting! It’s a fantastic way to bring the iconic characters from “Hocus Pocus” to life in your Halloween decor. The step-by-step instructions are clear and make it seem achievable for anyone interested in trying it.
I love that you included a FAQ section, addressing common questions and providing helpful tips. This shows that you’ve thought through potential concerns and made the project accessible to a wide audience.
It’s also great to know that the decor held up well in outdoor conditions and that you’ve had success with it for multiple Halloween seasons.
This project is sure to delight fans of the movie and anyone who appreciates creative and unique Halloween decorations. Thank you for sharing this magical and spooky DIY project! 🎃👻✨