


Modern Dining Room Reveal


After two years of living in our home, I can finally say WE HAVE A FUNCTIONING DINING ROOM! Can you tell that I’m excited!? And I love even more how it turned out. It’s fresh, it’s moody, and it’s exactly what we wanted for a dining room. For the past two years, we used our breakfast nook for our family of three. Now, just in time for Thanksgiving (literally 2 days away), we have a dining room that will allow us to successfully host holidays. Here’s where we started two weeks ago:

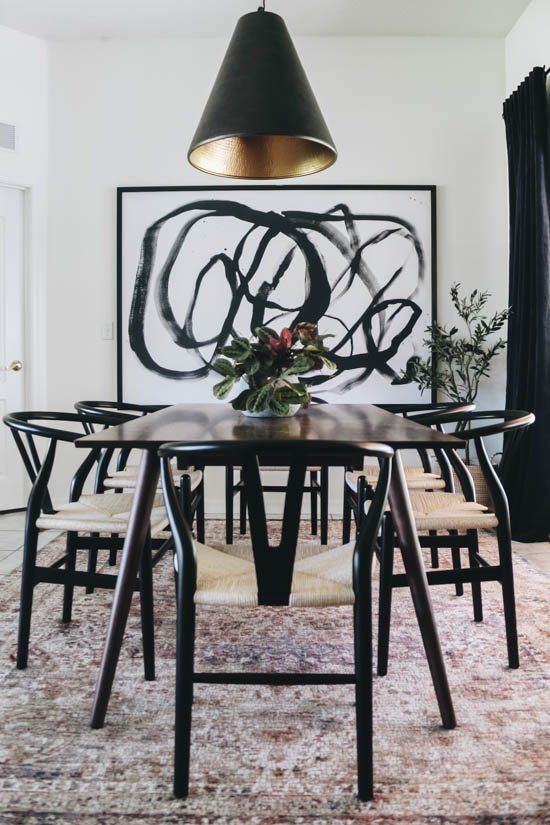
And here we are now:


We had a vision for this space and created a mood board to help it come to life. There were two non-negotiable items when it came to the dining room: the dark navy velvet curtains and a certain dining room table. Those were two things that we knew we wanted in the space no matter what. So if something didn’t work with those items, like a rug, we had to try something else to make it work.

The curtains add a bold pop of color. Something that I love to incorporate in just about every space of my home. And being the velvet curtains that they are, they also bring some texture to our dining room. Because they are so bold, we ended up painting the walls in Cloud White by Benjamin Moore. By being a creamier white, it helps to soften the space and not make it so stark against the darker colors.

Now, let’s chat about the table! We had a farmhouse style table in our previous home and knew without a doubt that we wanted something with cleaner lines for our dining room. I can’t tell you how many times we came back to this table by Article. Not only is it a gorgeous table, but since it’s not a bulky table it allowed the natural daylight to beautifully shine through the room from the sliding glass doors. Plus, our patio is an extension of our home so it naturally allows the eyes to continue outside as well.

From there we picked out the chairs. We knew we didn’t want upholstered chairs nor ones that leaned towards farmhouse. Can you tell that I’m trying to get away from our old style in our previous home? We decided on a chair that is often called a wishbone chair. And for good reason as you can see with the beautiful design of them. With the combination of the black frame and the natural rope woven seat, they’re exactly what we were looking for. Also, very comfortable I might add!


For above the table, we decided on a single pendant light. It was challenging to find one that was big enough to match the size of our table without having to use two lights. Which we wanted to avoid. But as soon as I saw this pendant light, that honestly popped up as an advertisement on my Instagram feed, I knew it was the one. I love the two tones of it being bronze on the outside and a brass gold on the inside. The hammered look also brings yet another texture to the space and the size is perfect! It measures a whopping 22 inches. This was my one splurge item for the dining room and so excited that I did!

Now, let’s chat about the rug. Finding the perfect rug for this space was a challenge and a process! I purchased three rugs online and returned every single one. They were each beautiful on their own but didn’t work in the space. Tired of shipping costs, I was determined to find a rug in person. After searching over the course of three weekends and going in multiple HomeGoods time and time again, I finally found the one.

This Loloi rug couldn’t come down fast enough. I wanted to add another color to the dining room and I kept leaning towards a brick red. Every time I looked at dining rooms on Pinterest, my eyes always went to a dining room with a rug with red in it. I stepped out of my comfort zone and so glad that I did. This rug also has shades of navy incorporated in it which allows it to flow with the curtains. Remember, one of my non-negotiables. Which meant I finally found a rug that would work with the furniture and the decor.

Since our dining room is a smaller space, there isn’t much room for more than a table. We were lucky to fit one to seat 6 people. I did manage to add this side table along the short wall. It was begging to have something placed there. I knew the second I saw it online this was the piece. I love the design of the doors and the fact that it’s back with a natural wood look on the inside. I’m looking forward to playing around with what we store inside of it to make it functional and pretty. For now, I love it!


Above the cabinet, I made these propagation tubes using the tutorial by Vintage Revivals. Any chance that I get to incorporate houseplants, I’m all over it! This was such a stunning and unique way to do just that. It also balances the space out a bit with the simplicity of them. I can’t wait to see the roots start to grow in the tubes. Also, they’re a great conversation starter for when we host friends and family.


Now, if you want my personal opinion, the biggest visual impact of the dining room is deciding to use a 55 x 78 piece of artwork on the large wall. We used an IKEA frame and a print by Juniper Print Shop that made this very budget-friendly for a piece of artwork of this size. This did a couple of things for the dining room space. First, it serves as that one piece that is a showstopper. Every space needs one, right? Second, it allowed us to add to that side of the dining without adding a piece of furniture. Which leads me to my third point. The size of the artwork serves the space well to where nothing else is needed.


Then there were just a few finishing touches to complete the space. Which was basically adding a mixture of faux and real plants. The olive tree in the corner is a faux plant. I honestly feel like this is an olive tree, just like a fiddle leaf fig, that can work in multiple areas of a home. It’s a cutie!

I placed a single vase on the table with a dramatic red prayer plant spilling out. This type of houseplant thrives in low light areas so I’m hoping it will decide to love it on our dining room table! I also added a few decor pieces on top of the cabinet and just kept it simple.

And I can’t believe that I didn’t mention this before! Besides decorating, one of the biggest changes we made to space was removing the ledge above the sliding glass doors. It served no purpose for us except for collecting dust. Will a new piece of drywall, a little joint compound, and paint, the only way you’ll know it used to be there is if we told you. And it might be my eyes playing tricks on me, but it allows for the sunlight to travel even further up in the space. Which is always a plus for me!

I’m beyond thrilled with how this dining room turned out. Each design element brings something to the dining room but is also simple in itself. Two years ago I didn’t have a visual direction for this space. So now, to take something that was an idea on a piece of paper and turn it into something wonderful, is truly one of the best feelings. We take so much pride in turning our house into a home and I’m forever thankful to be able to share this process with you. Now, off to prep my Thanksgiving menu so we can enjoy our new dining room this week! I’m going to leave you with even more pictures of the space and the links to everything that I used. Enjoy!
Dining Table
Dining Chairs
Pendant
Rug
Cabinet
Propagation Tubes Tutorial
Curtains
Abstract Artwork
Frame
Olive Tree
Vase – HomeGoods (similar found here)
Basket- HomeGoods
Misc. Items in Cabinet- HomeGoods
We also have a brand new community over on Facebook, House & Home, where we’ll be chatting, sharing, and helping one another when it comes to home decor and projects. Come join us! Check it out here.
Like on Facebook || Follow on Instagram || Follow on Pinterest


[…] dining room reveal made the list! This was our last big project of 2019 and it was long overdue. It took two years of […]
[…] recently revealed our dining room after it sat empty for two years. And it was one of the best feelings seeing it completed. Well, […]
Oh la la , what beautiful makeover! Love the rug, chairs and that art work to die for !!!! Gorgeous dining room !
Another great transformation!