


One Room Challenge Week 4: How to Create Knockdown Ceiling Texture

We’re beyond excited to be a part of the One Room Challenge as guest participants. This has been on our home bucket list for a few years now and finally the timing was right for us to participate. Over the next six weeks we’ll be giving our outdated guest bathroom the attention that it deserves. . . finally. We’re taking it down to the studs and creating an entirely new space. We hope you enjoy watching the process just as much as we enjoy creating a new space.
Previous Weeks

Well, my friends, I’m ready to say goodbye to this past week and hello to a brand new one as I bring you week 4 in the One Room Challenge! If you’ve been following along on Instagram Stories, you’ve certainly seen some of the highs and lows we’ve been sharing with out bathroom remodel. Not only is this our first One Room Challenge, but it’s also our first demo ever.
Which means first time skim coating walls, installing tile, replacing drywall and the list goes on. The exciting part is sharing what we learn, as we learn it, and then what not to do (or to do) when it’s your turn try a little DIY. So, what did we get done? Quite a few things that simply don’t have the dramatic visuals to show you we did.

Here’s what we got done this week:
- Leveled the floor with new concrete
- Textured the new ceiling + painted the whole ceiling
- Fixed all the holes in the walls
- Skim coated the walls for a smooth finish
- Installed last piece of drywall
- Sealed and waterproofed the shower
- Ordered a lot of decor items for the bathroom
Did you notice the list didn’t include installing tile? We mapped out our renovation so that it gave us a little wiggle room if we got behind. Thank goodness we did!

Here’s what set us back
- Wet saw broke
- Drill to mix mortar broke
- We had to take tiles back and find ones that matched the same dye lot.
These set us back back a few days since they didn’t all happen at once. But at least we caught the tile color before installing them and found the matching ones.

As for my win this week, it was learning how to texture a ceiling using the knockdown method and it turning out great! So, if you’re ever in a situation where you need to texture your ceilings using the knockdown method, here’s how to do just that with just 4 materials.
How to Create a Knockdown Ceiling
Supplies needed:
Textured sponge
Joint compound
Small container
Large knockdown knife

The How-To:
Place the joint compound in a small container. Apply a liberal amount of the compound onto the sponge by dipping the sponge in the material.

Press the sponge onto the ceiling and pull down to leave blobs of the joint compound. You’re going to move in a motion like you’re stamping. Dip your sponge in the compound frequently to make sure you’re applying enough on the ceiling. You’ll know if you aren’t if the blobs aren’t forming (compound hanging but not falling off the ceiling).

Let the joint compound sit on the ceiling sit for at least 15 minutes. This will help create the knockdown look. You’ll know you’re ready to move on to the next step when the joint compound looks dull and no longer shiny or wet. The longer you wait, the thicker the knockdown will be. Otherwise, you risk smearing it around too much.

Once it’s ready, use the large knockdown knife to run along the joint compound. You’re basically knocking down the blobs that were hanging and creating a smooth, textured surface.

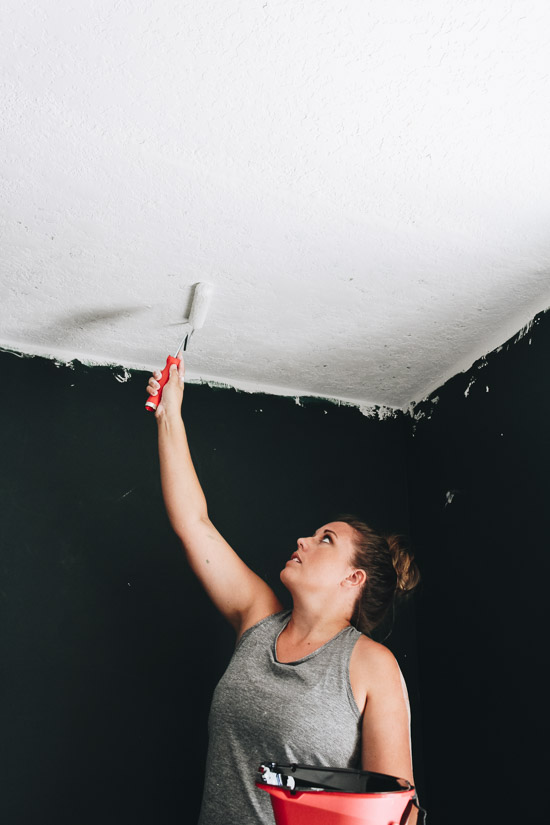
Allow the knockdown texture to dry for 24 hours before painting. We went with Sherwin-Williams’ Paint + Primer Ceiling paint. It’s the first time I’ve used this one and was very pleased with it!

I was able to apply it in two coats and it was super quick since I used my HANDy Paint materials. My buddies with HANDy Paint were kind enough to send me a few of their favorite products to help with our One Room Challenge space.

Where the ceiling met the wall, I used the HANDy Paint Pail and a brush to paint the edges first. By the way, all of their containers have a magnet so your paint brush can hang out on the side versus getting drenched in paint or having to find a spot for it. This was the cleanest my hands have ever stayed when using a paint brush because of this!

Once I was done with the edges, I upgraded to the HANDy Pro Pail where I was able to use a 6 1/2 inch roller to apply the ceiling paint. This saved me so much time (both of them) because not once did I have to climb off the ladder to get more paint.

Usually every few brush or roller strokes I’m having to step down and reload on paint. With the rubber grip on both the HANDy Paint Pails, I could easily hold it and didn’t have to step down once. Added bonus: I inserted their liners in each pail so clean up only took seconds. You can visit their HANDy Paint’s Product Page to see everything they offer.

Total time to complete ceiling (minus the dry times for the joint compound and paint)? Just over an hour. That’s the kind of home project I can get used to! Especially with results like this where you can finally have a sigh of relief knowing you don’t have to go back and fix anything.

Alright, so here’s where I try not to freak out a little bit. We officially have two weeks left to get this bathroom done. Technically less than that since I’ll need to take pictures a few days before. So, get ready for next week’s post where you’ll actually be able to see visible progress in our guest bathroom. I had no idea there would be SO much prep work before getting to the fun stuff!

Don’t forget to follow along over on the One Room Challenge blog to see the Featured Designers and Guest Participants. There are SO many amazing rooms that are being designed and brought to life!
Let’s keep in touch!
We have a brand new community over on Facebook, House & Home, where we’ll be chatting, sharing, and helping one another when it comes to home decor and projects. Come join us! Check it out here.
Like on Facebook || Follow on Instagram || Follow on Pinterest

this is amazing! so I can basically apply this to any side of the walls if I want to get the texture, right?
can’t wait to see the whole room!
Great job! I remember doing our ceilings 16 years ago! We homeschooled at the time, so both kids learned how to scrape the ceilings. It was the first time my hubby had done the knockdown texture. With each room, he improved, and we are still happy with it.