


There are so many kind of wood feature walls in homes today, but there’s something really unique about the DIY plywood accent wall I’m sharing in this post. It’s affordable, actually simple and quick enough to do in a weekend (or less!).
When I started the process of finally giving our front living room the attention it deserved, I knew the main wall needed something fun. I wanted it to flow with the rest of our home but make it something unique at the same time. I realized in that moment that plywood was about to become my DIY side kick to create one show-stopping wood accent wall. Here’s what I came up with:

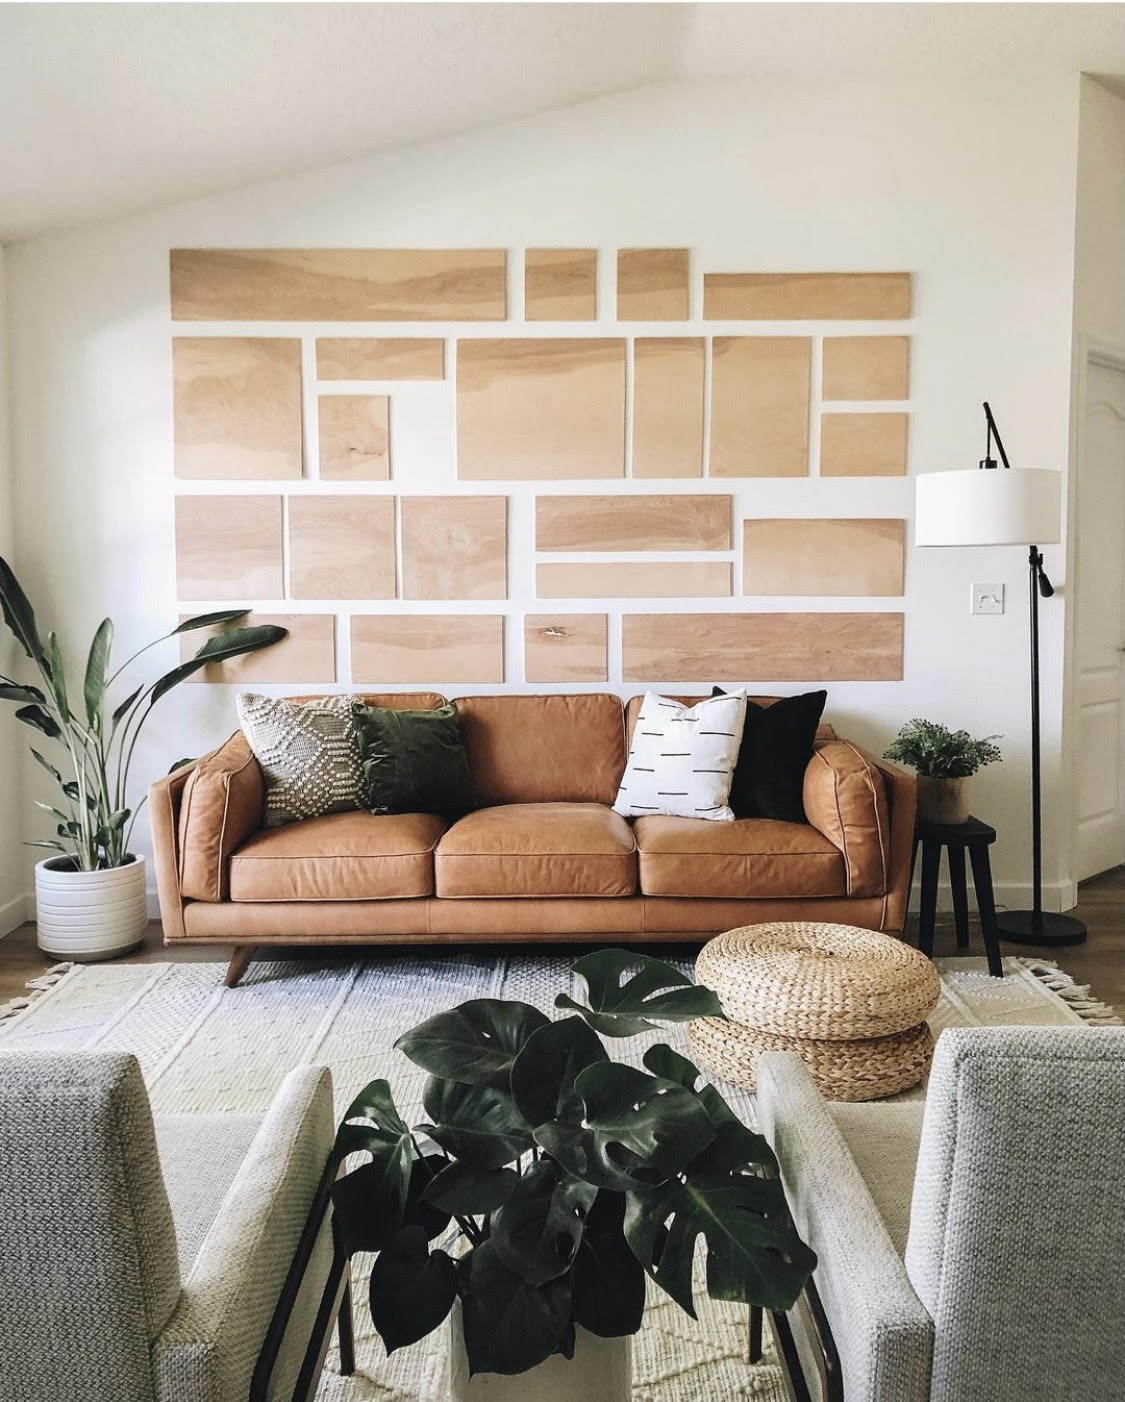
Not only was this DIY plywood accent wall budget-friendly, but it was a quick project with a huge impact on this space. Using a 1/4″ piece of plywood, a jig saw and command strips, this wall certainly came to life. Keep in mind, you can make this as large as mine or create it on a smaller scale – it’s a versatile DIY accent wall project that you can really make your own!
Can you really use plywood for an accent wall?
Ok, let’s just address the elephant in the room before we get into the how-to of this wood feature wall. Can you really use plywood to make a beautiful accent wall? If you’re like a lot of people I know, you might think of plywood as a super cheap, not-so-beautiful material. But you’d only be half-right.
Plywood is very affordable (I can usually get large sheets of plywood for under $50 at my local Home Depot). But that price doesn’t mean it’s not quality wood! I’ve used plywood for countless DIY projects in my home over the years, including my husband’s DIY plywood desk, my son’s DIY floating desk and even my viral DIY faux floating shelves.
It’s a durable material that can be just as beautiful as any other type of wood – if you know how to use it!
What is the best thickness for plywood on interior walls?
I used ¼” plywood for this project and I think it’s the best option for a plywood accent wall application. You don’t want the wood to be too thick and stand off the wall too much or be too heavy (especially because, as you’ll see, I’m attaching the plywood pieces with Command strips!).
PLYWOOD ACCENT WALL MATERIALS
4 x 8 – 1/4″ piece of birch plywood
Straight edge (I used a large level)
Marker
Jigsaw
Orbital sander + 120 grit sandpaper
Painter’s Tape
Command Picture Hanging Strips
Optional: Shipping paper to create your layout
** Some of these links are affiliate links.
HOW TO MAKE A PLYWOOD ACCENT WALL
STEP ONE: PLAN YOUR ACCENT WALL DESIGN
The very first thing you’ll want to decide is the size of your overall plywood accent (or gallery) wall. I knew I wanted to use my entire 4 x 8 sheet of plywood so it was just deciding the placement and sizes of my boards. The easiest way for me to do this was to cut out pieces of shipping paper in the sizes I wanted to try and tape them to the wall.
The first attempt was a fail for me. I went with an organic gallery wall (kind of placing the pieces where I liked them) and it just seemed really off to me. So back to the drawing board I went.

My second attempt I decided that I wanted more of a streamlined and clean look. To do this, I took into consideration of the size of my overall piece of plywood. Each row is the same width overall and the pieces in each row are all the same height for most of them. There were a few that I had fun with and made them shorter. If you’re a visual person like me, it might help to draw out your design first and include the measurements. I’m sharing my exact measurements further down!
I also made sure to create the same space between each row. To make sure that I liked this design before cutting my plywood, I turned to my shipping paper once again. Once I had it all up on the wall, I knew this is the direction I wanted to go. I LOVED it!
To help keep it visually the same, I used painter’s tape to create the border and the rows. This did a couple things. First, it helped me center the over all design from left to right. Also confirmed if I liked where I placed the top and bottom of the design. Secondly, using painter’s tape to measure out the rows ensures that all the pieces will start and end at the same spot and will be straight.

Once I had my cut outs all on the wall, I knew this is the direction I wanted to go. I LOVED it! Tip: Keep them up there until you replace them with the piece of plywood. Makes it go very smooth and quick!

STEP TWO: DRAW AND CUT PLYWOOD SHAPES
Once I had a clear plan for my DIY plywood accent wall, it was time to cut my board! Using a straight edge and a marker, I was able to measure out and draw all the squares and rectangles on my sheet of plywood. I did cut my 4 x 8 sheet on plywood in half (long ways) to make it easier for me draw and cut out the pieces.

If you’re planning to do a full sheet of plywood and want to create my same pattern, here are the measurements for each piece:

STEP THREE: SAND THE PLYWOOD
Once all of the pieces are cut out, sand down the edges using 120-grit sandpaper followed by 220-grit sandpaper. You can do this with a block sander or an orbital sander (which is quicker). If your boards are really rough along the edges, do 80, 120, 220. This will give you a very smooth and finished-looking edge.

STEP FOUR: HANG THE PLYWOOD FEATURE WALL
Now, it’s time to hang! At first I was going to hang these with saw tooth hangers but it gave me a headache just thinking about it. Instead, I used Command picture hanging strips where one set can hold at least 5 pounds. My goal as to place a command strip on each corner but I didn’t buy enough like I thought. Instead, I placed 2 command trips along the sides at the top for the smaller pieces and 3-4 on the large pieces hitting all the sides.
Once you have them in all in place and secured, carefully pull off the painter’s tape and your plywood accent wall is done! The hardest part about this project is just figuring out the size and placement of the plywood pieces.

DIY PLYWOOD ACCENT WALL ALTERNATIVES
There are so many different ways you could make this plywood gallery wall your own! Here are a few of my favorite alternatives I considered when creating mine:
- Staining the plywood pieces: You could stain the plywood all one color or use a few different stains to give each board its own look. For me personally, I wanted the natural wood look. But I love the idea of mixing different stains.
- Painting the plywood pieces: You could also make this accent wall a colorful one! While I love the look of the raw wood, this would look really pretty painted black, deep navy or even white (depending on the color of your walls). You could also use a few different colors for a bolder, more eye-catching look.
- Mixing in art prints: I love that this plywood accent wall looks a lot like a traditional gallery wall. And I am obsessed with the idea of mixing actual art pieces into the design. Strategically switch out a few of the boards for wall art in the same sizes or (if you’re feeling creative), create your own paintings on a few of the boards.
No matter what approach you take to creating a plywood accent wall, it’s a simple project just about anyone can do. It’s even a great project for those who are renting! By using the command strips, you can also create this accent wall without causing any damage to the wall.


Brilliant idea! Looks unique yet budget-friendly design.
GOfYnFuCrqNSDWmy
This plywood accent wall is something new and beautiful. Love the idea! You can add photos in there too.
Thank you so much!